Garden / Leaf Blowers
User Manual for DEWALT DCM849 20V 7-inch Variable Speed Rotary Polisher
Comprehensive user guide for the DEWALT DCM849 20V 7-inch Variable Speed Rotary Polisher. Includes assembly instructions, operation, maintenance, and safety guidelines.
Quick answers from the manual
Quick answer
- The DCM849 is a 20V cordless rotary polisher designed for professional polishing of painted or unfinished metal, fiberglass, and composite surfaces. p. 11
Key actions
- Install battery p. 12
- Adjust speed p. 13
First start
- Charge battery fully, attach handle, install polishing pad, and ensure switch is in lock-off position before inserting battery. p. 10, 11, 12
Problems and fixes
Tool stops unexpectedly
Electronic Protection System engaged; place battery on charger.
p. 10Maintenance and reset
- Clean air vents weekly and clean wool ingestion shields when buildup is visible. p. 11, 14
Technical specifications
| Parameter | Value | Meaning | Pages |
|---|---|---|---|
| Speed | 0-2200 RPM | Variable speed range | p. 13 |
| Pad Size | 7 inch (180 mm) | Maximum pad diameter | p. 11 |
Where to find it in the PDF
- Assembly p. 11, 12
- Operation p. 13
- Maintenance p. 14
Table of contents
Manual images
Click an image to enlargeQuick guide from the manual
The DEWALT DCM849 is a heavy-duty, cordless rotary polisher designed for professional applications on painted or unfinished metal, fiberglass, and composite surfaces. This manual provides essential safety, assembly, and operational instructions to ensure safe and effective use.
Product Description
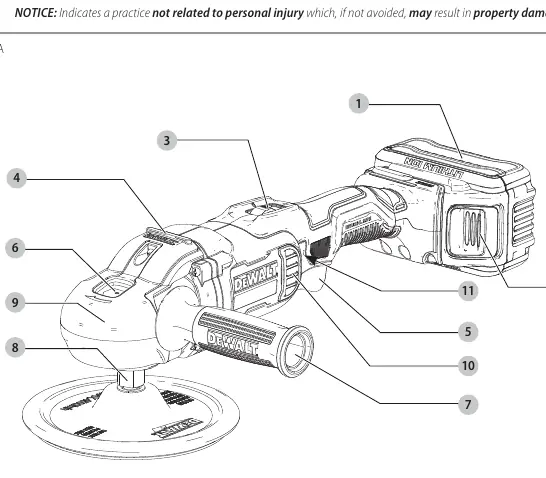
The tool features a variable speed trigger (0-2200 RPM) and a speed control wheel for precise speed management. It is designed to be used with 7-inch (180 mm) polishing pads. The tool includes an auxiliary handle and a bail handle for improved control.
Assembly and Adjustments
Attaching Handles
- Auxiliary Handle: Screw the handle tightly into one of the holes on either side of the gear case.
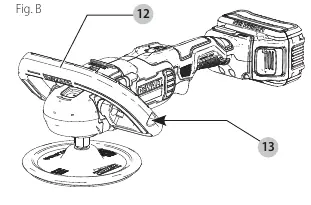
- Bail Handle: Place the bail handle over the gear case, align the screws with the threaded holes, and tighten using the supplied hex wrench. The angle can be adjusted to 45 or 90 degrees.
Attaching Polishing Pads
The tool supports two types of pad assemblies:
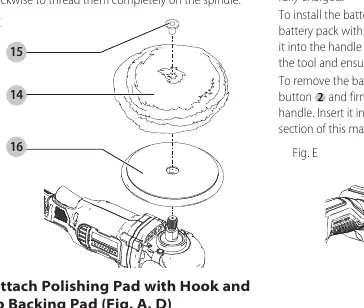
- Rubber Backing Pad: Push the hub of the clamp washer through the center hole of the pad, engage the hexagonal hole in the backing pad, and thread onto the spindle while holding the spindle lock button.
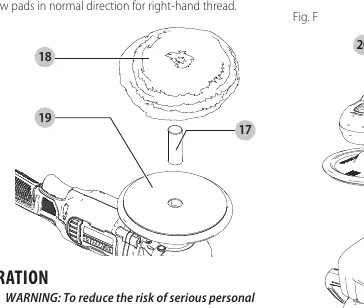
- Hook and Loop Backing Pad: Insert the centering tube into the center hole of the backing pad, align the pad, and screw the backing pad onto the spindle while holding the spindle lock button.
Operation
To operate the tool, squeeze the variable speed trigger. The further the trigger is depressed, the faster the tool runs. For continuous use, squeeze the trigger fully and depress the lock button. To stop, squeeze and release the trigger. The speed control wheel allows you to set a maximum speed between 800 and 2200 RPM.
Maintenance
Regular maintenance is required to ensure tool longevity:
- Cleaning: Blow dirt and dust out of all air vents with clean, dry air at least once a week.
- Wool Ingestion Shields: Clean these shields with soap and water if they become clogged with polish or debris.
- Soft Rubber Gear Case Cover: Can be removed if necessary by unscrewing the three mounting screws.
Safety
Always wear certified safety equipment, including ANSI Z87.1 eye protection, ANSI S12.6 hearing protection, and NIOSH/OSHA respiratory protection. Do not operate the tool near flammable materials or in wet conditions. Ensure the switch is in the lock-off position when not in use.
Manufacturer information
DEWALT
Practical help
Common problems
Tool stops unexpectedly
The Electronic Protection System may have engaged due to overload or overheating. Place the battery on the charger until fully charged.
Battery not charging
Check the receptacle, ensure the charger is not in a hot or cold environment, and verify the battery is fully seated.
Excessive vibration
Check that the polishing pad is correctly centered and securely attached to the spindle.
Before use
- Ensure the battery pack is fully charged.
- Check that the auxiliary or bail handle is securely tightened.
- Inspect the polishing pad for damage or cracks.
- Ensure the switch is in the lock-off position before inserting the battery.
- Wear appropriate personal protective equipment (eye, ear, and respiratory protection).
Specs in practice
- Variable Speed
- Allows control from 0 to 2200 RPM for different polishing tasks.
- Pad Diameter
- Compatible with 7-inch (180 mm) polishing pads.
Images and diagrams
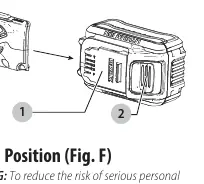
- Fig A: Overview of tool components including battery, speed control, and handles.
- Fig B: Bail handle installation and adjustment.
- Fig C: Attaching polishing pad with rubber backing.
- Fig D: Attaching polishing pad with hook and loop backing.
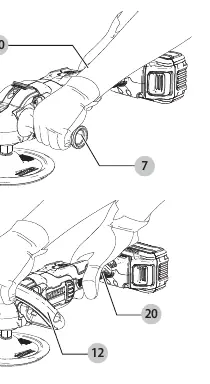
- Fig E: Battery installation and removal.
Model compatibility
- Compatible with DEWALT 20V Max battery packs.
- Use only DEWALT chargers.

Manual page author
David Miller
Documentation analyst
Organizes user manual content into clear summaries, with attention to model details, product context, and everyday usability.