Tools / Power Tools
User Manual for Dexter 200SHS2.5 Corded Orbital Sander
Quick guide for the Dexter 200SHS2.5 Corded Orbital Sander. Includes setup, operation, maintenance, and troubleshooting steps.
Quick answers from the manual
Quick answer
- The Dexter 200SHS2.5 is a corded orbital sander designed for dry sanding wood, metal, and painted surfaces. p. 6, 22, 38, 54
Key actions
- Attach sandpaper p. 13, 29, 45, 61
- Connect dust extraction p. 14, 30, 46, 62
Problems and fixes
Tool does not start
Check power connection, cord, or plug.
p. 17, 33, 49, 65Technical specifications
| Parameter | Value | Meaning | Pages |
|---|---|---|---|
| Power | 200W | Rated input power | p. 11, 27, 43, 59 |
Where to find it in the PDF
- Safety Instructions p. 6, 22, 38, 54
- Operation p. 15, 31, 46, 63
Table of contents
Manual images
Click an image to enlargeQuick guide from the manual
The Dexter 200SHS2.5 is a corded orbital sander designed for dry sanding wood, metal, and painted surfaces. Before using the tool, ensure you have read all safety instructions. Always wear appropriate personal protective equipment, including safety goggles and a dust mask.
Description
The sander features an ON/OFF switch, a hook & loop base for sandpaper, a dust extraction port, and a soft grip handle. It is designed for two-handed operation.
Before Use

- Sandpaper Selection: Choose the appropriate grit for your task. Coarse for rough surfaces, medium for smoothing, and fine for finishing.
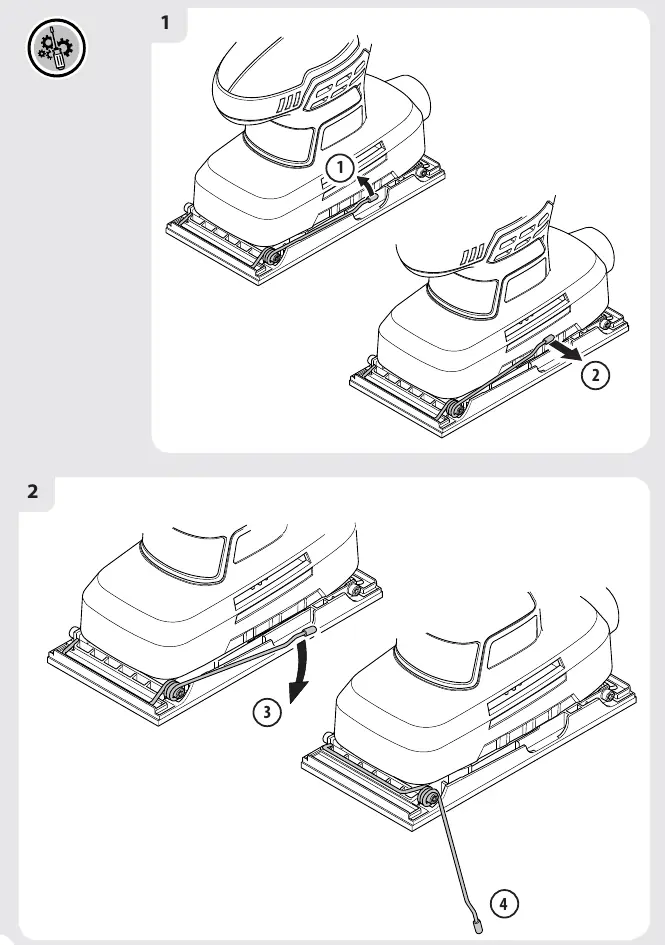
- Attaching Sandpaper: Ensure the tool is unplugged. Align the holes in the sandpaper with the holes in the base. Press firmly to attach (hook & loop) or secure with the clamps on both sides.
- Dust Extraction: Attach the dust extraction tube or bag to the port and rotate clockwise to lock.
Operation
To operate the sander:
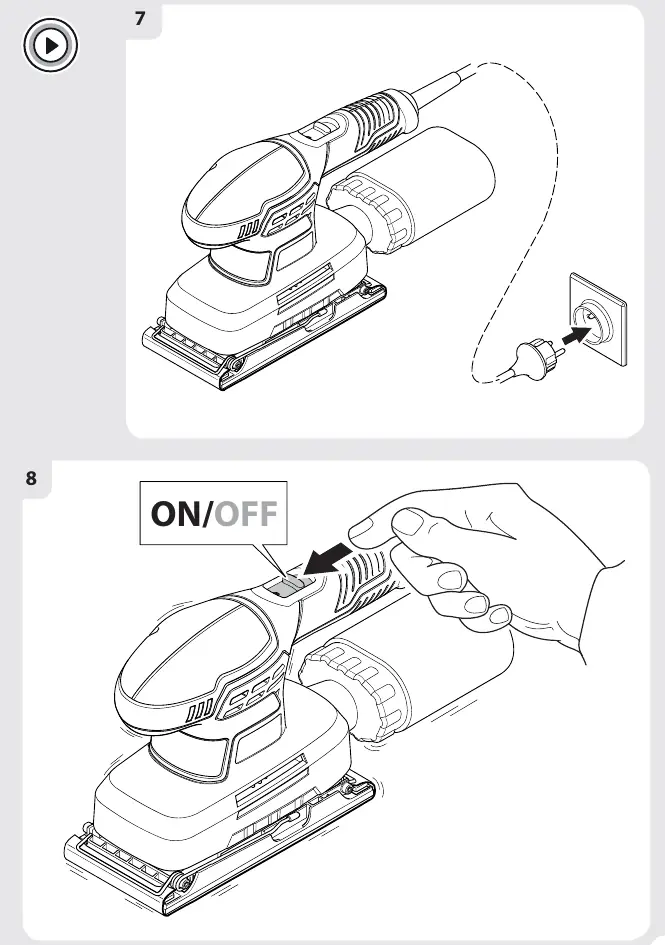
- Ensure the switch is in the OFF position before connecting to power.
- Place the sander on the workpiece without pressure.
- Switch the tool ON.
- Move the sander slowly in circular or curved motions with even, moderate pressure.
- Switch the tool OFF before lifting it from the workpiece.
Maintenance
- Cleaning: Regularly clean air vents to prevent dust accumulation. Use a clean cloth for plastic parts; avoid solvents.
- Lubrication: Bearings are lubricated for life; no extra lubrication is needed.
- Carbon Brushes: If replacement is needed, have this done by a qualified technician.
Troubleshooting
If the tool does not start, check the power connection, cord, and plug. If it lacks power, check the extension cord, power source voltage, or clear blocked air vents. If results are unsatisfactory, replace worn sandpaper or use the correct grit for the material.
Manufacturer information
Dexter
Practical help
Common problems
Tool does not start
Check power connection, power cord, or plug.
Tool does not reach full power
Check extension cord, power source voltage, or clear air vents.
Unsatisfactory sanding results
Replace worn sandpaper or use the correct grit for the material.
Before use
- Check tool and accessories for damage
- Select appropriate sandpaper grit
- Ensure switch is in OFF position before connecting
- Secure small workpieces
- Connect dust extraction system
Specs in practice
- Sanding pad size
- 92 x 182mm
- Sanding sheet size
- 92 x 230mm
Images and diagrams
- Exploded view of the sander components
- Sanding paper attachment steps
- Dust extraction setup
- On/Off switch operation
Model compatibility
- Use only for dry sanding
- Do not use on plaster
- Do not use the same sandpaper for wood and metal

Manual page author
David Miller
Documentation analyst
Organizes user manual content into clear summaries, with attention to model details, product context, and everyday usability.