Toys / Games
User Manual for Disney Life-Size Animated Oogie Boogie Character 226232
Quick guide for the Disney Life-Size Animated Oogie Boogie character (226232). Includes assembly steps, operation modes, power specifications, and safety warnings.
Quick answers from the manual
Quick answer
- The Disney Life-Size Animated Oogie Boogie (226232) is an animated decorative figure. It requires assembly of the base, support poles, torso, and costume. It operates via a power adapter and has three modes: Try Me (button), Off, and Sensor (motion/noise). p. 1, 2
Key actions
- Assemble the base, poles, torso, and costume as shown in the diagrams. p. 1
- Connect the wiring harness to the arms, head, and base. p. 2
First start
- Remove all plastic fasteners and tags. Remove the insulating strip from the control box. p. 2
Show 4 more answers Show less
Problems and fixes
Device not activating
Check power connection, ensure switch is not in OFF position, and remove insulating strip.
p. 2Maintenance and reset
- Return all parts to the original packaging and store in a cool, dry location. p. 2
Technical specifications
| Parameter | Value | Meaning | Pages |
|---|---|---|---|
| Power Adapter Input | 100-240V 50/60Hz | Standard power input | p. 1 |
| Power Adapter Output | 5.9V 2A | Required power output for the figure | p. 1 |
Where to find it in the PDF
- Assembly Instructions p. 1, 2
- Operation and Safety p. 2
Table of contents
Manual images
Click an image to enlargeQuick guide from the manual
This manual provides assembly and operation instructions for the Disney Life-Size Animated Oogie Boogie character (Model 226232). This product is intended for indoor decorative use only and is not a toy. The estimated assembly time is 15-20 minutes.
Package Contents
- Base
- Support poles (2)
- Costume
- Hip pieces (2)
- Torso frame
- Right arm
- Left arm
- Head
- Try me button
- Adapter
Assembly Instructions
- Base and Poles: Attach the support poles (B) to the base (A) by aligning the quick-connected push buttons into the pre-drilled holes.
- Costume: Lower the costume (C) over the support poles.
- Torso: Lower the hip (D) into the hole on the torso frame (E). Attach the torso frame (E) by aligning the quick-connected push buttons into the pre-drilled holes.
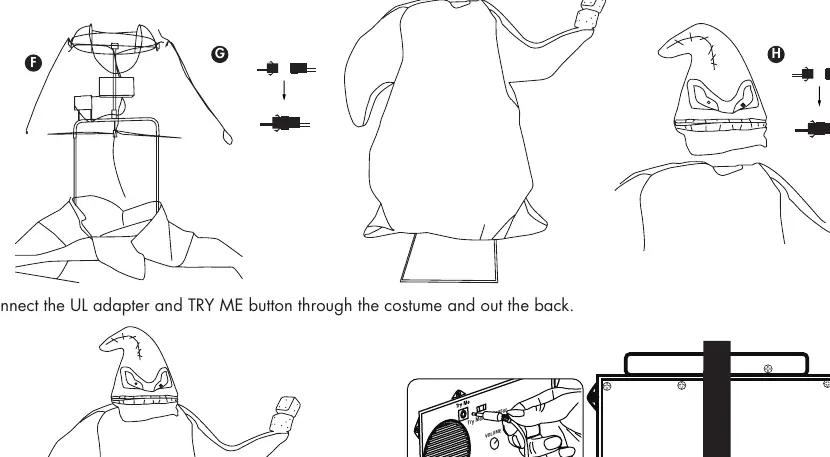
- Arms and Head: Connect the right arm (F) through the right sleeve and slide the forked hook into the hole on the torso frame. Repeat for the left arm (G). Place the head (H) onto the torso frame.
- Wiring: Carefully connect the wired jacks from the function box to the arms, base, and head. Connect the UL adapter and the 'Try Me' button through the costume and out the back.
Operation Modes
The figure has three operation settings located on the main function control box on the torso frame:
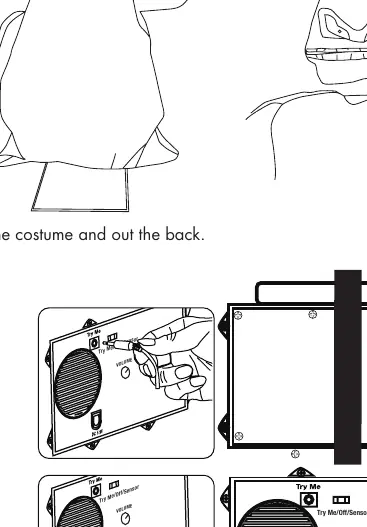
- TRY ME: Push-button activation.
- OFF: No function.
- SENSOR: Switch to this position and make a noise or walk by to activate. Ensure the insulating strip is removed before use.
Storage
Do not discard the box; it should be used for storage. Return all parts to the original packaging and store in a cool, dry location.
Safety and Warnings
- Indoor Use Only: This item is not a toy and should be used for decorative purposes only.
- Packaging: Remove all plastic fasteners and tags before use.
- FCC Compliance: This device complies with Part 15 of the FCC Rules. Operation is subject to the condition that it does not cause harmful interference and must accept any interference received.
Practical help
Common problems
Figure does not activate
Ensure the insulating strip is removed from the sensor/battery compartment, the power adapter is connected, and the switch is set to 'SENSOR' or 'TRY ME'.
Missing or damaged parts
Do not attempt to assemble, install, or operate the product. Verify all parts against the package contents list.
Before use
- Remove all plastic fasteners and tags
- Verify all parts are present
- Remove the insulating strip from the control box
- Ensure indoor use only
- Connect the power adapter
Show more Show less
Specs in practice
- Power Adapter
- Input: 100-240V 50/60Hz; Output: 5.9V 2A
Images and diagrams
- Assembly involves connecting the base to support poles, then mounting the torso frame and hip pieces.
- Wiring requires connecting the function box to the arms, head, and base.
- The control box features a switch for Try Me/Off/Sensor modes and a volume dial.
Model compatibility
- For indoor use only.
- Not a toy; for decorative purposes only.

Manual page author
Michael Turner
Technical manual editor