Tools / Air Compressors & Pneumatics
User Manual for Draper Soldering Iron 03860 / 03861
Quick guide for the Draper 10.8V and 12V Soldering Iron. Includes setup, battery installation, head rotation, operation, tip replacement, and safety instructions.
Table of contents
Manual images
Click an image to enlargeQuick guide from the manual
This document provides instructions for the Draper Soldering Iron (Stock No. 03860/03861). Before use, ensure you have read all safety precautions. The tool is designed for heating solder for attaching or tinning electrical components. Always use the appropriate Draper Tools 12V range battery pack and charger. Never leave the tool unattended while powered.
Product Overview
The soldering iron consists of the following key components:
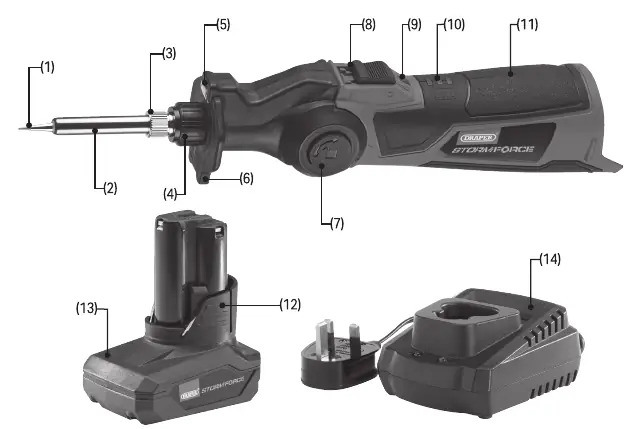
- Soldering tip
- Barrel
- Metal and plastic locking nuts
- Rotation button (for adjusting head angle)
- On/off switch
- Temperature and battery level indicators
Operating Instructions

Installing and Removing the Battery
Ensure the switch is in the off (O) position before installing or removing the battery. Insert the battery pack into the socket at the base of the tool until it clicks into place. To remove, press and hold the battery release button and slide the battery away.
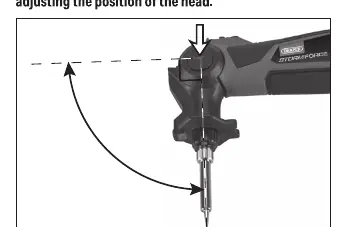
Rotating the Head
Ensure the soldering tip is cool and the temperature indicator is not lit. Press and hold the rotation button while moving the head to the desired angle (up to 90°). Ensure the head clicks into place.
Operation
- Rotate the head to the desired angle.
- Install the battery.
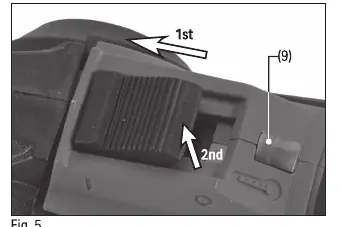
- Slide the on/off switch to the on position.
- Allow the tool to reach full temperature (indicated by the temperature indicator turning green).
- Hold the tool firmly and touch the soldering tip against the workpiece.
- Apply solder as required.
- When finished, release the switch to the off position.
- Allow the tool to cool for at least 20 minutes before storage.
Maintenance and Storage
Replacing the Soldering Tip
Warning: Only perform maintenance when the tool is cool and the battery is removed.
- Ensure the tool is off and the battery is removed.
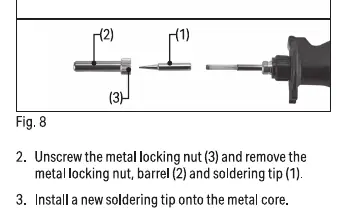
- Unscrew the metal locking nut and remove the barrel and soldering tip.
- Install a new soldering tip onto the metal core.
- Reinstall the barrel and metal locking nut, tightening securely.
Storage
Store the tool in a clean, dry location out of reach of children. Always remove the battery before storage. If stored for extended periods, charge the battery periodically.
Contact Details
For aftersales servicing or warranty repairs, contact Draper Tools Limited, Hursley Road, Chandler's Ford, Eastleigh, Hampshire, SO53 1YF, UK. Product Helpline: +44 (0) 23 8049 4344. Website: drapertools.com. Email: [email protected].
Official resources from the manual
Manufacturer information
Draper Tools
Practical help
Common problems
Tool does not power on
Check if the battery is fully inserted and charged. Ensure the switch is in the ON position.
Soldering tip not heating
Ensure the battery is charged and the switch is correctly engaged.
Head is loose
Ensure the locking nuts are tightened securely after adjusting the head angle.
Before use
- Inspect the tool for any signs of damage.
- Ensure the work area is well-lit and ventilated.
- Wear protective eye, face, and hand coverings.
- Check that the battery is fully charged.
- Ensure the soldering tip is clean and securely attached.
Specs in practice
- Rated voltage
- 10.8V DC (03860) or 12V DC (03861).
- Max. tip temperature
- 400°C.
- Ambient operating temperature
- -18°C to 50°C.
Images and diagrams
- Fig 1: Battery installation procedure.
- Fig 2: Head rotation adjustment mechanism.
- Fig 5: Switch operation and locking.
- Fig 8: Soldering tip replacement steps.
Model compatibility
- Use ONLY with Draper Tools 12V range battery packs and chargers.
- Do not use non-rechargeable batteries.

Manual page author
Emily Carter
User documentation editor
Prepares concise manual descriptions and highlights the most useful setup, operation, and maintenance information for readers.