Health / Assistive Technology
User Manual for Drive Med-Aire Edge Mattress Replacement System
Quick guide for the Drive Med-Aire Edge Alternating Pressure & Low Air Loss Mattress Replacement System. Includes setup, operation, cleaning, and troubleshooting for models 14360-B and 14360-P.
Table of contents
Manual images
Click an image to enlargeQuick guide from the manual
The Med-Aire Edge Mattress Replacement System is designed for pressure redistribution and wound management. This guide covers the setup, operation, and maintenance of the system. Always ensure the patient is positioned properly within the confines of the bed and that the system is installed on a compatible bed frame.
Important safety precautions
- Entrapment risk: Do not use if gaps exist between the mattress and head/foot panels or side rails.
- Electrical safety: Keep the power cord away from heated surfaces. Do not place the control unit where it can fall into water.
- Usage: Do not use in the presence of flammable anesthetics or smoking materials.
- Mounting: Secure mattress straps to the bed deck or frame, not to the side rails.
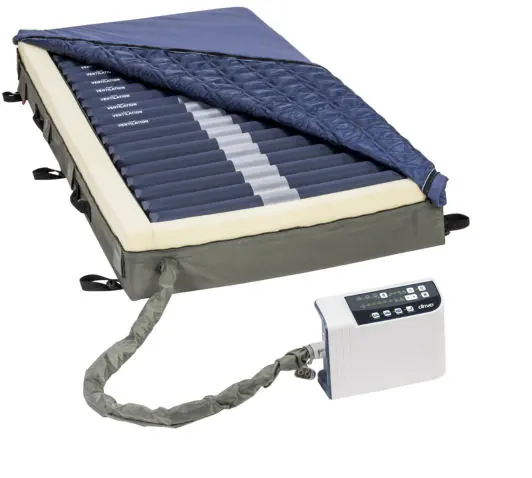
Installation


- Remove existing bedding from the bed.
- Position the mattress on the bed frame with the air hoses facing the foot end.
- Secure the mattress to the bed frame using the provided straps.
- Hang the control unit on the footboard of the bed.
- Connect the air hoses to the control unit using the quick connector until it clicks.
- Plug the power cord into a grounded AC outlet.
- Turn on the power switch. The system may take up to 40 minutes to fully inflate.
Operation
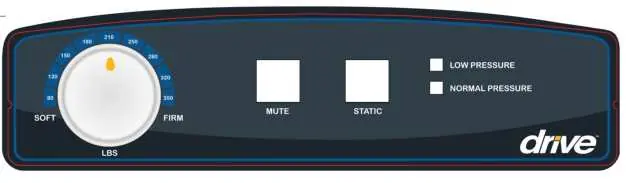
Analog Control Unit (14530P)
- Power: Use the side switch to turn the unit on.
- Pressure Dial: Adjust to the patient's weight and comfort level.
- Static Mode: Press the static button to discontinue alternating therapy.
- Mute: Silences the audible low-pressure alarm.
Digital Control Unit (14360XP)
- Power: Use the side switch, then press the power button on the front panel.
- Cycle Time: Select from 10, 15, 20, or 25 minutes.
- Weight Settings: Adjust pressure based on patient weight (80-450 lbs).
- Auto Firm: Inflates to maximum pressure for transfers or repositioning.
- Seat Inflate: Increases pressure for sacral support during head-of-bed elevation.
Patient positioning and comfort
Perform a Hand Check Procedure to ensure the patient is not bottoming out:
- Place four fingers stacked vertically beneath the air cell directly under the sacral region.
- The fingers should slide with minimal resistance between the sacral region and the lower portion of the mattress.
- Adjust the comfort setting if necessary and re-evaluate.
Cleaning and maintenance
- Control Unit: Unplug before cleaning. Wipe the exterior with a clean cloth. Do not spray cleaning solution directly on the unit.
- Mattress: Remove bedding. If disinfection is required, use a detergent/disinfectant solution. Covers may be soaked in disinfectant.
- Storage: Roll the mattress from the foot end to the head end. Do not fold or crease.
Troubleshooting
- Mattress fails to inflate: Check power connection, ensure air hoses are connected, and verify the CPR valve is sealed.
- Low pressure alarm: Check for leaks in tubes or connections.
- Pump runs but mattress does not alternate: Contact your provider for service.
Manufacturer information
Drive Medical
Practical help
Common problems
Mattress fails to inflate or does not inflate completely
Check if the power cord is plugged in, ensure the quick connector is securely attached to the pump, and verify the CPR valve is capped.
Low pressure alarm sounds
Check for air leaks in the tubing or connections. Ensure the CPR valve is sealed and the quick connector is properly attached.
Pump runs but mattress does not alternate
This may indicate a motor or PCB failure. Contact your provider for a warranty claim.
Before use
- Inspect all components for damage before use.
- Remove all existing covers and sheets from the bed.
- Ensure no sharp objects are in the immediate area.
- Position the mattress with air hoses towards the foot end.
- Secure straps to the bed frame (do not secure to side rails).
- Verify the electrical outlet is grounded and voltage is compatible.
Specs in practice
- Pressure range
- Adjustable range (30-60 mmHg for analog, 20-55 mmHg for digital) to suit patient weight and comfort.
- Maximum weight capacity
- The system supports patients up to 450 lbs.
Images and diagrams
- The control panel features buttons for power, mute, static mode, and pressure adjustments.
- The quick connector is used to attach the mattress air hoses to the control unit.
Model compatibility
- Not for use with cervical or skeletal traction.
- Not for use with unstable spinal cord injuries.
- System is designed for use with appropriate linens; avoid multiple layers of underpads.

Manual page author
David Miller
Documentation analyst
Organizes user manual content into clear summaries, with attention to model details, product context, and everyday usability.