Garden / Brushcutters & Trimmers
Operator Manual for Earthquake 40314 String Mower
Quick guide for the Earthquake 40314 String Mower. Includes assembly, operation, maintenance, troubleshooting, and safety instructions.
Table of contents
Manual images
Click an image to enlargeQuick guide from the manual
This manual provides essential instructions for the safe and effective operation of your Earthquake 40314 String Mower. Always read the full safety section before use. Key tasks include regular maintenance of the mower line, checking belt tension, and ensuring the engine is properly serviced with oil before the first use.
Safety Precautions
- Always wear safety goggles or glasses with side shields.
- Never operate the machine on slopes greater than 20 degrees. Mow across the face of slopes, never up and down.
- Stop the engine and disconnect the spark plug wire before cleaning, repairing, or adjusting the unit.
- Keep hands and feet away from rotating parts.
- Do not operate the machine in wet grass or when fatigued.
Product Features
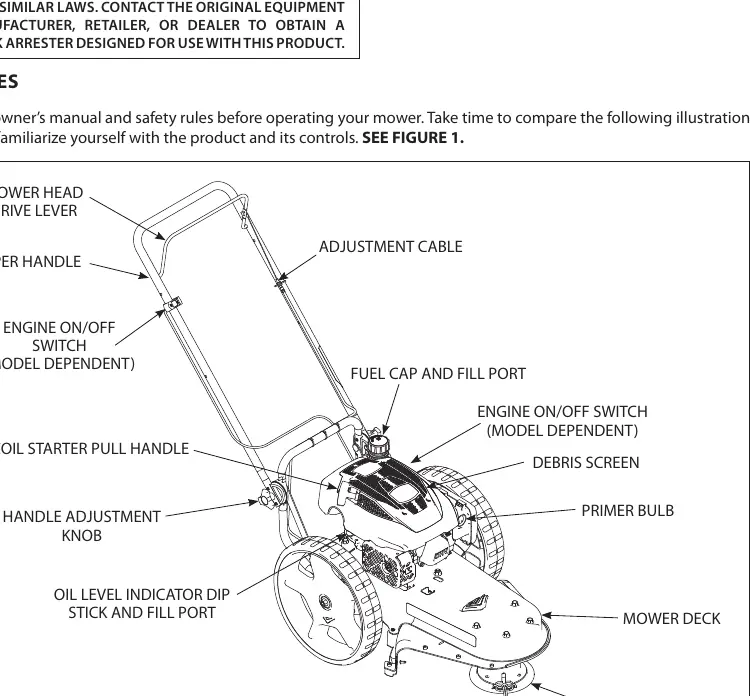
The mower features a 22-inch cutting diameter and uses a 0.155-inch diameter mower line. Key controls include the mower head drive lever, engine on/off switch, recoil starter, and handle adjustment knobs.
Assembly
To assemble the mower:
- Remove all loose parts and packing material from the carton.
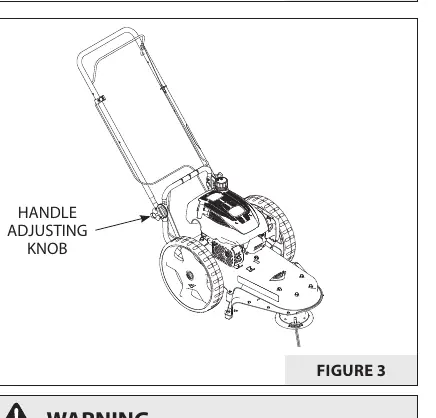
- Loosen the handle adjustment knobs to raise the handle to the operating position.
- Ensure cables are not caught between the upper and lower handle.
- Tighten the knobs to lock the handle in place.
Operation
Engine Preparation: The engine is shipped without oil or gasoline. You must service the engine before operation. Fill the crankcase to the FULL line on the dipstick.
Starting the Engine:
- Set the ON/OFF switch to ON.
- For a cold engine, push the primer bulb three times, waiting two seconds between each push.
- Pull the recoil starter handle sharply.
Mower Head Control: Hold the control lever against the handle to engage the mower head. Release the lever to stop the mower head.
Maintenance and Storage
Maintenance Schedule:
- Before Each Use: Check mower lines, check mower head engagement, clean engine/machine, check nuts and bolts.
- Every 25 Hours: Lubricate jackshaft assembly and wheel bearings.
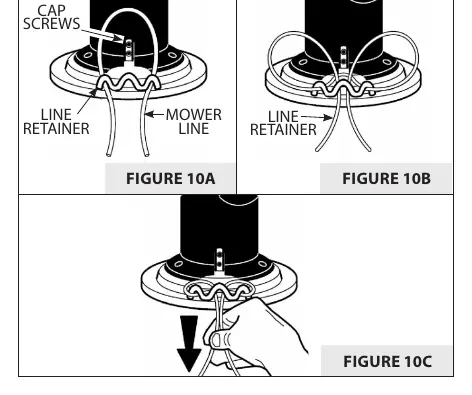
Mower Line Replacement: Use a 0.155" diameter line cut to 21.5 inches. Thread the line through the outside loops, cross over the line retainer, and thread through the center hole.
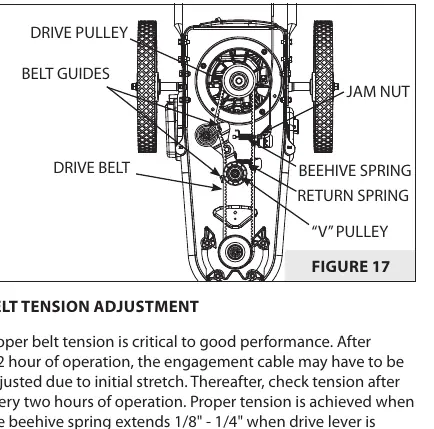
Belt Tension: Proper tension is achieved when the beehive spring extends 1/8" - 1/4" when the drive lever is engaged. Adjust using the jam nuts on the engagement cable.
Troubleshooting
If the engine does not start, check if the spark plug wire is connected, the engine is primed, or if the fuel tank is empty. If the mower vibrates, check if the socket head cap screws for the mower head are loose or if the mower line lengths are uneven.
Practical help
Common problems
Engine does not start
Check if spark plug wire is connected, prime the engine, check for empty fuel tank, or replace/gap spark plug.
Engine runs poorly
Replace spark plug, replace air filter, or drain stale gasoline and add fresh fuel.
Mower vibrates
Tighten socket head cap screws for the mower head, ensure mower line lengths are equal, or check for loose nuts/bolts.
Mower head does not retain line
Ensure line is properly attached, check for broken line retainer, or use correct 0.155" diameter line.
Before use
- Check mower lines for wear
- Check mower head engagement
- Clean engine and debris screen
- Check all nuts and bolts for tightness
- Check oil level
Specs in practice
- Mower Line Diameter
- 0.155 Inches (use this size for optimal performance)
- Mower Cutting Diameter
- 22 Inches
- Wheel Diameter
- 14 Inches
Images and diagrams
- Figure 1: Overview of controls including mower head drive lever, primer bulb, and oil fill port.
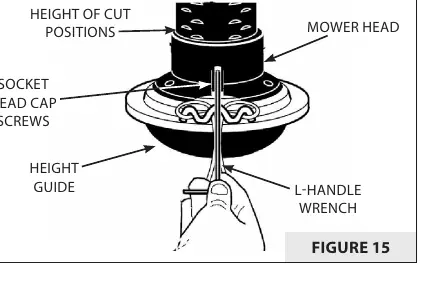
- Figure 15: Height of cut adjustment using socket head cap screws.
- Figure 17: Drive belt routing and tension adjustment components.
Model compatibility
- Use only OEM replacement belts.
- Use only 0.155" diameter mower line.
- Do not attach any metal parts to the cutting head.

Manual page author
Emily Carter
User documentation editor
Prepares concise manual descriptions and highlights the most useful setup, operation, and maintenance information for readers.