Garden / Garden Tools
User Manual for Toro 14in or 16in 60V MAX String Trimmer 88716
Get started with your Toro 14in or 16in 60V MAX String Trimmer (Model 88716). This guide covers assembly, operation, string replacement, maintenance, and troubleshooting.
Table of contents
Manual images
Click an image to enlargeQuick Guide
This manual provides instructions for the Toro 14in or 16in 60V MAX String Trimmer (Model 88716). This attachment is designed to be used with the Toro Flex-Force Power System 60V MAX Attachment-Capable Power Head (Model 51810T). Always ensure the battery is removed before performing any maintenance or adjustments.
Setup
Connecting the Attachment to the Power Head:
- Install the square shaft of the attachment into the square shaft of the power head.
- Align the locking button on the lower shaft with the slotted hole on the upper shaft and slide the two shafts together until the button clicks into place.
- Tighten the screw-handle on the shaft connector until secure.
Installing the Guard:
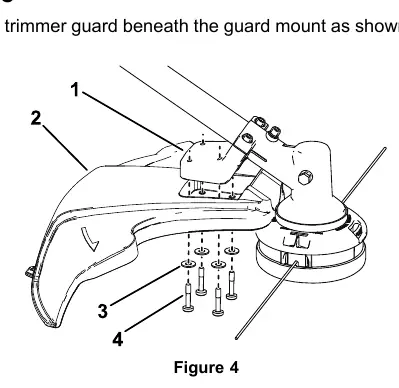
- Align the trimmer guard beneath the guard mount.
- Secure the guard to the trimmer using the 4 provided washers and 4 bolts.
Operation
Starting the Attachment:
- Ensure vents are clear of debris.
- Align the battery pack cavity with the tongue on the handle housing and push until it locks.
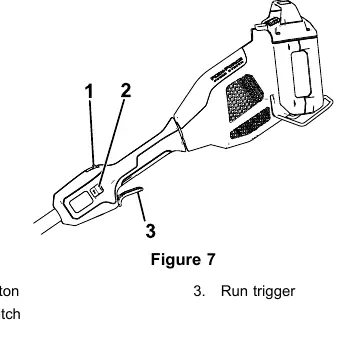
- To start, press the lockout button and squeeze the run trigger.
- Use the 2-speed switch to adjust the speed of the attachment.
Advancing the Line:
- Bump Feed: While running at full throttle, tap the bump button on the ground. Do not hold the button on the ground.
- Manual Advance: Remove the battery, then push the bump button at the base of the spool retainer while pulling the trimmer line.
Adjusting the Cutting Swath:
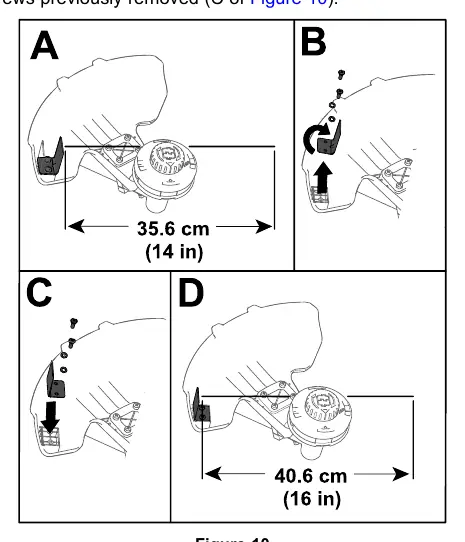
The trimmer can be adjusted between 14 inches (36.6 cm) and 16 inches (40.6 cm). Remove the swath blade from the bottom of the guard using the provided Allen wrench, rotate it 180°, and reinstall it using the same screws.
Maintenance
- After Each Use: Remove the battery and wipe the trimmer clean with a damp cloth. Do not submerge in water.
- Gearbox Lubrication: Every 25 hours or monthly, remove the plug from the side of the trimmer and apply a small amount of No. 2 lithium grease using a grease gun.
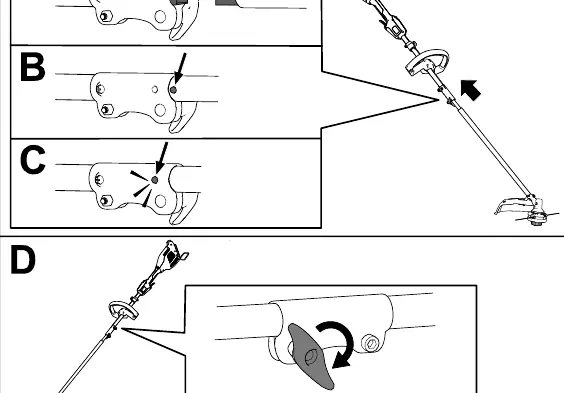
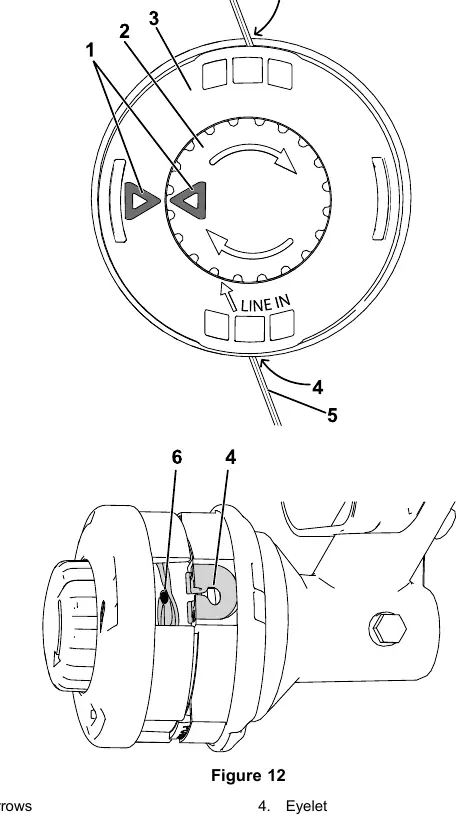
- Replacing the String: Use only 2 mm (0.080 inch) monofilament string (Part No. 88611) or 2.4 mm (0.095 inch) twisted monofilament string (Part No. 88202). Align the arrow on the knob with the arrow on the string head, insert the line through the eyelet, and rotate the knob clockwise to wind the line.
Troubleshooting
If the tool does not run, check that the battery is fully installed, charged, and within the appropriate temperature range (5°C to 40°C). If the tool lacks power or the gearbox is hot, check for blocked air vents or lack of lubrication. If the tool produces excessive vibration, check for debris under the grass shield or ensure the spool is properly wound.
Practical help
Common problems
Tool does not run or runs intermittently
Check if the battery is fully installed and latched. Ensure the battery is charged and within the operating temperature range. Check for moisture on battery leads.
Tool lacks power or gearbox is getting hot
Ensure the battery is fully charged, air vents are not blocked, and the gearbox is properly lubricated.
Excessive vibration or noise
Lubricate the gearbox, clean debris from under the grass shield/bump head, or re-wind the spool.
Bump head does not advance line
Add more line to the bump head, untangle the line inside the housing, or clean debris from the bump head area.
Before use
- Ensure the battery is fully charged.
- Verify the attachment is securely connected to the power head.
- Check that all guards are in place.
- Clear the area of bystanders.
- Wear appropriate safety gear (eye protection, long pants, sturdy shoes).
Specs in practice
- Cutting Swath
- Adjustable between 14 inches (36.6 cm) and 16 inches (40.6 cm).
- Operating Temperature
- Use the trimmer between 0°C (32°F) and 49°C (120°F).
- Battery Charging Temp
- Charge the battery pack between 5°C (41°F) and 40°C (104°F).
Images and diagrams
- Figure 3: Shows how to connect the attachment to the power head.
- Figure 4: Illustrates the installation of the trimmer guard.
- Figure 10: Demonstrates how to adjust the cutting swath between 14 and 16 inches.
- Figure 12: Details the string replacement process.
Model compatibility
- Designed for use with Toro Flex-Force Power System 60V MAX Attachment-Capable Power Head Model 51810T.

Manual page author
David Miller
Documentation analyst
Organizes user manual content into clear summaries, with attention to model details, product context, and everyday usability.