Tools / Power Tools
User Manual for Weed Eater 1400T Trimmer
Quick guide for the Weed Eater 1400T trimmer. Includes assembly instructions, fuel mixing ratios, starting procedures, maintenance tips, and troubleshooting.
Table of contents
Manual images
Click an image to enlargeQuick guide from the manual
The Weed Eater 1400T is a gas-powered string trimmer designed for lawn maintenance. This manual provides essential safety, assembly, operation, and maintenance instructions. Always wear eye and leg protection during operation and keep bystanders at least 30 feet away.
Assembly
If the tool is not pre-assembled, follow these steps:

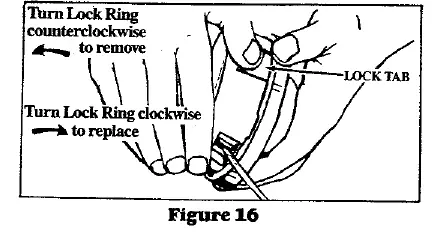
- Drive Shaft Housing: Remove the packing cover. Align the keyway in the drive shaft housing with the key in the engine shroud. Push the housing into the shroud until it bottoms out and tighten the clamp screw.
- Trimmer Head: Hold the dust cup with a wrench to prevent the arbor shaft from turning. Thread the trimmer head onto the shaft.
- Shield: Align the raised area on the shield with the V-slot on the drive shaft housing. Install the bracket and screws securely.
- Assist Handle: Position the handle on the drive shaft housing, install the bolt, washer, and wing nut, and tighten by hand.
Engine and Fueling
The 1400T uses a 2-cycle engine requiring a specific fuel mixture.
- Fuel Mix: Use a 40:1 ratio (mix 3.2 oz of Poulan/Weed Eater 40:1 Engine Oil with 1 gallon of gasoline).
- Mixing: Always mix fuel in a separate container before filling the tank. Do not mix directly in the fuel tank.
- Prohibited: Do not use automotive oil or BIA oil, as these can damage the engine.
Starting Instructions
Cold Engine:
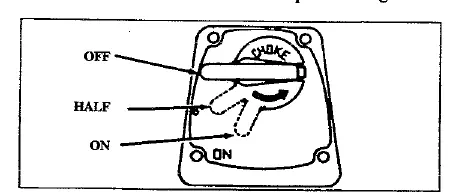
- Move choke to "On" position.
- Grip rear handle and squeeze throttle trigger.
- Pull starter rope sharply until engine attempts to run (max 8 pulls).
- Move choke to "Half" position.
- Pull starter rope until engine runs (max 5 pulls).
- After engine runs for 5 seconds, push choke to "Off" position.
Warm Engine:
- Move choke to "Half" position.
- Grip rear handle and squeeze throttle trigger.
- Pull starter rope until engine runs (max 5 pulls).
- Move choke to "Off" position.
Operation
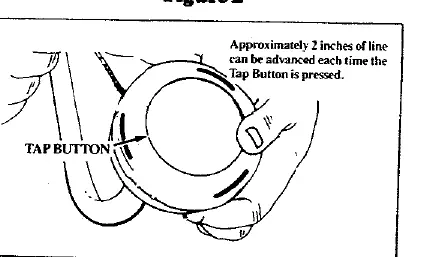
The trimmer head rotates when the engine is running. Always hold the tool with both hands. Use the "Tap-N-Go" feature to advance the line: while the engine is at full throttle, tap the bottom of the trimmer head lightly on the ground once to advance approximately 2 inches of line.
Maintenance
- Air Filter: Clean every 5 tanks of fuel or 5 hours of operation. Wash in soap and water.
- Drive Shaft: Lubricate the flexible drive shaft every 10 hours of operation using Weed Eater Flex Shaft Lube.
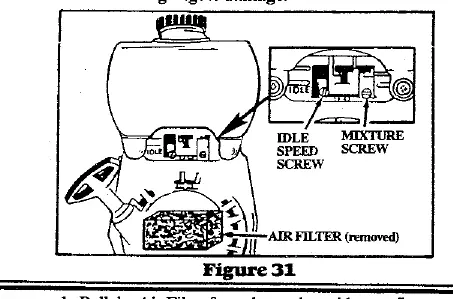
- Carburetor: Adjustments should be made with the drive shaft housing supported. Small adjustments to the mixture screw and idle speed screw can be made if the engine does not idle or accelerate properly.
Practical help
Common problems
Engine will not start
Check if fuel tank is empty, engine is flooded, or spark plug is fouled. Ensure spark plug is firing.
Engine will not idle
Adjust idle speed or low speed mixture screw.
Trimmer head does not turn
Check if drive shaft is broken or not properly engaged in the engine shroud.
Line does not advance
Check if line is caught between spool and hub or improperly wound.
Before use
- Inspect entire tool for damaged parts or fuel leaks.
- Ensure all fasteners are tight.
- Verify shield is properly attached.
- Check fuel level (40:1 mix).
- Wear eye and leg protection.
- Clear area of debris (rocks, wire, glass).
Specs in practice
- Engine Displacement
- 22.2 cc, 2-cycle, air-cooled.
- Cutting Line
- .080" diameter monofilament.
Images and diagrams
- Figure 1: Drive shaft housing assembly.
- Figure 8: Choke and throttle control positions.
- Figure 10: Advancing the trimmer line by tapping the head.
- Figure 31: Carburetor adjustment screw locations.
Model compatibility
- Use only .080" diameter monofilament line.
- Use only genuine Weed Eater replacement parts.
- Do not use wire, rope, or string as cutting line.

Manual page author
Emily Carter
User documentation editor
Prepares concise manual descriptions and highlights the most useful setup, operation, and maintenance information for readers.