Lighting / Controllers Dimmers
EcoDim Smart LED Dimmer 0-200W Z-Wave User Guide
Quick guide for the EcoDim 0-200W Z-Wave smart LED dimmer. Includes installation steps, wiring diagrams, MIN/MAX light adjustment, and Z-Wave network pairing instructions.
Table of contents
Quick guide from the manual
This document provides instructions for the EcoDim 0-200W Z-Wave smart LED dimmer. Before starting, ensure the mains voltage is switched off. The device supports 2-wire installation (no neutral required) and is compatible with various cover frame brands. Key operations include MIN/MAX light level adjustment for stability and Z-Wave network inclusion/exclusion using the reset button.
Product description
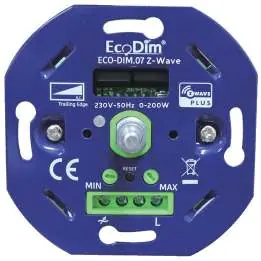
The EcoDim 0-200W Z-Wave dimmer is designed for smart lighting control. It features a push/turn button for manual operation, LED indicator for status, and MIN/MAX adjustment screws for fine-tuning light levels. It supports Z-Wave Plus, SmartStart, and voice assistants via a compatible controller.
Installation
- Remove the knob and the cover plate.
- Ensure electricity is switched off. Connect wires according to the connection diagram.
- Install the dimmer in the mounting box using screws or mounting clamps.
- Switch the electricity back on.
- Switch on the lights by pressing the dimmer shaft.
- Perform MIN/MAX adjustment.
- Connect to your SMART home system if required.
- Replace the cover plate and dimmer knob.
MIN/MAX adjustment
To ensure optimal performance, adjust the light range:
- MIN adjustment: Switch on lights. Insert a screwdriver into the MIN slot and turn left. If the light becomes unsteady, turn slightly back to the right until steady.
- MAX adjustment: Switch on lights. Insert a screwdriver into the MAX slot and turn right. If the light becomes unsteady, turn slightly back to the left until steady.
Wiring diagrams
The dimmer supports two main configurations:
- One Way Connection: Standard wiring for a single dimmer.
- Multiway master & slave: Wiring configuration for using multiple push buttons with the dimmer. Note that multiway switching is only possible with push buttons, not multiple dimmers.
Z-Wave operation
- SmartStart Inclusion: Add the dimmer DSK to the primary controller's provisioning list, power cycle the dimmer, and wait for automatic inclusion.
- Inclusion to Z-Wave Network: Remove from previous network first. Double press the reset button. The indicator will blink blue and stay solid for 10s upon success.
- Remove from Z-Wave Network: Press the reset button 3 times. The indicator will blink purple and stay solid for 10s upon success.
- Factory Reset: Press and hold the reset button for 5 seconds. The indicator will stay red for 10s when finished. Use only if the primary controller is inoperable.
Specifications
- Input voltage: 220-240 Vac, 50Hz
- Power (load): 0-200W LED
- Dimmer type: R,C Phase cut
- Working temperature: 35 °C
- Operation: Push / turn button
- Dimensions: 70.6x70.6x33mm
Compatibility
The dimmer is suitable for surface-mounted and flush-mounted boxes. Compatible cover material brands include: Berker by Hager, Busch-Jaeger, Gira, JUNG, Kopp, Merten by Schneider, Niko, and PEHA.
Manufacturer information
EcoDim B.V.
Practical help
Common problems
Light flickering or unstable dimming
Perform the MIN/MAX adjustment procedure to set the correct light range for your specific LED bulbs.
Pairing mode fails
Ensure the device is removed from any previous Z-Wave network before attempting to pair it again.
Need to reset the device
If the primary controller is inoperable, press and hold the reset button for 5 seconds until the indicator stays red for 10 seconds.
Before use
- Switch off the mains voltage before starting installation.
- Verify your LED load is within the 0-200W range.
- Check if your wall box is compatible (surface or flush-mounted).
- Ensure you have the correct cover frame brand (e.g., Busch-Jaeger, Gira, Niko).
- Confirm if you are using a 2-wire connection (no neutral required).
Specs in practice
- Input voltage
- 220-240 Vac, 50Hz power supply requirement.
- Working temperature
- Maximum operating temperature is 35°C.
Images and diagrams
- One Way Connection: Standard wiring diagram for a single dimmer setup.
- Multiway master & slave: Wiring diagram for connecting multiple push buttons to control the same light.
Model compatibility
- Compatible with any Z-Wave or Z-Wave Plus controller.
- Suitable for 90% of all LED bulbs.
- Compatible with cover frames from Berker, Busch-Jaeger, Gira, JUNG, Kopp, Merten, Niko, and PEHA.

Manual page author
Emily Carter
User documentation editor
Prepares concise manual descriptions and highlights the most useful setup, operation, and maintenance information for readers.