Tools / Power Tools
User Manual for Einhell TC-BG 200 Bench Grinder
Quick guide and user manual for the Einhell TC-BG 200 bench grinder. Includes assembly, safety instructions, operation, maintenance, and technical specifications.
Quick answers from the manual
Quick answer
- The Einhell TC-BG 200 is a double-wheel bench grinder for rough and precision grinding. It requires secure mounting to a workbench and periodic adjustment of the spark deflector and workpiece supports to maintain a maximum 2mm clearance from the grinding wheels. p. 26, 27, 28
Key actions
- Mounting the machine p. 28
- Adjusting spark deflector p. 28
First start
- Ensure the machine is securely screwed to a workbench, all safety devices are fitted, and the grinding wheel runs freely before connecting to power. p. 28
Problems and fixes
Grinding wheel jammed
Remove the workpiece and wait until the tool reaches its top speed again.
p. 29Technical specifications
| Parameter | Value | Meaning | Pages |
|---|---|---|---|
| Power | 150 W (S2 30 min) | Nominal power rating | p. 27 |
| Max. clearance | 2 mm | Max distance between wheel and supports | p. 26 |
Where to find it in the PDF
- Safety Instructions p. 24, 25, 26
- Assembly and Operation p. 28, 29
Table of contents
Manual images
Click an image to enlargeQuick guide from the manual
The Einhell TC-BG 200 is a bench grinder designed for rough and precision grinding of metals, plastics, and other materials. Important: The machine must be securely screwed to a workbench before use. Always maintain a maximum clearance of 2 mm between the grinding wheel and the spark deflector/workpiece support. If the grinding wheel jams, remove the workpiece and wait for the tool to reach full speed again.
Description of the tool
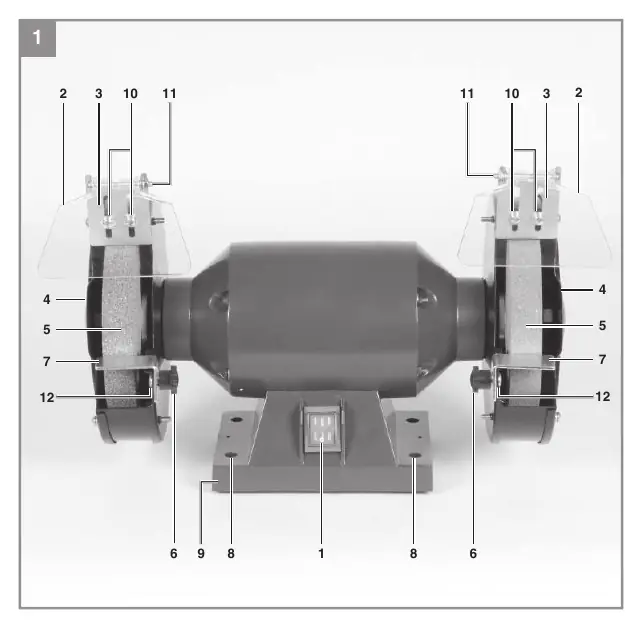
- 1: ON/OFF switch
- 2: Safety window
- 3: Spark deflector
- 4: Safety hood
- 5: Grinding wheel
- 6: Workpiece support fastening screw
- 7: Workpiece support
- 8: Mounting holes
- 9: Foot
- 10: Spark deflector adjusting screw
Assembly
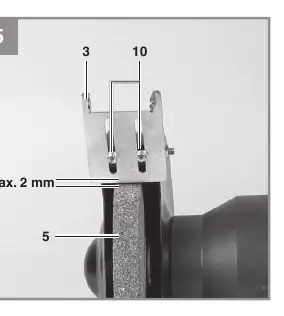
Fitting the spark deflector
Attach the spark deflector (3) to the grinder using the adjusting screw (10).
Fitting the workpiece supports
Secure the workpiece supports (7) to the grinder using the fastening screws (6). Adjust them so the distance between the grinding wheel (5) and the support (7) is as small as possible, not exceeding 2 mm.
Operation
To switch on, set the ON/OFF switch (1) to position 1. To switch off, set it to position 0. Wait for the machine to reach maximum speed before starting work. Move the workpiece slowly against the grinding wheel at the desired angle. Move the workpiece slightly back and forth to ensure even wear on the grinding wheel.
Maintenance
Cleaning
Keep all safety devices, air vents, and the motor housing free of dirt and dust. Wipe with a clean cloth or use low-pressure compressed air. Do not use cleaning agents or solvents.
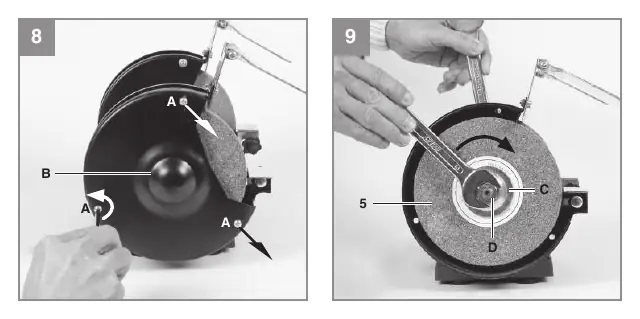
Replacing the grinding wheel
Remove the 3 screws (A) from the side of the safety hood (B) and remove the hood. Undo the nut (D). Note: The left grinding wheel has a left-handed thread, and the right grinding wheel has a right-handed thread. Hold the nut on the opposite side to loosen. Replace the wheel (5), replace the flange (C), and tighten the nut (D) by hand.
Safety
- Always wear safety goggles, ear-muffs, and a breathing mask.
- Do not work on materials containing asbestos.
- Ensure the machine is securely mounted to a workbench.
- Do not use damaged grinding wheels.
- The workpiece becomes hot during grinding; allow it to cool.
Manufacturer information
Einhell
Practical help
Common problems
Grinding wheel jammed
Remove the workpiece and wait until the tool reaches its top speed again.
Excessive vibration
Ensure the machine is securely screwed to a workbench and check the condition of the grinding wheels.
Before use
- Check the device, mains cable, and plug for damage.
- Ensure the machine is securely screwed to a workbench.
- Verify that all covers and safety devices are properly fitted.
- Ensure the grinding wheel can run freely.
- Check that the voltage on the rating plate matches your supply voltage.
Images and diagrams
- Figure 1: Overview of components (switch, spark deflector, safety window, grinding wheel, etc.)
- Figure 5: Correct clearance (max 2mm) between wheel and spark deflector.
- Figure 8-9: Replacing the grinding wheel.
Model compatibility
- Use only grinding wheels marked with manufacturer details, bonding agent type, dimensions, and permissible RPM.
- Do not use reducer sleeves to fit wheels with larger holes.

Manual page author
David Miller
Documentation analyst
Organizes user manual content into clear summaries, with attention to model details, product context, and everyday usability.