Tools / Drills
User Manual for Einhell TP-CW 18/750-C Li BL Cordless Impact Wrench
Quick guide for the Einhell TP-CW 18/750-C Li BL Cordless Impact Wrench. Includes operating instructions, safety warnings, battery charging, and maintenance tips.
Table of contents
Manual images
Click an image to enlargeQuick guide from the manual
This guide provides essential information for operating the Einhell TP-CW 18/750-C Li BL Cordless Impact Wrench. Always read the full safety instructions provided in the original manual before use.
Device Description
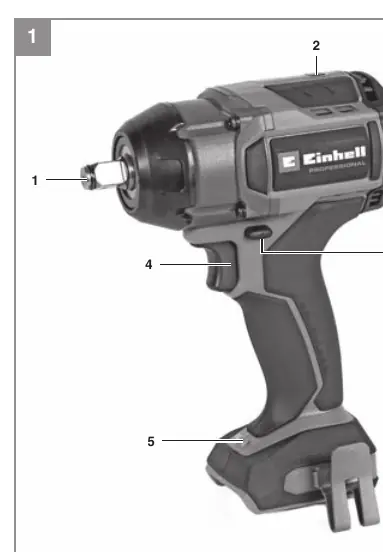
The impact wrench features a 1/2" external square drive mount, a selector switch for 4 operating modes (1, 2, 3, A), a direction changeover switch, an on/off trigger, and an integrated LED light for illuminating the work area.
Safety Instructions
- Always wear ear protection, a dust mask, and safety goggles.
- Do not work on materials containing asbestos.
- Store batteries in dry rooms at temperatures between +10°C and +40°C.
- Ensure the battery is at least 40% charged before storage.
Operation
Charging the Battery
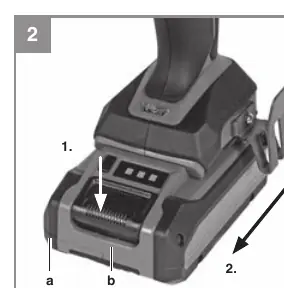
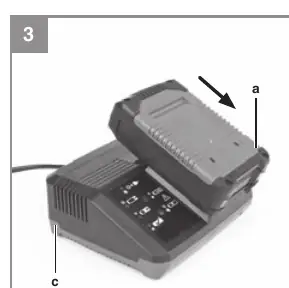
Remove the battery pack from the handle by pressing the pushlock button. Check that the mains voltage matches the charger's rating. Insert the charger into a power outlet; the green LED will flash. Slide the battery onto the charger. Refer to the charger indicator table in the manual for status meanings.
Using the Impact Wrench
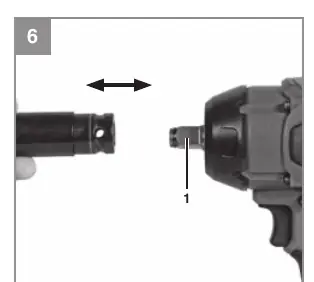
- Tool Change: Set the direction switch to the center position before changing tools. Push the required socket insert onto the square drive mount.
- Settings: Use the selector switch (1-2-3-A) to adjust speed and torque. Press the switch briefly to cycle through settings.
- Autostop (Setting A): In clockwise rotation, the device stops when resistance is detected to prevent overtightening. In counter-clockwise rotation, it stops when no resistance is detected to prevent the nut from falling out.
- Operation: Place the tool on the nut/bolt and press the on/off switch. For very tight or rusted nuts, loosen them manually first with a tire wrench.
Cleaning and Maintenance
Always remove the battery before performing any adjustments or cleaning. Keep air vents and the motor housing free of dust and dirt. Clean the device with a clean cloth or low-pressure compressed air. Do not use harsh cleaning agents or solvents.
Manufacturer information
Einhell
Practical help
Common problems
Battery does not charge
Check if the power socket has voltage and ensure the charger contacts are clean and making good contact.
Battery temperature fault
Remove the battery from the device and let it reach room temperature for one day. If the fault persists, the battery may be defective.
Device stops during use
Check the battery capacity indicator. If the battery is empty, recharge it. If it is overheated, let it cool down.
Before use
- Check for concealed electric, gas, or water lines in walls before drilling/screwing.
- Ensure the battery is fully charged.
- Use only suitable and undamaged socket inserts.
- Wear appropriate safety gear (goggles, ear protection, dust mask).
- Set the direction switch to the desired rotation.
Specs in practice
- Autostop (Setting A)
- A safety feature that stops the tool automatically to prevent overtightening or losing the nut.
Images and diagrams
- Fig 1: Overview of the tool components including the drive mount and selector switch.
- Fig 2-3: Battery removal and charging procedure.
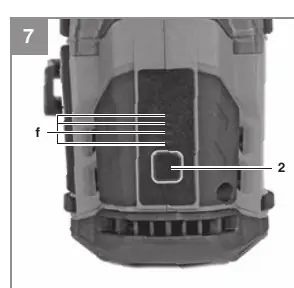
- Fig 7: Selector switch for speed/torque settings and LED indicators.
Model compatibility
- Use only original Einhell batteries and chargers.
- Torque limiters are recommended for tightening to specific torque requirements.

Manual page author
Emily Carter
User documentation editor
Prepares concise manual descriptions and highlights the most useful setup, operation, and maintenance information for readers.