Tools / Power Tools
Einhell TE-AG 18/115 Li Cordless Angle Grinder User Manual
Quick guide for the Einhell TE-AG 18/115 Li cordless angle grinder. Includes setup, operation, wheel changing, safety, and maintenance instructions.
Table of contents
Quick guide from the manual
This manual provides essential instructions for the safe and efficient operation of the Einhell TE-AG 18/115 Li cordless angle grinder. Always read the full safety instructions provided in the separate booklet before use.
Device Description
The angle grinder features the following main components:
- Spindle lock: Used to secure the spindle during wheel changes.
- ON/OFF switch: Operates the tool.
- Additional handle: Provides better control and stability.
- Guard: Protects the user from debris.
- Battery: Power source for the tool.
- Charger: Used to recharge the battery.
Before Starting
Before using the tool, ensure the battery is fully charged. An empty battery takes approximately 0.5 to 1 hour to charge. The additional handle can be mounted in three positions (A, B, C) to suit both left-handed and right-handed users. The safety guard must be adjusted to protect your hands and direct debris away from your body.
Operation
To switch on, push the ON/OFF switch to the right and then forward. To switch off, press the back of the switch, and it will return to the starting position. Always wait for the machine to reach its top speed before applying it to the workpiece.
Changing Grinding Wheels
Use the supplied face spanner to change wheels. Press the spindle lock to secure the spindle, then use the spanner to loosen the flange nut. Replace the wheel and tighten the nut. Note: Only press the spindle lock when the motor and spindle are at a complete standstill.
Maintenance and Cleaning
Keep all safety devices, air vents, and the motor housing free of dirt and dust. Wipe the equipment with a clean cloth or blow it with low-pressure compressed air. Clean the device regularly with a moist cloth and some soft soap. Do not use cleaning agents or solvents, as these can damage the plastic parts.
Charger Indicator
The charger features LED indicators to show the status of the battery:
- Ready for use: Green LED flashing.
- Charging: Red LED on.
- Charged: Green LED on.
- Temperature fault: Both LEDs on (battery too hot or too cold).
- Fault: Both LEDs flashing (battery defective).
Manufacturer information
Einhell
Practical help
Common problems
Battery not charging
Check if there is voltage at the socket and ensure good contact at the charging contacts.
Machine not starting
Check if the battery is charged and correctly inserted.
Vibrating wheels
Replace the wheel immediately.
Before use
- Charge the battery pack.
- Mount the additional handle in the desired position.
- Ensure the safety guard is securely mounted and adjusted.
- Check the grinding or cutting wheel for damage.
- Ensure the spindle lock is released.
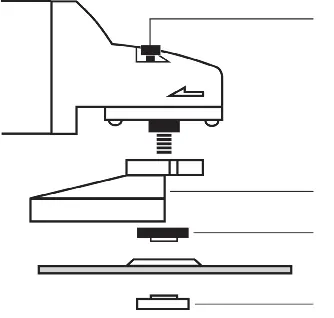
Images and diagrams
- Fig 1: Overview of components (spindle lock, switch, handle, guard, battery, charger).
- Fig 2: Mounting the additional handle in positions A, B, or C.
- Fig 3: Adjusting the safety guard.
- Fig 4: Operating the safety switch.
- Fig 7-10: Correct flange arrangements for different wheel types.
Model compatibility
- Use only wheels approved for at least 8,500 rpm and 52 m/s peripheral speed.
- Recommended: 4.0 Ah Power X-Change battery for best performance.

Manual page author
David Miller
Documentation analyst
Organizes user manual content into clear summaries, with attention to model details, product context, and everyday usability.