Tools / Power Tools
Einhell TP-CD 18/50-C Li-i BL Cordless Hammer Drill/Screwdriver User Manual
Quick guide for the Einhell TP-CD 18/50-C Li-i BL cordless hammer drill/screwdriver. Includes setup, operation, torque settings, Anti-Kickback system, and maintenance.
Table of contents
Manual images
Click an image to enlargeQuick guide from the manual
This manual provides essential instructions for the safe and efficient use of the Einhell TP-CD 18/50-C Li-i BL cordless hammer drill/screwdriver. Always read the safety instructions before use. Ensure the battery is charged and the correct drill bit or screwdriver bit is securely installed before starting work.
Device description
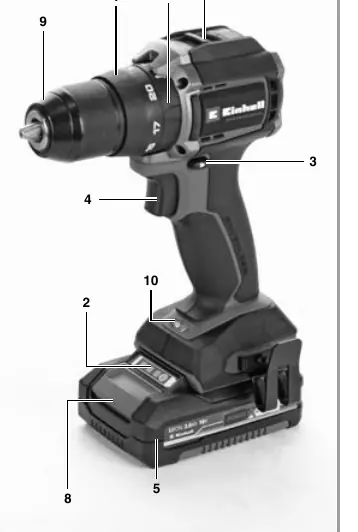
The device features a torque selector, battery capacity indicator, changeover switch for rotation direction, ON/OFF switch, gear selector (1st/2nd gear), quick-change drill chuck, LED lamp, and an Anti-Kickback system.
Operation
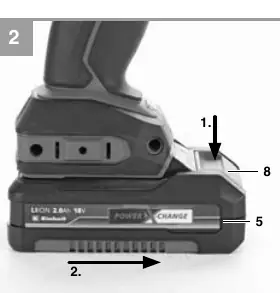
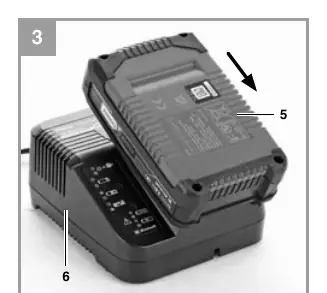
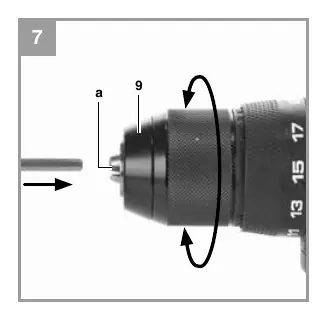
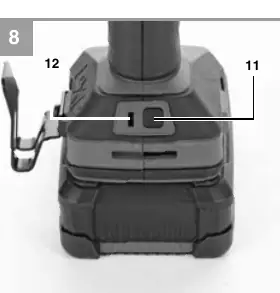
To charge the battery, remove it from the handle by pressing the pushlock buttons. Connect the charger to the mains and slide the battery onto the charger. The green LED indicates charging status. To change tools, set the rotation switch to the center position, open the chuck, insert the tool, and tighten the chuck securely.
Torque and gear settings
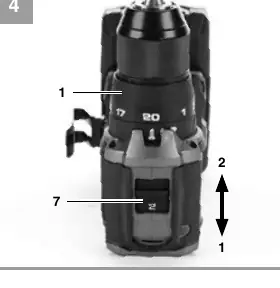
The torque is adjusted using the setting ring. The correct torque depends on the material, screw size, and length. Use the selector switch to choose between driving (screw), drilling (bit), or impact drilling (hammer). Always change gears and torque settings only when the tool is at a standstill.
Anti-Kickback system
The device is equipped with an Anti-Kickback system that detects sudden rotation due to blockage and switches off the device. If active, the green status LED lights up. If a kickback is detected, the device switches off and the LED flashes. The system can be temporarily deactivated using the Anti-Kickback button.
Cleaning and maintenance
Keep air vents and the motor housing free of dust and dirt. Clean the device regularly with a moist cloth and soft soap. Do not use cleaning agents or solvents. There are no internal parts requiring maintenance.
Charger indicator
The charger features LED indicators to show the status: flashing green means ready for use; solid red means charging; solid green means charged and ready; flashing red/green indicates a fault or temperature issue.
Manufacturer information
Einhell
Practical help
Common problems
Battery fails to charge
Check if there is voltage at the socket-outlet and ensure proper contact at the charging contacts.
Anti-Kickback system triggered
The device switches off automatically. Wait for the system to reset or use the Anti-Kickback button to temporarily deactivate.
Battery temperature fault
Remove the battery and store it at room temperature for one day.
Before use
- Check for concealed electric cables, gas, and water pipes in walls
- Use only sharp drill bits and suitable screwdriver bits
- Ensure the battery is fully charged
- Set the correct torque and gear for the task
Specs in practice
- 0-500 / 0-2000 rpm
- Idling speed for 1st and 2nd gear respectively.
Images and diagrams
- Fig 1: Device layout and component identification
- Fig 2-3: Battery removal and charging procedure
- Fig 4: Torque selector and gear switch operation
- Fig 5: Rotation direction switch and ON/OFF trigger
- Fig 7: Tool change using the quick-action chuck
Model compatibility
- Compatible with Einhell Power X-Change battery system.

Manual page author
David Miller
Documentation analyst
Organizes user manual content into clear summaries, with attention to model details, product context, and everyday usability.