Electronics / Monitors
User Manual for Ernitec 0070-24224-AC HDMI/VGA/BNC Monitor
Quick guide for the Ernitec 0070-24224-AC monitor. Learn how to connect devices, adjust OSD settings, install batteries, and troubleshoot common display issues.
Table of contents
Manual images
Click an image to enlargeQuick Guide
This manual provides instructions for the Ernitec 0070-24224-AC monitor. Before operating, ensure the monitor is placed on a stable surface and connected to a compatible power source. Always retain this manual for future reference and record the serial number located on the back cover for service inquiries.
Connection Options
The monitor features multiple input options located on the back panel:
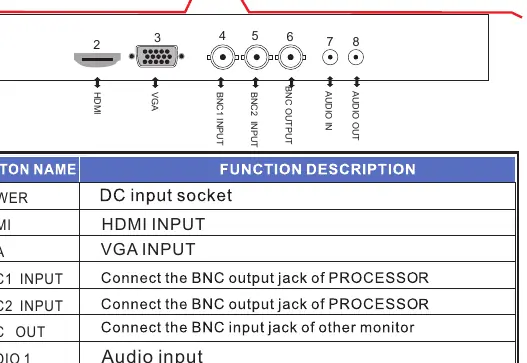
- DC12V: Power input socket.
- HDMI: HDMI input for high-definition video.
- VGA: VGA input for PC connection.
- BNC1/BNC2 Input: Used for professional video processors.
- BNC Output: Used to daisy-chain to another monitor.
- Audio In/Out: Ports for audio signal management.
For PC connections, the monitor supports plug-and-play capability via the VESA DDC protocol.
OSD Menu Setup
Use the buttons on the front panel or the remote control to navigate the On-Screen Display (OSD) menu:
- Picture Menu: Adjust Contrast, Brightness, Color, Tint, Sharpness, Color Temp, Aspect Ratio (4:3, Panorama, Zoom, Auto), and Picture Mode.
- Sound Menu: Adjust Bass, Treble, Balance, Sound Mode, and Auto Volume.
- Option/Function Menu: Configure OSD Language, OSD Duration, Transparency, and perform Software Updates via USB.
To adjust settings, press the MENU button to access the interface, use the arrow buttons to select the desired submenu, and press MENU again to enter. Adjust values as needed and press MENU to exit.
Remote Control
The remote control allows for convenient operation of the monitor. Key functions include:
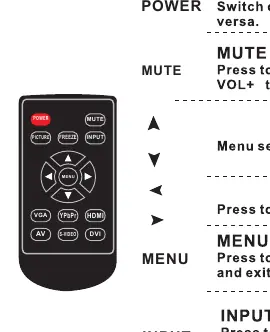
- POWER: Switch the monitor between standby and active modes.
- MUTE: Toggle sound on/off.
- INPUT: Cycle through available input sources (VGA, BNC1, BNC2, HDMI, YPbPr).
- PICTURE: Cycle through available picture modes.
- Navigation: Use arrow keys to navigate menus and adjust settings.
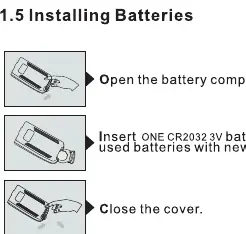
To install batteries, open the compartment on the back of the remote and insert one CR2032 3V battery, ensuring correct polarity.
Maintenance and Troubleshooting
Regular maintenance ensures optimal performance:
- Cleaning: Turn off and unplug the monitor before cleaning. Use a soft, dry, lint-free cloth for the cabinet. For the screen, use a soft cloth dampened with a mixture of lukewarm water and a mild fabric softener or dish detergent; wring until almost dry before wiping.
- Extended Absence: Unplug the power cord if the monitor will be unused for a long period to protect against power surges.
If you encounter issues, check the following:
- No sound/picture: Verify the power connection and that the monitor is turned on.
- Signal out of range: Adjust the resolution or frequency settings on your source device.
- Remote not working: Check battery installation and ensure there is no obstruction between the remote and the sensor.
Manufacturer information
Ernitec
Practical help
Common problems
No sound or picture
Check that the power plug is connected to a wall outlet, the power button is pressed, and contrast/brightness settings are correct.
Normal picture but no sound
Check the volume level, ensure the MUTE button is not active, and verify audio cable connections.
Signal out of range
Adjust the resolution, horizontal frequency, or vertical frequency on your source device.
Remote control does not work
Check if batteries are installed correctly (CR2032), ensure there is no obstruction, and verify the remote is within 7 meters.
Before use
- Ensure all cables (HDMI, VGA, BNC) are securely connected.
- Verify the power source matches the monitor requirements.
- Install a CR2032 3V battery in the remote control.
- Place the monitor on a stable, flat surface.
- Ensure the monitor is not exposed to water or excessive heat.
Specs in practice
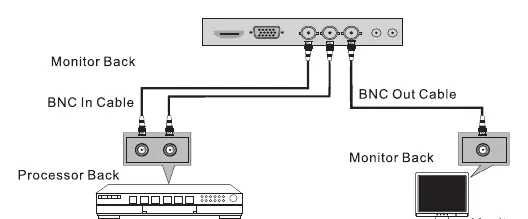
- BNC Input/Output
- Used for connecting professional video processors and daisy-chaining multiple monitors.
- Aspect Ratio
- Allows switching between display formats like 4:3, Panorama, Zoom1, Zoom2, and Auto.
Images and diagrams
- Connection Panel: Located on the back, includes DC12V, HDMI, VGA, BNC inputs/outputs, and Audio ports.
- Remote Control: Use to power on/off, select input source, adjust volume, and navigate OSD menus.
Model compatibility
- Supports VGA, HDMI, and BNC input sources.
- PC connection via VGA supports plug-and-play (DDC protocol).

Manual page author
David Miller
Documentation analyst
Organizes user manual content into clear summaries, with attention to model details, product context, and everyday usability.