Tools / Welding Equipment
Instruction Manual for ESAB Rogue ES 201i Arc Welder
Quick guide for the ESAB Rogue ES 201i arc welder. Includes installation, operation, maintenance, safety precautions, and troubleshooting steps.
Quick answers from the manual
Quick answer
- The ESAB Rogue ES 201i is an inverter-based power source for MMA welding. It operates on a 230V AC supply and features adjustable welding current and Arc Force. p. 7, 8
Key actions
- Connect welding and return cables to the positive (+) and negative (-) terminals based on electrode type. p. 12, 13
- Adjust welding current and Arc Force using the dials on the setting panel. p. 14
First start
- Ensure the unit is placed in a well-ventilated area, connect the power supply (230V), and attach the welding/return cables. p. 9, 10, 12
Problems and fixes
No Arc
Check power switch, power indicator, cable connections, and fuses.
p. 17Maintenance and reset
- Thermal protection resets automatically when the temperature has been sufficiently reduced. p. 13
Technical specifications
| Parameter | Value | Meaning | Pages |
|---|---|---|---|
| Supply voltage | 230 V ±15%, 1~ 50/60 Hz | Input power requirements | p. 8 |
| Current setting range | 20-200 A | MMA welding current range | p. 8 |
| Weight | 8 kg | Unit weight | p. 8 |
Where to find it in the PDF
- Installation p. 9, 10, 11
- Operation p. 12, 13, 14
- Maintenance p. 15, 16
Table of contents
Manual images
Click an image to enlargeQuick Guide from the Manual
The ESAB Rogue ES 201i is an inverter-based power source designed for MMA (Manual Metal Arc) welding. This manual covers essential safety, installation, operation, and maintenance procedures. Always ensure the unit is placed in a well-ventilated area and that the mains supply is disconnected before performing any maintenance.
Safety Precautions
- Electric Shock: Do not touch live electrical parts or electrodes with bare skin or wet clothing. Insulate yourself from work and ground.
- EMF: Welders with pacemakers should consult a physician before use. Route electrode and work cables together on the same side of your body.
- Fumes and Gases: Keep your head out of fumes and use proper ventilation.
- Fire Hazard: Ensure no flammable materials are nearby.
- Hot Surfaces: Do not touch parts bare-handed; allow for a cooling period.
- Class A Equipment: Not intended for use in residential locations where power is provided by the public low-voltage supply system.
Installation
Installation must be carried out by a professional.

- Location: Position the power source so that cooling air inlets and outlets are not obstructed. Maintain a minimum of 200 mm clearance on all sides.
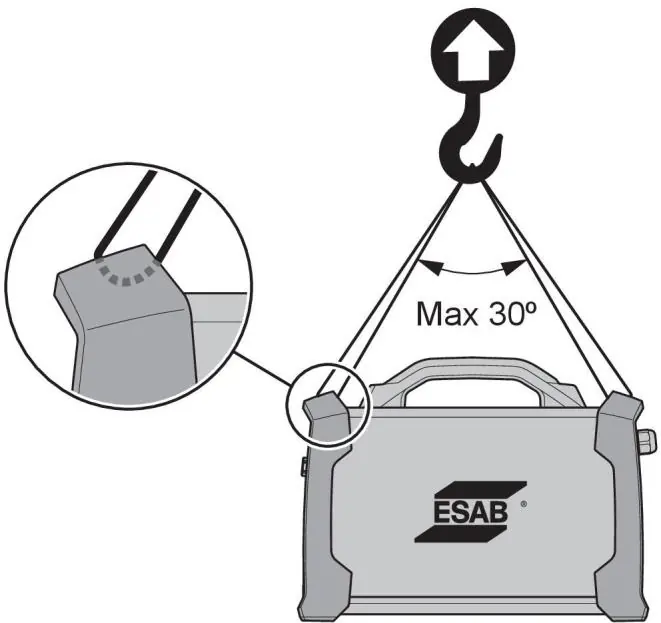
- Lifting: Use the handle on top of the case. If using a hoist, ensure the lifting angle is no more than 30 degrees.
- Mains Supply: The unit automatically adjusts to the supplied input voltage (230V AC). Ensure it is protected by the correct fuse rating and that a protective ground connection is made.
Operation
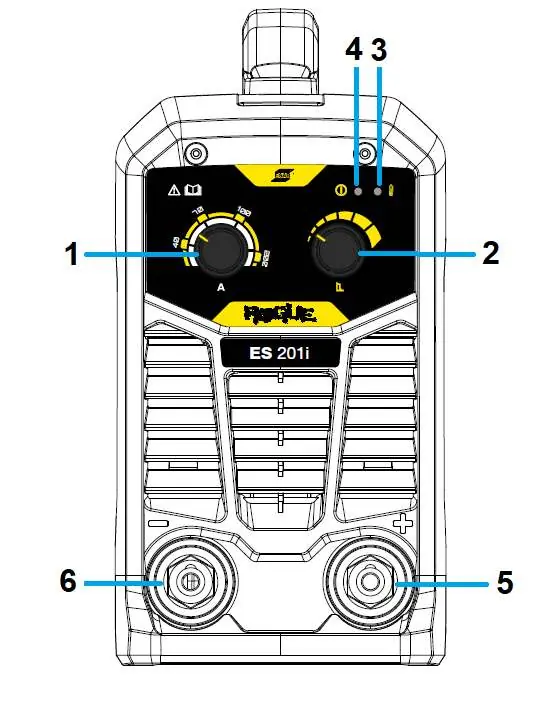
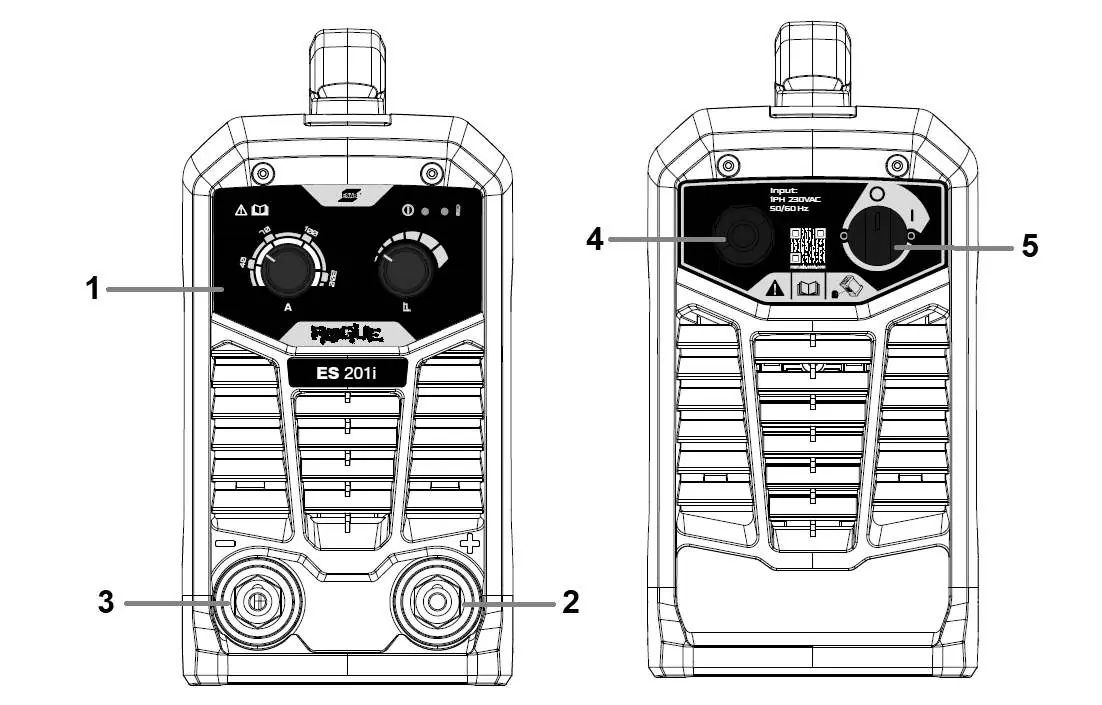
- Connections: The unit has a positive (+) and negative (-) welding terminal. Connection polarity depends on the electrode type; check the electrode packaging.
- Turning Power On/Off: Use the I/O switch. Do not turn off the power source during welding (under load).
- Thermal Protection: If overheating occurs, welding stops, and an indicator lights up. The system resets automatically once cooled.
- Arc Force: This function adjusts current in response to arc length variations. Use a low value for a calm arc with little spatter, and a high value for a hot, digging arc.
Maintenance
- Routine Maintenance: Check cables and the torch for damage before every use.
- Cleaning: Regularly clean the inside of the equipment using dry compressed air with reduced pressure. Disconnect from mains supply before cleaning.
- Intervals: Clean or replace unreadable labels and weld terminals every 3 months. Clean inside the equipment every 6 months.
Troubleshooting

- No Arc: Check if the power switch is on, the power indicator is lit, cables are connected, and fuses are intact.
- Thermal Protection Trips Frequently: Ensure the recommended duty cycle has not been exceeded, air inlets/outlets are not clogged, and clean the inside of the machine.
Manufacturer information
ESAB
Practical help
Common problems
No Arc
Check that the power switch is on, the power indicator is lit, welding/return cables are correctly connected, and electrical fuses are intact.
Thermal protection trips frequently
Ensure the recommended duty cycle has not been exceeded, check that air inlets/outlets are not clogged, and clean the inside of the machine.
Welding current interrupted
Check if the Over Temperature LED is on; if so, allow the unit to cool down.
Before use
- Ensure the power source is placed in a well-ventilated area.
- Verify that the welding and return cables are securely connected.
- Check that the torch is clean and undamaged.
- Ensure the mains supply is protected by the correct fuse rating.
- Confirm that no flammable materials are in the vicinity.
Images and diagrams
- The setting panel features controls for welding current and Arc Force, along with power and overheating indicators.
- Lifting instructions specify using the handle and maintaining a maximum 30-degree angle if using a hoist.
Model compatibility
- Class A equipment is not intended for use in residential locations.
- Requires 230V AC supply.
- Complies with IEC 61000-3-12 regarding short-circuit power.

Manual page author
David Miller
Documentation analyst
Organizes user manual content into clear summaries, with attention to model details, product context, and everyday usability.