Tools / Metalworking Tools
Operating Instructions for ELMAG AD 2060M P/PFC/MV Welding Inverter
Comprehensive operating instructions for the ELMAG AD 2060M P/PFC/MV TIG AC/DC welding inverter. Includes setup, operation, maintenance, troubleshooting, and spare parts information.
Quick answers from the manual
Quick answer
- The ELMAG AD 2060M P/PFC/MV is a TIG/TIG AC/DC welding inverter. Setup involves connecting the power supply, gas (for TIG), and welding cables. Operation is controlled via the front panel, where you can select welding modes (MMA/TIG), adjust parameters, and monitor for errors. p. 9, 12, 13
Key actions
- Sync wireless remote control p. 25, 26
- Set up MMA welding p. 19
- Set up TIG welding p. 21
Problems and fixes
No arc
Check earth cable, power supply, and mode selection.
p. 20, 29
Alarm light on
Overheating protection active; reduce duty cycle.
p. 29Error codes
| Code | Meaning | Action | Pages |
|---|---|---|---|
| E01-E04 | Overheating (thermal relay) | Allow machine to cool. | p. 30 |
| E11 | No water | Check water cooling system. | p. 30 |
| E12 | No gas | Check gas supply. | p. 30 |
Maintenance and reset
- Deactivate wireless remote control p. 26
Technical specifications
| Parameter | Value | Meaning | Pages |
|---|---|---|---|
| Input power | ~110V / ~230V, 50/60 Hz | Supported mains voltage. | p. 8 |
| Duty cycle (40°C) | 35% @ 200A (TIG) | Welding capacity at 230V. | p. 8 |
Where to find it in the PDF
- Technical Data p. 8
- Control Panel p. 13
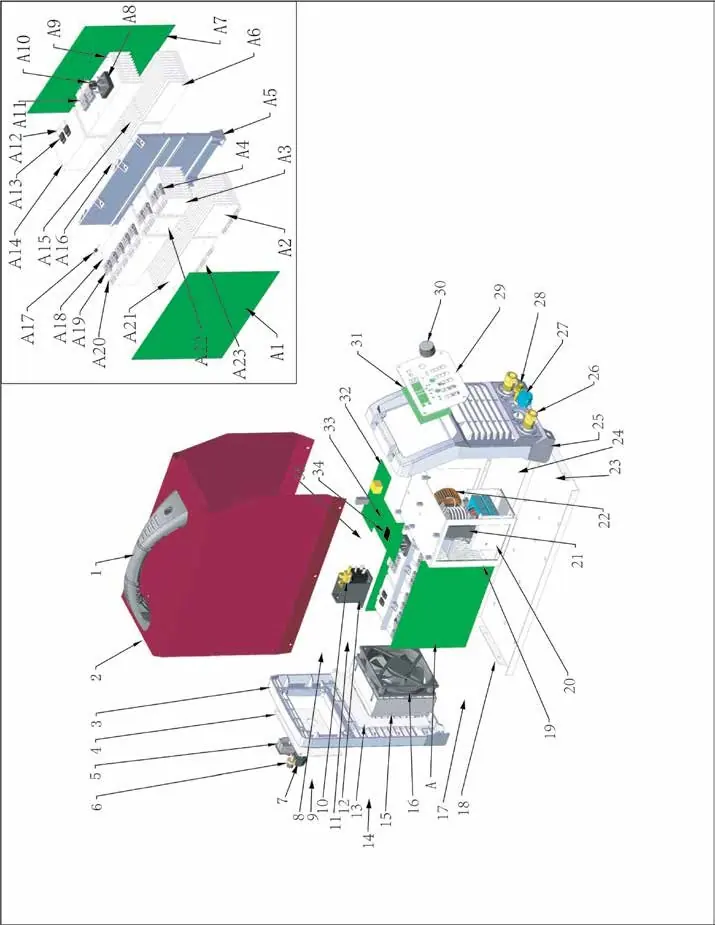
- Spare Parts p. 32, 33, 34
Table of contents
Manual images
Click an image to enlargeImportant Information
This manual provides essential safety, operation, and maintenance instructions for the ELMAG AD 2060M P/PFC/MV welding inverter. Users must read and understand the safety chapter before operating the machine. The device is intended for commercial and industrial use. Improper use can lead to serious injury or death. Always ensure the machine is de-energized before performing maintenance.
Product Description
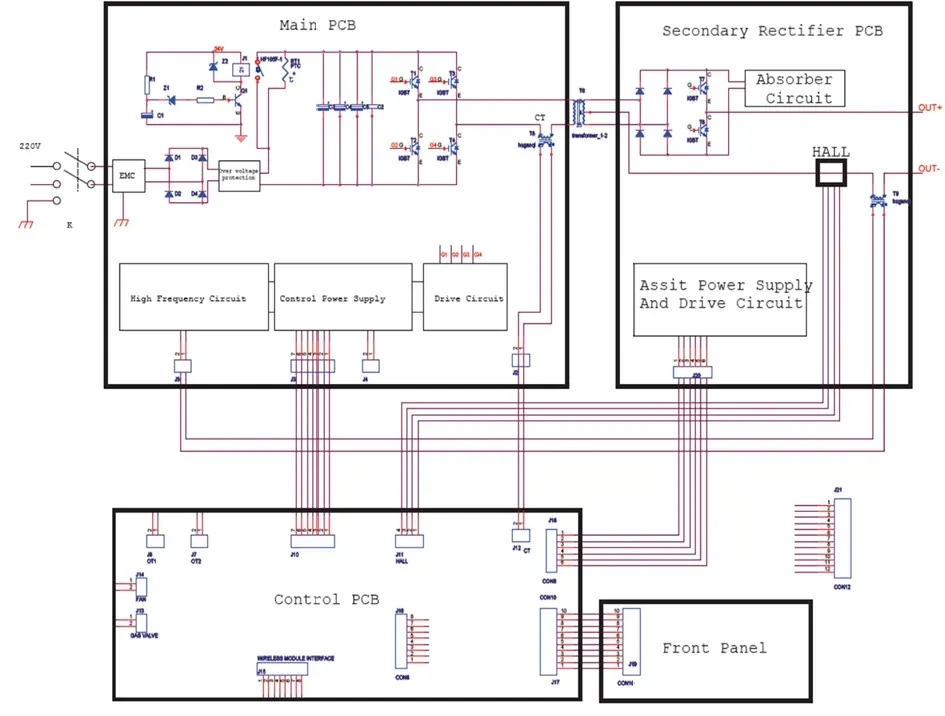
The AD 2060M P/PFC/MV is a TIG/TIG AC/DC welding inverter featuring:

- PFC technology for energy efficiency and stable welding.
- TIG HF ignition for non-contact starting or LIFT TIG for contact ignition.
- MMA/E-hand welding mode with adjustable arc force and hot start.
- Pulse function for thin surfaces.
- Digital display for precise parameter monitoring.
- Optional water cooling and remote control support.
Setup & Operation
Mains Connection: Must be installed by qualified personnel in compliance with local regulations.
MMA/E-Hand Welding: Connect the electrode holder to the positive terminal (DCEP) or negative terminal (DCEN) depending on the electrode type. Ensure the earth clamp is attached to clean, bare metal.
TIG Welding: Connect the TIG hosepack to the negative terminal. Connect the gas hose to the regulator and the machine's gas inlet. Adjust gas flow between 5-12 l/min. Select the appropriate ignition mode (HF or LIFT) on the control panel.
Remote Control: The machine supports wireless radio remote controls or wired foot pedals. Follow the synchronization procedure outlined in the manual to pair wireless accessories.
Maintenance & Troubleshooting
Regular maintenance is required to ensure safe operation. Perform daily checks on controls, cables, and the fan. Monthly audits should include cleaning the interior with dry compressed air. If the machine overheats, the alarm light will illuminate; allow the machine to cool for 10-15 minutes with the fan running.
Error Codes: The machine displays error codes (e.g., E01-E04 for thermal relay, E10-E16 for machine errors) to assist in troubleshooting. Refer to the full error code list in the manual for specific meanings and required actions.
Manufacturer information
ELMAG Entwicklungs und Handels GmbH
Practical help
Common problems
No arc
Check earth cable connection, ensure power supply is on, and verify the correct welding mode is selected.
Porosity in weld seam
Check for gas leaks, ensure gas flow is 5-12 l/min, clean base metal, and use dry electrodes.
Unstable arc
Lower the torch to 2-5 mm from the workpiece, clean the tungsten electrode, or check for loose connections.
Alarm light on
Overheating protection is active. Reduce welding current or duty cycle and allow the machine to cool.
Before use
- Ensure the power supply matches the machine requirements (110V/230V).
- Check that all cables (earth, torch, gas) are securely connected.
- Verify the gas cylinder valve is open and pressure is sufficient.
- Ensure the tungsten electrode is sharpened correctly.
- Check that the correct welding mode (MMA/TIG) is selected on the control panel.
- Wear appropriate protective clothing, gloves, and a welding mask.
Specs in practice
- PFC Technology
- Power Factor Correction ensures energy efficiency and stable welding even with fluctuating input voltage.
Images and diagrams
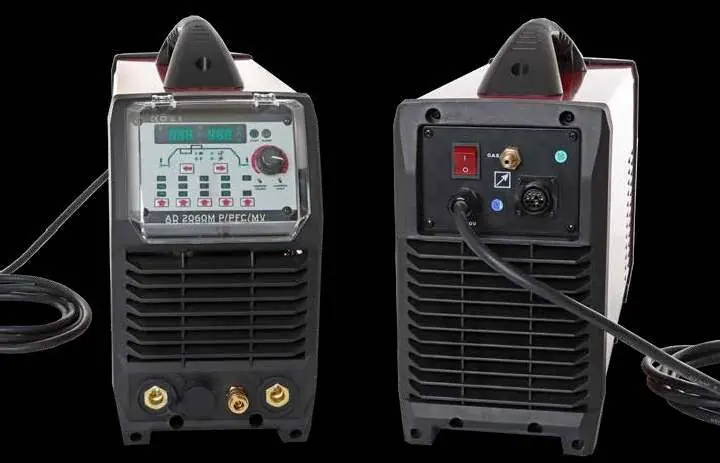
- Front Panel: Displays welding parameters, mode selection, and alarm indicators.
- Rear Panel: Contains the power switch, gas inlet, and connections for optional water cooling.
- TIG Connection: Shows the setup for the torch, gas, and earth cable.
Model compatibility
- Compatible with optional wireless radio hand or foot remote controls.
- Supports optional water cooling unit (WK1-MINI).
- Designed for 110V/230V AC power supply.

Manual page author
Michael Turner
Technical manual editor
Reviews PDF manuals for structure, safety notes, and practical product details so readers can find the right information quickly.