Tools / Welding Equipment
ESAB Rogue ET 201iP PRO TIG Welder Instruction Manual
Quick guide for the ESAB Rogue ET 201iP PRO TIG welder. Includes installation, operation, maintenance, troubleshooting, and technical specifications.
Quick answers from the manual
Quick answer
- The ESAB Rogue ET 201iP PRO is an inverter-based power source for MMA/Stick and TIG welding. It supports 120V/230V input and features LiftArc and HF start capabilities. p. 7
Key actions
- Connect welding and return cables p. 13
- Set welding parameters p. 16, 17
First start
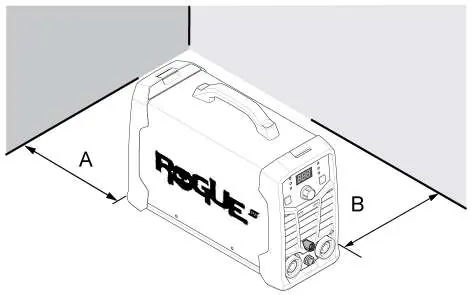
- Ensure proper location with 200mm clearance, connect cables, and turn on the power switch. p. 10, 13, 14
Problems and fixes
No arc
Check power switch, display, cable connections, and fuses.
p. 20Maintenance and reset
- Thermal protection is automatically reset once the temperature has decreased to a safe level. p. 14
Technical specifications
| Parameter | Value | Meaning | Pages |
|---|---|---|---|
| Weight | 9.6 kg | Unit weight | p. 9 |
| Operating temperature | -10 to +40 °C | Ambient temperature range | p. 8 |
Where to find it in the PDF
- Technical Data p. 8, 9
- Installation p. 10, 11, 12
- Operation p. 13, 14, 15, 16
- Maintenance p. 18, 19
- Troubleshooting p. 20
Table of contents
Manual images
Click an image to enlargeQuick guide from the manual
The ESAB Rogue ET 201iP PRO is an inverter-based power source designed for MMA (Stick) and TIG welding. This manual provides essential information for safe installation, operation, and maintenance. Always ensure the unit is installed by a professional and that all safety precautions are followed.
Safety
Warning: Arc welding and cutting can be injurious. Always wear appropriate personal protective equipment (PPE) such as safety glasses, flame-proof clothing, and safety gloves. Ensure the workplace is free from drafts and unauthorized persons. Be aware of electric shock hazards, electromagnetic fields (EMF), fumes, gases, and arc rays.
Installation
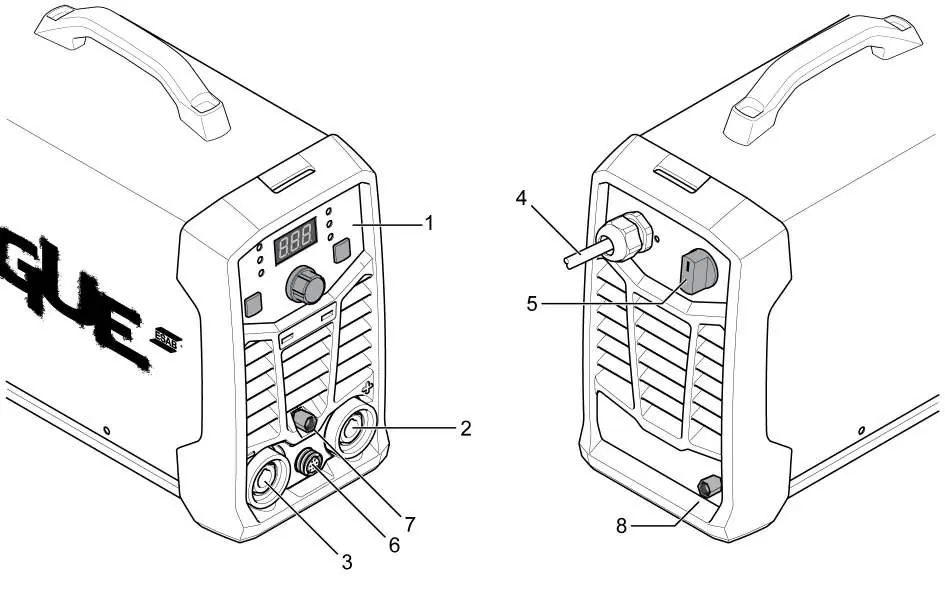
Location: Position the power source with at least 200 mm (8 in.) of clearance for cooling air inlets and outlets. Secure the equipment, especially on uneven or sloping ground.
Mains supply: The unit automatically adjusts to the supplied input voltage (120V or 230V). Ensure it is protected by the correct fuse rating and that a protective ground connection is made.
Operation
Connections: The front panel features positive and negative welding terminals. For TIG welding, the negative terminal is used for the torch. For MMA welding, polarity depends on the electrode type.
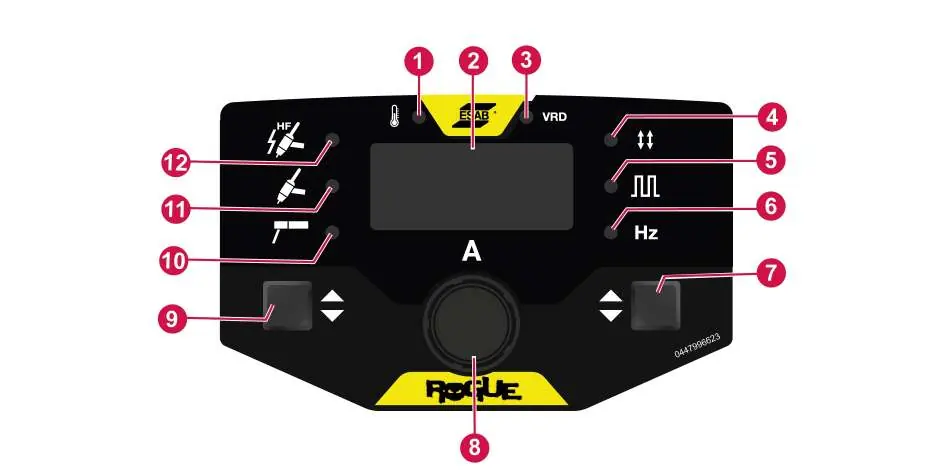
Welding Modes: The unit supports MMA/Stick, MMA pulse, TIG/GTAW, TIG pulse, and HF TIG welding. Use the Process selection button to switch between modes and the Control knob to adjust parameters.
Trigger Modes: Supports 2-stroke (2T) and 4-stroke (4T) modes for TIG welding.
Maintenance
Routine Maintenance: Regularly check that the product and cables are undamaged. Clean weld terminals and check cables every 3 months. Clean the inside of the equipment with dry compressed air every 6 months, depending on the environment.
Cleaning: Always disconnect the power source before cleaning. Use a vacuum cleaner to remove accumulated dirt and metal filings.
Troubleshooting
If you encounter issues, check the following before contacting a service technician:
- No arc: Check power switch, display, cable connections, and fuses.
- Thermal protection trips: Check duty cycle, ensure air inlets/outlets are not clogged, and clean the machine.
- Welding problems: Verify the correct welding process is selected, cables are connected properly, and the return clamp has good contact.
Manufacturer information
ESAB
Practical help
Common problems
No arc
Check that the power switch is on, the display is active, cables are connected, and fuses are intact.
Thermal protection trips frequently
Ensure the duty cycle is not exceeded, air inlets/outlets are not clogged, and clean the inside of the machine.
Welding current interrupted
Check if the Over Temperature LED (Thermal Protection) is illuminated on the setting panel.
Before use
- Ensure power is disconnected before performing any maintenance.
- Check that the product and cables are undamaged.
- Verify the torch is clean and in good condition.
- Ensure the return clamp has good contact with the workpiece.
- Wear appropriate PPE (safety glasses, flame-proof clothing, gloves).
- Ensure proper ventilation in the working area.
Images and diagrams
- Front panel controls (1-12) for setting welding parameters.
- Rear panel connections for gas and power.
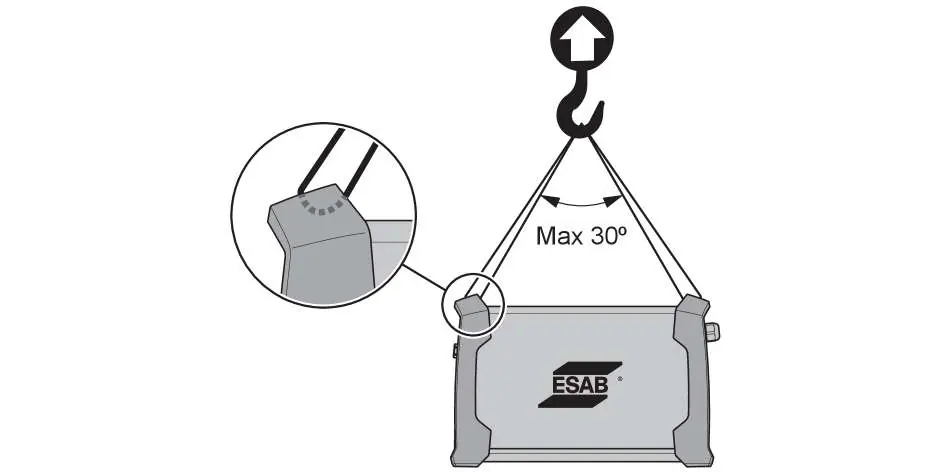
- Lifting instructions showing a maximum 30-degree angle for safe lifting.
Model compatibility
- Requires 120V or 230V supply.
- Compatible with ESAB approved coolant only.
- Compatible with remote control devices.

Manual page author
Michael Turner
Technical manual editor
Reviews PDF manuals for structure, safety notes, and practical product details so readers can find the right information quickly.