Lighting / Fixtures
Installation Guide for Eterna CFLEDWHSC 17W LED Ceiling/Wall Fitting
A comprehensive installation guide for the Eterna CFLEDWHSC 17W LED Ceiling/Wall Fitting. Includes step-by-step mounting instructions, wiring diagrams, technical specifications, and safety guidelines for qualified electricians.
Quick answers from the manual
Quick answer
- The Eterna CFLEDWHSC is a 17W LED ceiling/wall fitting. It must be installed by a qualified electrician, requires earth connection, and is suitable for bathroom zone 2 installations. p. 1, 2
Key actions
- Connect to earth p. 2
- Seal screw heads for moisture protection p. 2
First start
- Restore power and switch on after installation p. 2
Maintenance and reset
- Clean with a soft dry cloth p. 2
Technical specifications
| Parameter | Value | Meaning | Pages |
|---|---|---|---|
| Rated Wattage | 17W | Power consumption | p. 1 |
| Colour Temperature | 4200K | Light colour | p. 1 |
Where to find it in the PDF
- Specifications and Product Info p. 1
- Installation and Wiring p. 2
Table of contents
Manual images
Click an image to enlargeImportant Information
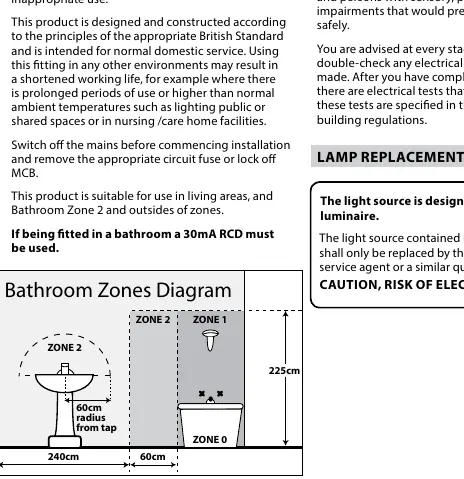
This product must be installed by a competent person in accordance with current building and IEE wiring regulations. Before commencing installation, switch off the mains and remove the appropriate circuit fuse or lock off the MCB. This fitting is designed for permanent connection to fixed wiring and is suitable for installation on surfaces with normal flammability (e.g., wood, plasterboard, masonry). It is not suitable for use on highly flammable surfaces like polystyrene or textiles.
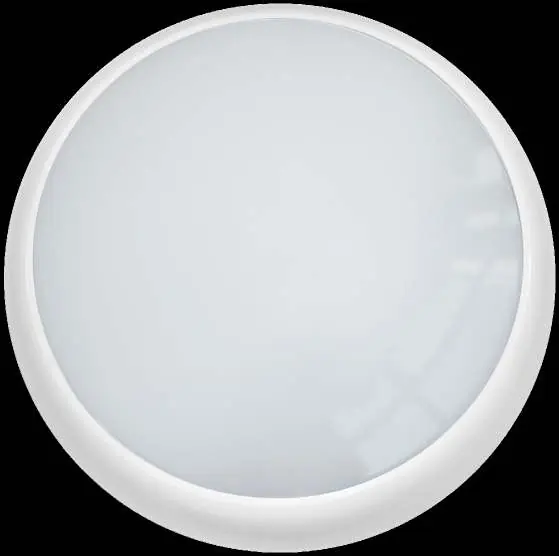
Technical Specifications
- Rated Wattage: 17W
- Colour Temperature: 4200K
- Lumens (with diffuser): 1350 lm
- Rated Lamp Lifetime: 35,000 hrs
- Voltage/Frequency: 240V~50Hz
- IP Rating: IP65
- Dimmable: No
Installation
- Hold the base of the fitting and gently turn the diffuser and decorative trim anti-clockwise to lift off.
- Drill holes in the back of the fitting for fixing screws, ensuring a clean hole.
- Use the back of the fitting as a template to mark the position of fixing holes on the mounting surface.
- Prepare the holes in the mounting surface.
- Pierce the rubber grommet in the back of the fitting to create a tight fit around the incoming mains cable.
- Thread the cable through the grommet and offer the fitting to the ceiling or wall.
- Secure the fitting in place. If protection against moisture ingress is required, cover screw heads with silicone or similar sealant.
- Check that the grommet is correctly fitted in the cable entry hole.
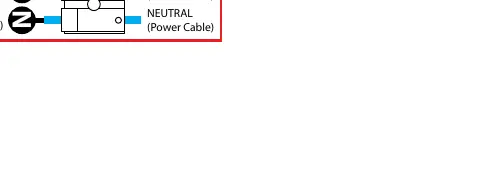
- Make electrical connections to the gear tray: Brown to Live (L), Blue to Neutral (N), and Yellow/Green to Earth (E).
- Offer the diffuser and decorative trim onto the top of the fitting and turn clockwise until secure.
- Restore power and switch on.
Wiring Connections
Ensure that terminals are tightened securely and that no strands of wire protrude. Check that terminals are tightened onto the bared conductors and not onto any insulation. The product must be connected to earth termination.
Bathroom Zones
This product is suitable for use in living areas, and Bathroom Zone 2 and outsides of zones. If fitting in a bathroom, a 30mA RCD must be used.
Cleaning and Maintenance
Clean the fitting only with a soft dry cloth. Do not use any chemical or abrasive cleaners. The light source is designed to last the lifetime of the luminaire and should only be replaced by the manufacturer, service agent, or a similar qualified person.
Manufacturer information
Eterna Lighting
Practical help
Common problems
Moisture ingress
Ensure the rubber grommet is correctly fitted around the cable and seal screw heads with silicone if necessary.
Fitting not secure
Ensure the fitting is mounted to a solid surface like a ceiling joist and that all fixings are tightened.
Before use
- Verify you have all parts listed on the front of the booklet.
- Ensure the mounting surface is not highly flammable.
- Check for hidden pipes or cables behind the mounting surface.
- Ensure the power is isolated at the mains.
- Confirm the installation location complies with bathroom zone regulations if applicable.
Images and diagrams
- Wiring: Connect Brown to Live (L), Blue to Neutral (N), and Yellow/Green to Earth (E).
- Bathroom Zones: The diagram illustrates safe installation zones (Zone 1, Zone 2, Zone 0) relative to water sources.
Model compatibility
- Not suitable for accent lighting.
- Not dimmable.
- Suitable for Bathroom Zone 2 and outside zones.

Manual page author
David Miller
Documentation analyst
Organizes user manual content into clear summaries, with attention to model details, product context, and everyday usability.