Lighting / Fixtures
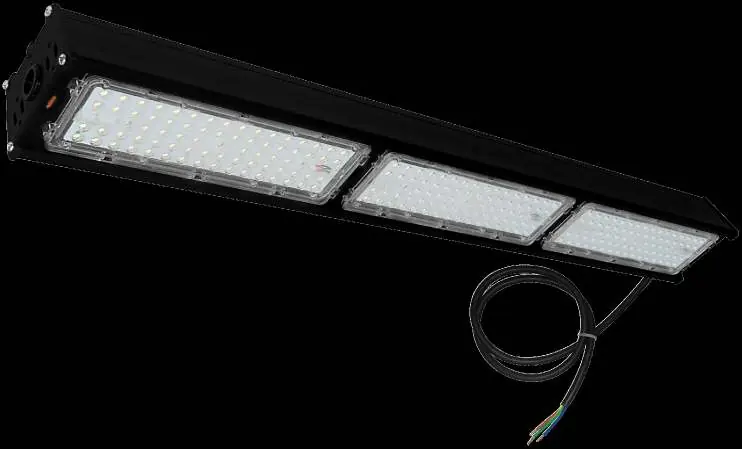
Installation Instructions for Eterna HBAYLIN 150W Linear LED High Bay
A comprehensive installation and usage guide for the Eterna HBAYLIN 150W Linear LED High Bay. Includes detailed steps for suspension and bracket mounting, wiring diagrams, safety warnings, and technical specifications.
Table of contents
Manual images
Click an image to enlargeQuick guide from the manual
This document provides installation guidelines for the Eterna HBAYLIN 150W Linear LED High Bay. The product is designed for professional use and must be installed by a qualified electrician in accordance with current building and IEE wiring regulations. Ensure the mounting surface is strong enough to support the weight of the fitting.
Safety and Installation Requirements
- Indoor use only: This product is not suitable for outdoor or accent lighting.
- Qualified installation: Must be installed by a competent person.
- Clearance: Maintain at least 0.5m (500mm) distance between the luminaire and any illuminated surface.
- Power isolation: Always switch off the mains and remove the appropriate circuit fuse or lock off the MCB before starting installation.
- Earthing: This product must be connected to earth termination.
- Environment: Avoid environments with prolonged high ambient temperatures, as this may shorten the working life of the fitting.
Technical Specifications
- Rated Wattage: 150W
- Luminaire Lumens: 21460 lm (with diffuser)
- Colour Temperature: 6300K
- Beam Angle: 90°
- Voltage / Frequency: 240V~50-60Hz
- Colour Rendering: ≥80
- Lifetime: 40,000 hrs
Suspending the Fitting
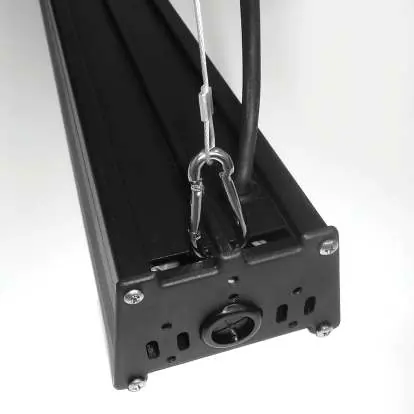
- Choose the location for the fitting.
- Isolate the mains power.
- Secure the ceiling cup to the mounting surface, ensuring fixings are sufficient to hold the weight.
- Clip the carabiner to the slots in the back of the luminaire nearest the end cap.
- Terminate the loose ends of wire to an appropriate junction box.
- Restore power and test the luminaire.
Mounting with Brackets
- Choose the location for the fitting.
- Isolate the mains power.
- Secure the brackets to the end caps using the supplied allen key.
- Use the brackets as a template to mark the position of fixing holes on the mounting surface.
- Prepare the holes and secure the fitting in place.
- Terminate the loose ends of wire to an appropriate junction box.
- Adjust the fitting as required and secure in position with the two bracket screws at both ends.
- Restore power and test the luminaire.
Wiring and Electrical Connections
When making connections, ensure terminals are tightened securely and no strands of wire protrude. Check that terminals are tightened onto bared conductors, not insulation.
- Live: Brown or Red
- Neutral: Blue or Black
- Earth: Green and Yellow
Maintenance and Disposal
Cleaning: Clean the product only with a soft dry cloth. Disconnect the power and clean the exterior only with a moist (not wet) cloth. Do not use chemical or abrasive cleaners.
Lamp Replacement: The light source is designed to last the lifetime of the luminaire and shall only be replaced by the manufacturer, service agent, or a similar qualified person.
Disposal: This product is subject to WEEE regulations. Do not dispose of with household waste; recycle where facilities exist.
Manufacturer information
Eterna Lighting
Practical help
Common problems
Fitting is loose or unstable
Ensure fixings are strong enough to support the weight and that bracket screws are tightened at both ends.
Shortened working life
Ensure the fitting is not installed in an environment with prolonged periods of use or higher than normal ambient temperatures.
Electrical connection issues
Double-check that terminals are tightened onto bared conductors and not onto insulation, and that no strands of wire protrude.
Before use
- Verify all parts are present (LED fitting, suspension kit, mounting bracket kit).
- Ensure installation is performed by a qualified electrician.
- Confirm the mounting surface can support the weight of the fitting.
- Ensure the power is isolated at the mains before starting.
- Check that the installation location is indoors and allows for 0.5m clearance.
Specs in practice
- Rated Wattage
- 150W power consumption.
- Colour Temperature
- 6300K, providing a cool daylight appearance.
Images and diagrams
- Suspension kit: Includes ceiling cups, cables, and carabiners for hanging installation.
- Mounting bracket kit: Includes brackets, screws, and an allen key for fixed installation.
Model compatibility
- Indoor use only.
- Not suitable for accent lighting.
- Must be connected to earth termination.

Manual page author
David Miller
Documentation analyst
Organizes user manual content into clear summaries, with attention to model details, product context, and everyday usability.