Tools / Drills
User manual for Fieldmann FDV 10345-A Cordless Drill
Quick guide for the Fieldmann FDV 10345-A cordless drill. Includes setup, battery charging instructions, torque settings, drilling techniques, maintenance, and troubleshooting.
Table of contents
Quick guide from the manual
The Fieldmann FDV 10345-A is a cordless drill designed for home use. Before first use, ensure the battery is fully charged (3-5 hours). Always check that the drill bit is correctly inserted and tightened, and that the direction switch is set to the desired rotation. Wear appropriate protective gear, including eye and ear protection, and secure your workpiece before drilling.
Description of the machine
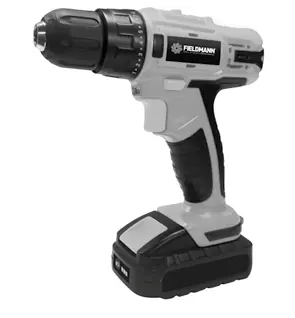
- A: Keyless chuck
- B: Torque and impact adjustment ring
- C: Forward/reverse switch and neutral lock
- D: Trigger switch
- E: Handle
- F: LED battery charge indicator
- G: Battery
- H: 2-speed switch
- I: Work area LED light
Operation
Charging the battery
Remove the battery from the drill by pressing the release button. Place the charger on a table near a power outlet and insert the battery. Connect the charger to the mains. A red and green light will indicate charging. Once fully charged, the green light remains on and the red light turns off.
Chuck adjustment
To open the chuck, hold the rear part and rotate the front part counter-clockwise. Insert the tool, then rotate the front part clockwise to tighten, ensuring the jaws grip the tool evenly.
Torque and impact settings
The torque control (18+1 positions) allows for precise screw driving. Use low values for small screws and soft materials, and high values for large screws and hard materials. Start at the lowest setting and increase until the desired torque is reached.
On/Off
Press the trigger switch to start the drill. The pressure applied determines the speed. Release the trigger to stop. Use the forward/reverse switch to change rotation direction. Set to the neutral (middle) position when not in use to prevent accidental starting.
Usage
Screwing
Drill a pilot hole before driving screws into wood to prevent surface damage. Use low speeds for better control.
Drilling
Do not use torque control for drilling. Use wood bits for wood, and metal bits for metal or plastic. Use high speeds for soft wood and low speeds for hard wood.
Maintenance and storage
Clean the tool after every use with a soft cloth. Do not use harsh detergents or solvents. Regularly check for wear and tear. If the tool is damaged, have it repaired by an authorized service center. Store in a dry place away from heat sources and out of reach of children.
Troubleshooting
- Product won't start: Check power connection, check cable/plug, or consult an electrician.
- Low performance: Ensure the extension cable is suitable, check power supply voltage, and clean air vents.
- Unsatisfactory results: Replace worn or damaged drill bits; ensure the bit is suitable for the material.
- Excessive vibration or noise: Replace worn bits and tighten any loose screws or nuts.
Technical data
- Voltage: 14.4V
- No-load speed: 0-350 / 0-1400 rpm
- Battery: 1.3 Ah, Li-ion
- Torque settings: 18+1
- Max drilling diameter: 10 mm
Manufacturer information
Fieldmann
Practical help
Common problems
Product does not start
Check if connected to the mains, inspect the power cable/plug, or have the power supply checked by an electrician.
Product does not reach full power
Use a suitable extension cable, check if the power source voltage is sufficient, and clean blocked air vents.
Unsatisfactory drilling results
Replace worn or damaged drill bits and ensure the bit type is appropriate for the material being drilled.
Excessive vibration or noise
Replace worn/damaged bits and tighten any loose screws or nuts on the tool.
Before use
- Charge the battery fully (3-5 hours for the first charge).
- Ensure the drill bit is correctly inserted and tightened in the chuck.
- Check that the direction switch is set to the desired rotation.
- Secure the workpiece to a workbench or with a clamp.
- Check for hidden electrical wires in walls using a detector.
Specs in practice
- No-load speed
- 0-350 rpm (low gear) / 0-1400 rpm (high gear).
- Torque settings
- 18+1 positions for adjusting driving force.
- Max. diameter
- Maximum drilling capacity of 10 mm.
Images and diagrams
- A: Keyless chuck for tool insertion.
- B: Adjustment ring for torque and impact settings.
- C: Forward/reverse switch for rotation control.
- D: Trigger switch for speed control.
- H: 2-speed gear selector.
Model compatibility
- Use only the battery and charger supplied with this tool.
- Not intended for professional use.
- Do not use in explosive environments.

Manual page author
Emily Carter
User documentation editor
Prepares concise manual descriptions and highlights the most useful setup, operation, and maintenance information for readers.