Lighting / Stage Lighting
User Manual for Flash LED PAR 36 12W RGB
Quick guide for the Flash LED PAR 36 12W RGB stage light. Includes installation, DMX connection, channel mapping, and safety instructions.
Table of contents
Manual images
Click an image to enlargeQuick guide from the manual
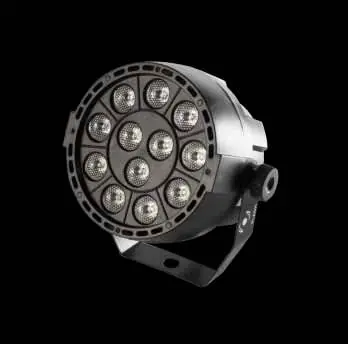
The Flash LED PAR 36 12W RGB is a stage lighting fixture designed for professional use. This manual covers safety, installation, DMX connection, and operation modes. Always ensure the fixture is installed by qualified personnel and that the power supply matches the requirements (100-240V, 50/60Hz).
Safety Information
- Maximum ambient temperature is 40°C.
- Do not connect the device to any dimmer pack.
- Ensure the yellow/green conductor is grounded to earth.
- Disconnect main power before servicing.
- Do not look directly at the LED light spot while the fixture is on.
- Use a safety chain when fixing the fixture.
- Do not expose the fixture to rain or moisture.
Installation
The unit should be mounted via the screw holes on the bracket. Ensure the structure can support 10 times the weight of the unit. Always use a safety cable that can hold 12 times the weight of the unit. Install in a well-ventilated area, at least 15cm away from walls or ceilings, and ensure ventilation openings are not blocked.
Connection
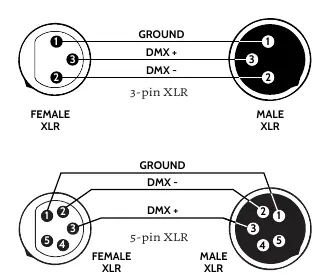
The device uses a powerCON connector for power and 3-pin or 5-pin XLR sockets for DMX signal. When connecting DMX, ensure the last fixture in the chain is terminated with a 120Ω resistor between signal (-) and signal (+).
DMX Channel Mapping
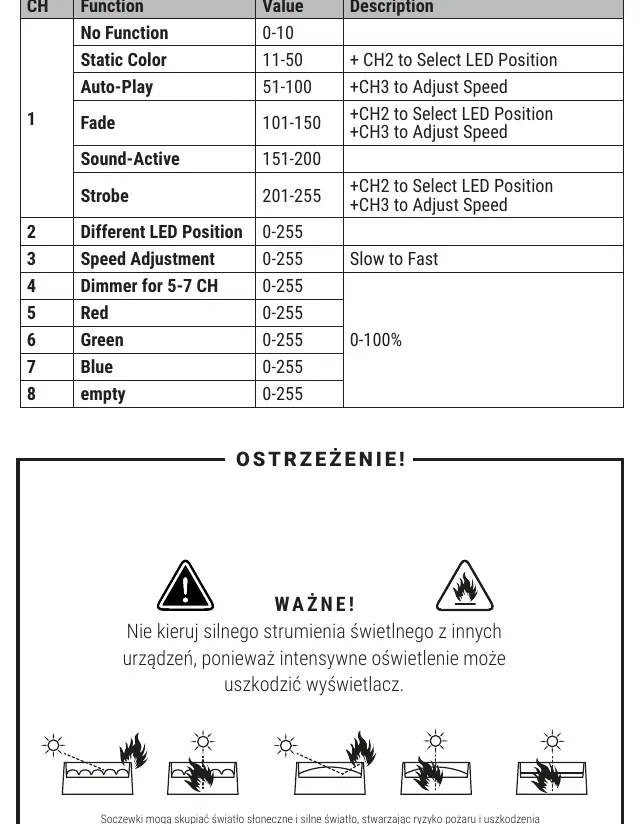
The device operates in an 8-channel DMX mode:
- Channel 1: Function selection (0-10: No Function, 11-50: Static Color, 51-100: Auto-Play, 101-150: Fade, 151-200: Sound-Active, 201-255: Strobe).
- Channel 2: Different LED Position (0-255).
- Channel 3: Speed Adjustment (0-255, Slow to Fast).
- Channel 4: Dimmer for 5-7 CH (0-255, 0-100%).
- Channel 5: Red (0-255).
- Channel 6: Green (0-255).
- Channel 7: Blue (0-255).
- Channel 8: Empty.
Maintenance
Do not use organic solvents to clean the fixture housing. If the housing is visibly damaged, it must be replaced. In case of serious operating problems, stop using the fixture immediately and contact an authorized technical assistance center.
Practical help
Common problems
Fixture does not turn on
Check the power supply connection and ensure the powerCON connector is securely plugged in.
DMX signal issues
Ensure the last fixture in the DMX chain is terminated with a 120Ω resistor.
Overheating
Ensure the fixture is installed in a well-ventilated area with at least 15cm clearance and that fans are working.
Before use
- Check for transportation damage before use.
- Verify that the power supply voltage (100-240V) matches the fixture requirements.
- Ensure the fixture is properly grounded.
- Install a safety chain/cable.
- Ensure the mounting structure can support 10x the unit's weight.
Specs in practice
- Light Source
- 12 pieces of 3W LEDs.
- Power Consumption
- 40W total power draw.
Images and diagrams
- The DMX wiring diagram shows the pinout for 3-pin and 5-pin XLR connectors, identifying Ground, DMX+, and DMX- pins.
Model compatibility
- Do not connect to any dimmer pack.
- Maximum ambient temperature: 40°C.
- Use only authorized spare parts for repairs.

Manual page author
Michael Turner
Technical manual editor
Reviews PDF manuals for structure, safety notes, and practical product details so readers can find the right information quickly.