Lighting / Stage Lighting
User Manual for Flash PAR 12X20W 6in1 WDMX Battery Stage Light
Quick guide for the Flash PAR 12X20W 6in1 WDMX Battery IP65 stage light. Includes installation, DMX connection, wireless setup, and operation instructions.
Table of contents
Manual images
Click an image to enlargeQuick Guide from the Manual
This document provides instructions for the Flash PAR 12X20W 6in1 WDMX Battery IP65 stage light. Key operations include wireless DMX control, battery management, and various lighting modes. Always ensure the fixture is securely mounted with a safety cable and that the power supply matches the 100-250V requirement.
Product Overview
The fixture is a battery-powered, wireless DMX intelligent RGBAW UV color light. It features 12 static colors, wireless 2.4G transmission, and supports master/slave, auto, sound active, and IR remote control modes.
Installation
The unit must be mounted via screw holes on the bracket. Ensure the structure can support 10 times the weight of the unit. A safety cable capable of holding 12 times the weight of the fixture must be used. The fixture can be installed in any orientation, but if installed horizontally with a downward beam-angle, ensure moisture does not pool in the fan wells.
Connection
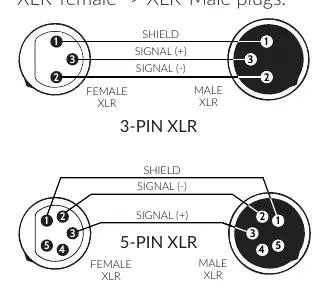
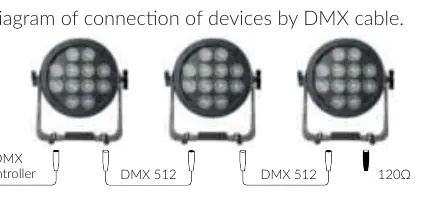
The device uses 3-pin or 5-pin XLR sockets for DMX and TrueCON sockets for power. For DMX, the last fixture in the chain must be terminated with a 120-ohm resistor between signal (-) and signal (+).
Operation
Wireless Control: Set the fixture to 2.4G wireless mode (ON), select an ID Group (1-7), and match the ID Group (A001) with the transmitter.
DMX Mode: Set the fixture to Sl1 or Sl2 mode via the menu. The fixture will enter standby mode to catch the DMX signal.
Mobile App Control: Install the 'LED light' app. Switch the fixture to WiFi mode. Search for the WiFi address starting with 'LED' on your phone and connect.
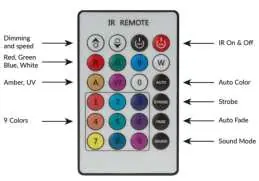
IR Remote: Use the provided IR remote for direct control of dimming, speed, colors, and modes.
Maintenance and Safety
The fixture includes temperature protection. If the temperature reaches 50-59°C, brightness reduces by 30%; at 60-69°C by 25%; at 70-79°C by 30%; and at 80°C, the unit turns off automatically. Always disconnect power before servicing. Do not look directly into the light source.
Practical help
Common problems
Wireless signal indicator is not green
Ensure the signal switch is on and the fixture is within range. Press the black button below the LED indicator until it shows red, then sync with the transmitter until it turns green.
Light does not turn on
Ensure the power switch is activated. If charging, the light may not illuminate unless the power switch is turned on.
Brightness drops unexpectedly
The fixture has built-in temperature protection. If the unit overheats (above 50°C), it will automatically reduce brightness to protect the LEDs.
Before use
- Check for transportation damage.
- Verify power supply voltage (100-250V).
- Ensure proper grounding of the yellow/green conductor.
- Charge the battery for at least 4 hours before first use.
- Install a safety cable capable of holding 12x the fixture's weight.
Specs in practice
- 12x18 6in1 LEDs
- 12 LEDs, each containing 6 colors (Red, Green, Blue, Amber, White, UV).
- DMX Channels
- Supports 2, 6, 8, or 11 channel modes for different levels of control.
Images and diagrams
- DMX Wiring: Shows pinout for 3-pin and 5-pin XLR connectors (Shield, Signal +, Signal -).
- IR Remote: Illustrates buttons for dimming, speed, color selection, and mode activation.
Model compatibility
- Supports wired RDM.
- Compatible with wireless DMX transmitters.
- Mobile app control requires the 'LED light' app.

Manual page author
Michael Turner
Technical manual editor
Reviews PDF manuals for structure, safety notes, and practical product details so readers can find the right information quickly.