Lighting / Stage Lighting
User Manual for Flash Moving Head 12R
Comprehensive user guide for the Flash Moving Head 12R. Includes installation procedures, DMX channel mapping, safety warnings, menu navigation, and maintenance tips for professional stage lighting.
Table of contents
Manual images
Click an image to enlargeQuick Guide
The Flash Moving Head 12R is a professional stage lighting fixture. Before operation, ensure the unit is securely mounted and the power supply voltage matches the requirements (100-240V, 50/60Hz). Always use a safety cable and ensure the fixture is installed by professionals. The device supports DMX512, Manual, Auto, Sound-controlled, and Master/Slave modes.
Safety Information
- Mounting: Use two clamps to rig the fixture. Do not hang from a single clamp. Lock each clamp with 1/4-turn fasteners (turned 90 degrees clockwise).
- Sunlight Warning: Never expose the front lens to direct sunlight or strong light sources, as the lens can focus rays and cause a fire hazard.
- Electrical Safety: Ground the yellow/green conductor. Do not connect to any dimmer pack. Disconnect power before servicing.
- Handling: Do not handle the fixture by the head; always use the base.
- Environment: Maximum ambient temperature is 40°C. Do not expose to rain or moisture.
Installation
The unit must be mounted via screw holes on the bracket. Ensure the structure can support 10 times the unit's weight. Always use a safety cable capable of holding 12 times the unit's weight. The fixture must be installed in a location inaccessible to the public.
Connection
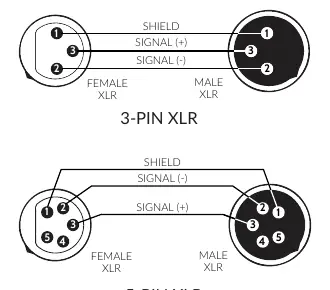
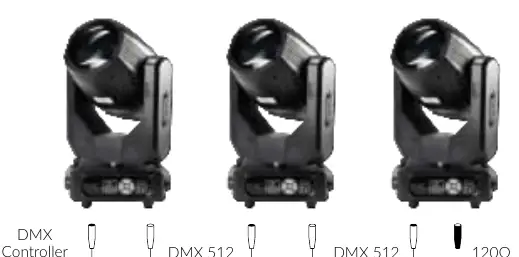
The device features DMX (in/out) via 3-pin or 5-pin XLR sockets and power (in/out) via powerCON connectors. For DMX, the last fixture in the chain must be terminated with a 120Ω resistor between signal (-) and signal (+). The maximum number of devices connected in series via power cable is 4 units.
Operation and Menu
The fixture is controlled via an onboard menu system. Use the MENU, ENTER, UP, and DOWN buttons to navigate settings. Key settings include DMX address, Lamp control, Pan/Tilt inversion, and Auto mode configurations. The DMX chart provides 16 channels for controlling Pan, Tilt, Strobe, Dimmer, Color, Gobo, Prism, and Focus.
Maintenance
If the lamp is turned off, wait 20 minutes for full cooling before restarting. Frequent switching reduces lamp life. In case of cable damage, do not attempt repairs; contact authorized personnel. The housing must be replaced if visibly damaged.
Practical help
Common problems
Base moves during operation
Ensure the fixture is securely fastened to a surface or rigging hardware; the pan/tilt motor torque can cause movement if unsecured.
Display damaged
Do not point strong light output from other fixtures directly at the 12R.
Lamp is dark or has short life
Ensure voltage is within ±10% of requirements. Allow 20 minutes for cooling before restarting.
DMX signal issues
Ensure the last fixture in the DMX chain is terminated with a 120Ω resistor between signal (-) and signal (+).
Before use
- Unpack and check for transportation damage.
- Verify power supply voltage and frequency match the fixture requirements.
- Ensure the yellow/green conductor is properly grounded.
- Use two clamps for rigging.
- Attach a safety cable capable of holding 12 times the unit's weight.
- Ensure the installation location is out of reach of people.
Specs in practice
- Power consumption
- 310 W
- DMX channel mode
- 16 channels
Images and diagrams
- DMX Wiring: Shows pinout for 3-pin and 5-pin XLR connectors (Shield, Signal +, Signal -).
- DMX Termination: Illustrates the placement of a 120Ω resistor at the end of the DMX chain.
- Sunlight Warning: Visual guide showing the danger of focusing sunlight through the lens.
Model compatibility
- Do not connect to any dimmer pack.
- Maximum number of devices connected in series via power cable is 4 pcs.

Manual page author
David Miller
Documentation analyst
Organizes user manual content into clear summaries, with attention to model details, product context, and everyday usability.