Furniture / Storage Shelving
Assembly Instructions for Furinno 22061 3-Tier Bookcase
A comprehensive assembly guide for the Furinno 22061 3-Tier Bookcase. Includes step-by-step installation instructions, hardware lists, and safety guidelines for proper setup and wall mounting.
Quick answers from the manual
Quick answer
- This document provides assembly instructions for the Furinno 22061 3-Tier Bookcase. It covers the hardware list, step-by-step assembly, and safety precautions. p. 1, 2, 3, 4
Key actions
- Assemble the frame using the Minifix system. p. 2, 3, 4
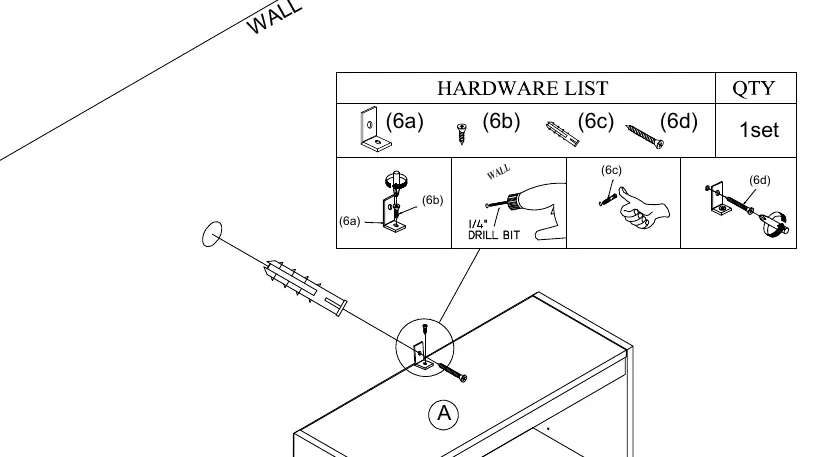
- Secure the unit to the wall. p. 2
Maintenance and reset
- Clean the product with a mild cleanser using a soft, damp cloth. Do not use harsh or abrasive cleaners. p. 2
Technical specifications
| Parameter | Value | Meaning | Pages |
|---|---|---|---|
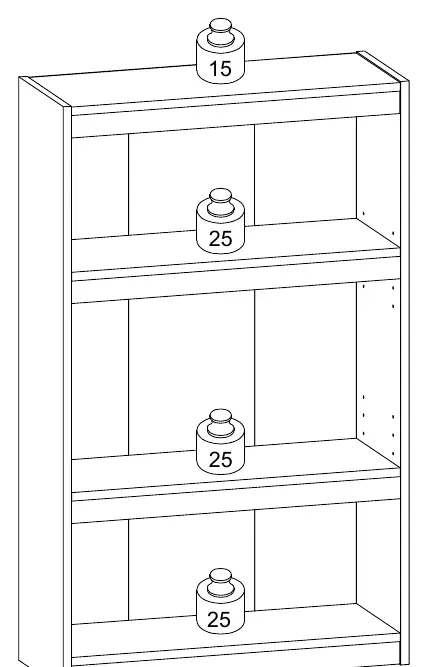
| Weight Capacity (Top) | 15 lbs | Maximum load for the top panel | p. 1 |
| Weight Capacity (Shelf) | 25 lbs | Maximum load per shelf | p. 1 |
Where to find it in the PDF
- Safety and Weight Limits p. 1
- Hardware and Parts List p. 2
- Assembly Steps p. 2, 3, 4
Table of contents
Manual images
Click an image to enlargeQuick Guide and Safety Information
This manual provides instructions for assembling the Furinno 22061 3-Tier Bookcase. Before beginning, ensure you have a second person to assist and the necessary tools (screwdriver and hammer). Assemble the unit on cardboard to prevent scratches. Important: Do not exceed the weight limits: 15 lbs for the top panel and 25 lbs for each shelf. Always place heavier items on lower shelves and do not allow children to climb on the unit.
Parts and Hardware List
Before starting assembly, identify and count all parts to ensure nothing is missing. The hardware kit includes Minifix cam locks, L-brackets, screws, shelf supports, power pins, and a wall mounting set.
Assembly Instructions
The assembly process utilizes a Minifix cam lock system. Ensure that the arrow on the cam lock faces outward before tightening. Follow these steps:
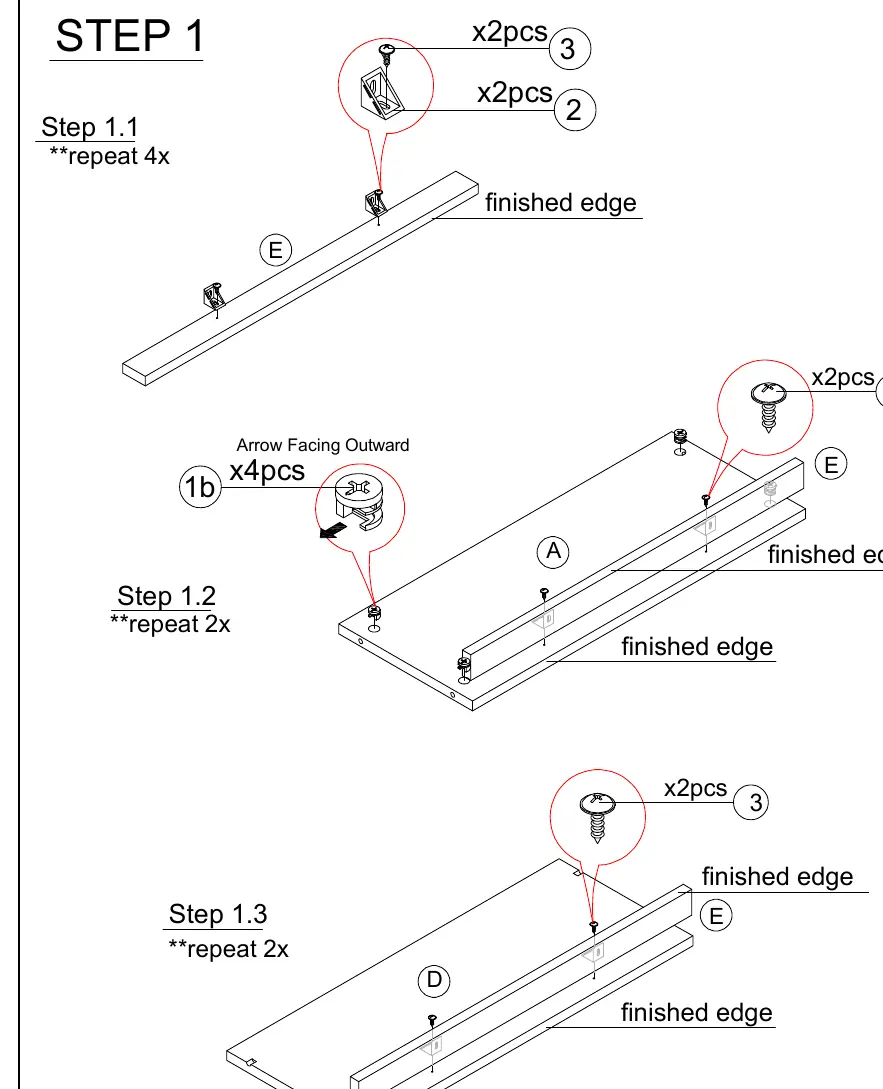
- Step 1: Attach hardware to panels E, A, and D using Minifix and screws.
- Step 2-4: Assemble the frame by connecting the side panels (B, C) to the top/bottom panels (A). Ensure the unfinished edges are oriented correctly as shown in the diagrams.
- Step 5: Attach the back panel (F) using the provided power pins.
- Step 6: Insert shelf supports and place the shelves (D) into the unit.
- Step 7: Secure the bookcase to the wall using the provided wall mount set to prevent tipping.
Safety and Maintenance
Clean the product with a mild cleanser using a soft, damp cloth. Do not use harsh or abrasive cleaners. Regularly check that all hardware is tight and the unit remains stable. If the unit shows signs of instability, check the wall mount connection.
Practical help
Common problems
Instability or sagging
Ensure you do not exceed the weight limits (15 lbs for top, 25 lbs for shelves) and place heavier items on lower shelves.
Difficulty assembling Minifix system
Ensure the arrow on the cam lock faces outward before tightening the screw.
Before use
- Identify, sort, and count all parts before assembly.
- Assemble on packaging cardboard to prevent scratches.
- Ensure you have a second person to assist.
- Have a hammer and screwdriver ready.
- Read each step carefully before starting.
Specs in practice
- Weight Limit (Top)
- 15 lbs
- Weight Limit (Shelf)
- 25 lbs
Images and diagrams
- Minifix system: Ensure the arrow on the cam lock faces outward before tightening.
- Wall mounting: Use the provided wall mount set to secure the unit to the wall.
Model compatibility
- Requires wall mounting for safety.

Manual page author
Michael Turner
Technical manual editor
Reviews PDF manuals for structure, safety notes, and practical product details so readers can find the right information quickly.