Furniture / Bedroom Furniture
Assembly Instructions for Furinno Lucca 3-Drawer Dresser 19154H
Complete assembly guide for the Furinno Lucca 3-Drawer Dresser (Model 19154H). Includes step-by-step installation instructions, parts list, hardware requirements, and safety warnings for proper setup.
Quick answers from the manual
Quick answer
- The Furinno Lucca 3-Drawer Dresser (19154H) requires 2 people and approximately 1.5 hours to assemble. Essential tools include a screwdriver and a hammer. p. 1
Key actions
- Wall Mounting p. 1
First start
- Preparation p. 2
Maintenance and reset
- Cleaning p. 2
Where to find it in the PDF
- Assembly Steps p. 3, 4
Table of contents
Manual images
Click an image to enlargeQuick guide from the manual
The Furinno Lucca 3-Drawer Dresser (19154H) is designed for home storage. Assembly requires approximately 1.5 hours and should be performed by 2 people. Essential tools required for assembly include a screwdriver and a hammer. Always assemble the furniture on packaging cardboard to prevent scratches or damage to the product.
Useful hints before you start
- Read each step carefully before starting.
- It is important that each step is performed in the correct order to avoid difficulties.
- Identify, sort, and count all parts before beginning assembly.
- Using incompatible hardware might cause damage to the product.
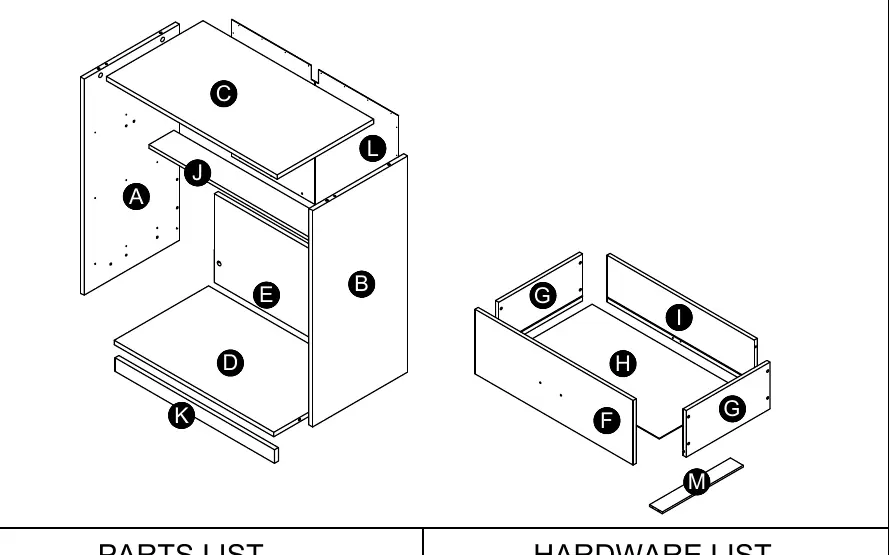
Parts and hardware
The manual provides an exploded view and a detailed parts list. Ensure all panels (A-M) and hardware (1-13) are present before starting. Hardware includes cam bolts, cam locks, dowels, screws, drawer slides, and handles.
Assembly steps
The assembly process is divided into 12 steps:
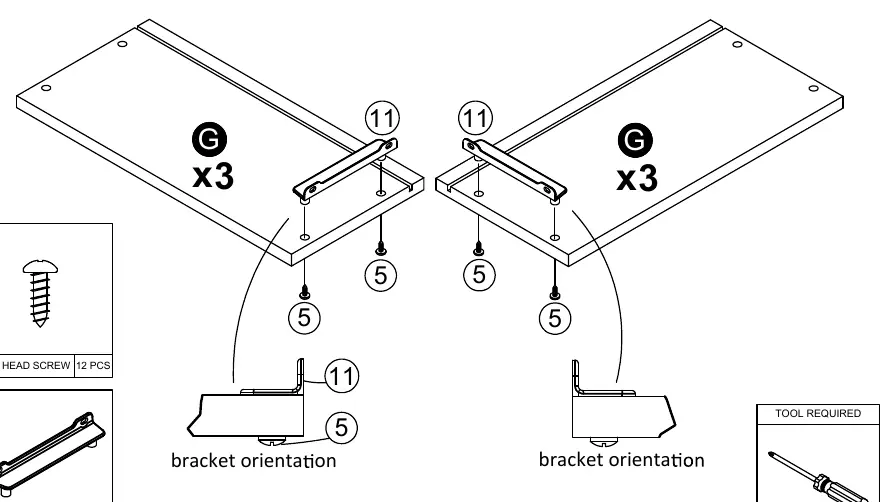
- Steps 1-6: Focus on assembling the main frame of the dresser, including attaching drawer slides and connecting panels.
- Steps 7-10: Cover the assembly of the three individual drawers, including attaching drawer brackets and handles.
- Step 11: Details the mandatory wall mounting procedure to ensure stability.
- Step 12: Outlines the recommended maximum weight limits for the unit.
Safety and maintenance
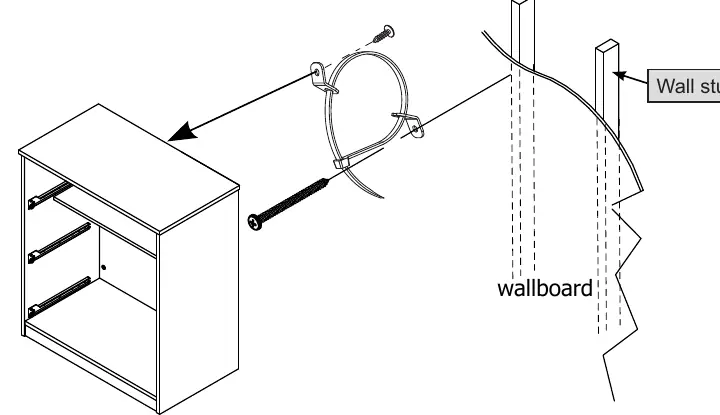
- Wall Mounting: The unit must be secured to a wall stud using the provided wall mounting set to prevent tipping.
- Weight Limits: Do not exceed the maximum load limits shown in the manual. Put heavier items on lower shelves.
- Safety: Do not allow children to climb on the unit.
- Cleaning: Clean the product with a mild cleanser using a soft, dampened cloth. Do not use harsh or abrasive cleansers.
Practical help
Common problems
Dresser instability or tipping
Ensure the unit is square and the back panel is attached securely. You must use the provided wall mounting set to anchor the unit to a wall stud.
Difficulty during assembly
Ensure you have 2 people assisting. Assemble on packaging cardboard to prevent scratches and ensure all parts are identified and counted before starting.
Before use
- Identify, sort, and count all parts and hardware
- Prepare a screwdriver and a hammer
- Clear a workspace and lay down cardboard
- Ensure a second person is available to assist with assembly
- Verify all panels (A-M) are present
Specs in practice
- Weight Limit
- The unit is designed to support specific maximum loads. Exceeding these limits can cause sagging, instability, or product collapse.
Images and diagrams
- Steps 1-6: Main frame and drawer slide installation
- Steps 7-10: Drawer box assembly
- Step 11: Wall mounting procedure
- Step 12: Weight distribution guidelines
Model compatibility
- Designed for indoor use
- Must be anchored to a wall stud

Manual page author
Emily Carter
User documentation editor
Prepares concise manual descriptions and highlights the most useful setup, operation, and maintenance information for readers.