Furniture / Bedroom Furniture
Assembly Instructions for Furinno Lucca Nightstand 19153H
Complete assembly guide for the Furinno Lucca Nightstand (Model 19153H). Includes parts list, hardware identification, step-by-step assembly instructions, and safety warnings for proper setup.
Quick answers from the manual
Quick answer
- This manual provides assembly instructions for the Furinno Lucca Nightstand (Model 19153H). It covers parts identification, hardware lists, and a 10-step assembly process. p. 1, 2
Key actions
- Identify and count all parts and hardware before beginning assembly. p. 2
- Assemble on a soft surface to avoid damage. p. 2
First start
- Prepare tools (screwdriver, hammer) and clear a space to assemble on the cardboard packaging. p. 1, 2
Problems and fixes
Hardware mismatch
Ensure you are using the correct hardware (1-11) as specified in each step.
p. 2Maintenance and reset
- Clean the product with mild cleanser using soft damped cloth. Do not use harsh or abrasive cleanser. p. 2
Technical specifications
| Parameter | Value | Meaning | Pages |
|---|---|---|---|
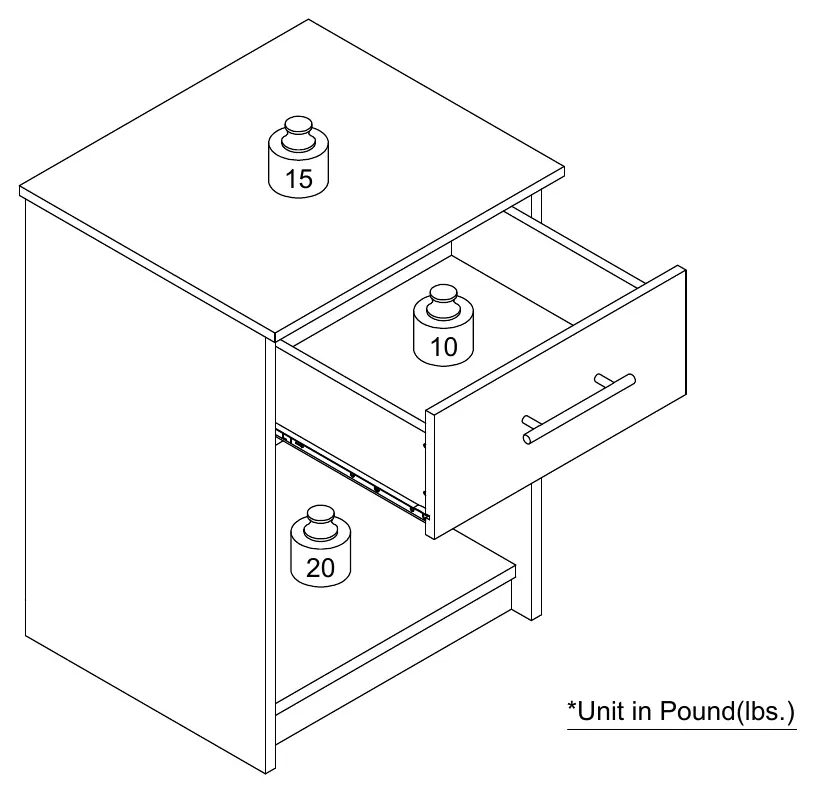
| Max Weight (Top) | 15 lbs | Maximum load for the top surface | p. 1 |
| Max Weight (Drawer) | 10 lbs | Maximum load for the drawer | p. 1 |
| Max Weight (Bottom) | 20 lbs | Maximum load for the bottom shelf | p. 1 |
Where to find it in the PDF
- Assembly Overview & Warnings p. 1
- Parts & Hardware List p. 2
- Assembly Steps 1-2 p. 3
- Assembly Steps 3-6 p. 4
- Assembly Steps 7-10 p. 2, 3
Table of contents
Manual images
Click an image to enlargeQuick guide from the manual
This manual provides assembly instructions for the Furinno Lucca Nightstand (Model 19153H). The unit is designed for assembly by one person in approximately 1 hour. You will need a screwdriver and a hammer to complete the assembly. Please note that this product is a set of 2 nightstands; ensure all parts are accounted for before beginning.
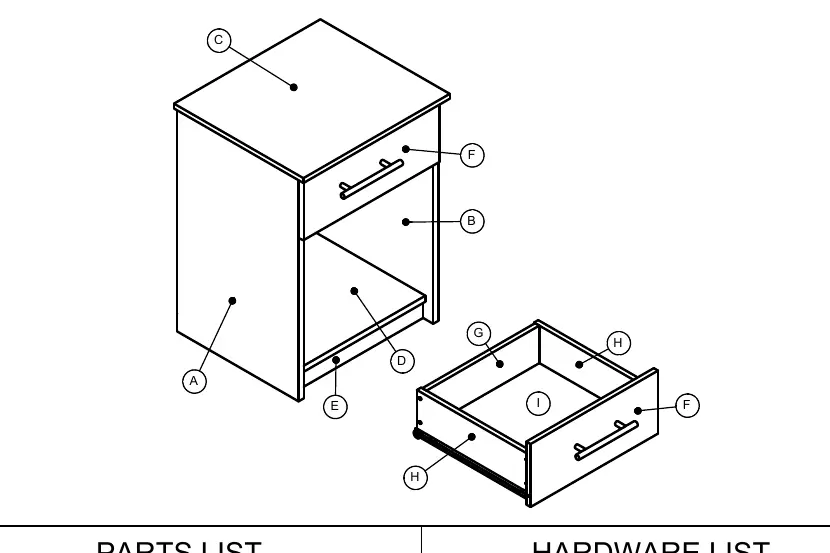
Parts and hardware
Before starting, identify and count all components to ensure nothing is missing. The parts list includes panels A through J, and the hardware list includes items 1 through 11, such as cam locks, cam bolts, drawer slides, and screws. Assemble the furniture on the packaging cardboard to prevent scratches or damage.
Assembly instructions
Follow the steps in the correct order to avoid difficulties:
- Steps 1-2: Install drawer slides (CL/CR) onto side panels (A/B) using cam bolts, cam locks, and flat head screws. Ensure the arrow on the cam lock faces outward.
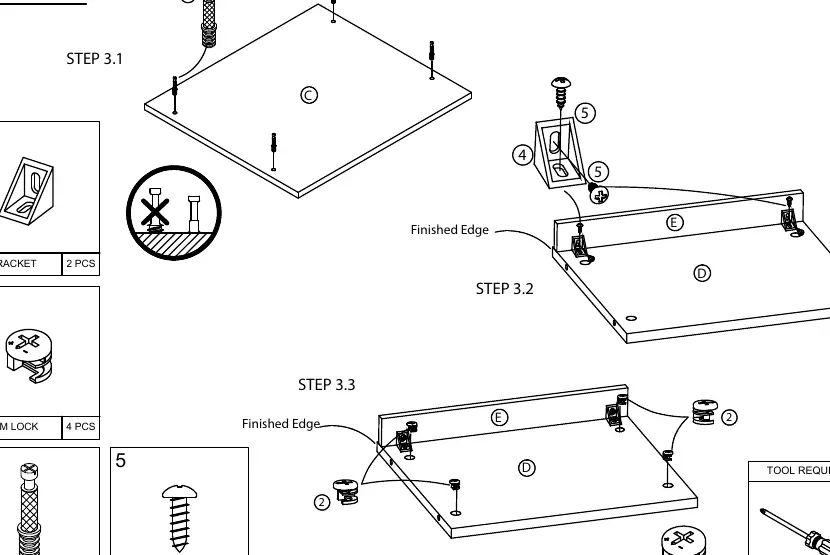
- Steps 3-4: Assemble the main frame by attaching panels C, D, and E using L-brackets, cam bolts, and cam locks.
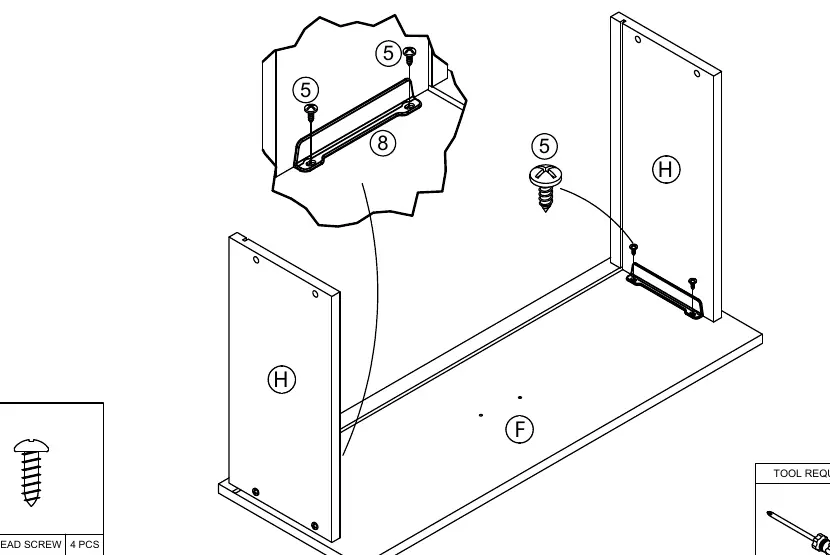
- Steps 5-6: Attach the back panel (J) and drawer brackets (8) to the side panels (H).
- Steps 7-8: Assemble the drawer box using panels F, G, H, and I. Secure with driver fasteners and handle screws.
- Steps 9-10: Install the drawer slides (DL/DR) onto the drawer box and insert the completed drawer into the main frame.
Safety warnings
- Weight limits: Do not exceed the maximum load: 15 lbs for the top, 10 lbs for the drawer, and 20 lbs for the bottom shelf. Exceeding these limits may cause instability or collapse.
- Usage: Do not allow children to climb on the unit. Do not sit on the unit.
- Placement: Always place heavier items on the lower shelves.
Care and maintenance
Clean the product with a mild cleanser using a soft, damped cloth. Do not use harsh or abrasive cleansers. Using incompatible hardware may cause damage to the product.
Practical help
Common problems
Drawer not sliding smoothly
Ensure drawer slides (CL/CR/DL/DR) are installed in the correct orientation and all screws are flush with the surface.
Unit feels unstable
Check that all cam locks are fully tightened and L-brackets are securely fastened.
Before use
- Identify and count all parts (A-J) and hardware (1-11) before starting.
- Assemble on a soft surface (like the packaging cardboard) to prevent scratches.
- Ensure you have a screwdriver and hammer ready.
- Verify you have 1 person available for assembly.
- Read each step carefully before starting.
Specs in practice
- Weight Limit (Top)
- Maximum load capacity is 15 lbs.
- Weight Limit (Drawer)
- Maximum load capacity is 10 lbs.
- Weight Limit (Bottom)
- Maximum load capacity is 20 lbs.
Images and diagrams
- Exploded view shows the relative position of all panels and hardware.
- Steps 1-2 detail the installation of drawer slides on side panels.
- Step 9-10 detail the final drawer assembly and insertion.
Model compatibility
- This product is a set of 2 nightstands.

Manual page author
David Miller
Documentation analyst
Organizes user manual content into clear summaries, with attention to model details, product context, and everyday usability.