Garden / Outdoor
Gardena EasyTrim 25/18V P4A Battery Trimmer User Manual
Quick guide for the Gardena EasyTrim 25/18V P4A battery trimmer. Includes assembly, operation, maintenance, and troubleshooting steps.
Table of contents
Manual images
Click an image to enlargeQuick guide from the manual
This manual provides essential instructions for the Gardena EasyTrim 25/18V P4A battery trimmer. Key tasks include assembly, battery charging, and maintenance. Always remove the battery before performing any maintenance or assembly to prevent accidental starting.
Assembly
The trimmer requires assembly before first use:
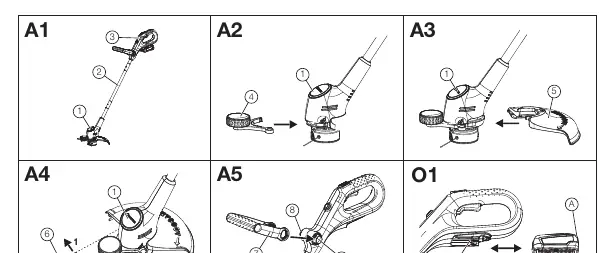
- Trimmer tube: Slide the trimmer tube onto the trimmer head tube until it engages. Ensure the cable is not pinched.
- Main handle: Slide the main handle tube onto the trimmer tube until it engages.
- Wheel: Insert the left side of the wheel into the trimmer head and slide the right side until it engages.
- Protective cover: Slide the protective cover onto the trimmer head until it audibly engages.
- Plant guard: Push the plant guard slightly outwards and push it onto the trimmer head until it engages.
- Additional handle: Squeeze the handle brackets and slide the additional handle onto the brackets until it engages.
Operation
Charging the battery: Press the release button to remove the battery. Connect the charger to a mains socket and slide it onto the battery. A flashing green light indicates charging; a solid green light indicates the battery is fully charged.
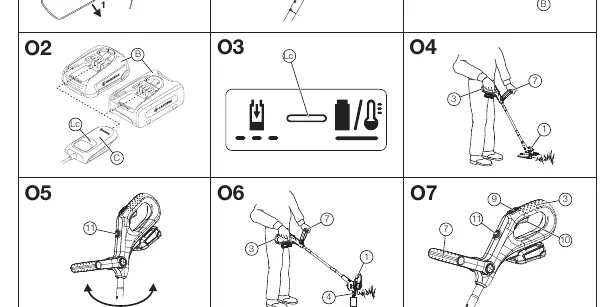
Working positions: Hold the product by the additional and main handles so the trimmer head is tilted slightly forward. For edge trimming, press the button and turn the main handle 180°.
Starting/Stopping: The trimmer features a two-handed safety device. Slide the switch-on lock forward and pull the start lever towards the handle to start. Release the start lever to stop.
Extending the cutting filament: The filament is extended automatically when the spool stops after being switched off. If necessary, switch the tool off and on again multiple times to extend the filament in small increments.
Maintenance
Cleaning: Do not use water or high-pressure jets to clean the trimmer. Use a soft brush to clean ventilation slots. Remove grass and dirt from the protective cover after each use.
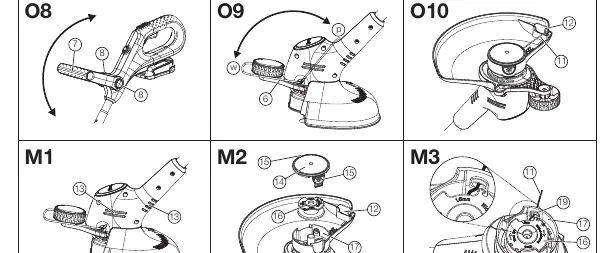
Replacing the filament cassette: Press the cassette cover catches simultaneously to remove the cover. Remove the old filament cassette, clean the bracket, and insert the new cassette. Feed the filament through the metal sleeve and ensure it is not pinched when replacing the cover.
Troubleshooting
If the trimmer does not start, ensure the battery is fully inserted. If it cuts poorly, the filament may be worn or used up; extend or replace the filament. If the trimmer vibrates severely, check for dirt in the spool holder.
Technical Data
The trimmer has a cutting width of 25 cm and uses a 1.6 mm diameter cutting filament. The filament cassette speed is 9500 R/min. The weight without battery is 1.7 kg.
Manufacturer information
GARDENA
Practical help
Common problems
Trimmer does not start
Ensure the battery is fully inserted into the battery holder until it audibly clicks.
Trimmer cuts poorly
Extend the cutting filament or replace the filament cassette if it is used up.
Trimmer vibrates severely
Open the spool holder cover and remove dirt and grass.
Trimmer stops during operation
Remove long cuttings wrapped around the filament cassette bracket.
Before use
- Check that the wheel is correctly fitted.
- Check that the protective cover is correctly fitted.
- Check that the plant guard is correctly fitted.
- Ensure the battery is fully charged.
Specs in practice
- Cutting width
- 25 cm
- Filament diameter
- 1.6 mm
- Weight (without battery)
- 1.7 kg
Images and diagrams
- A1-A5: Assembly steps for the trimmer tube, wheel, protective cover, plant guard, and additional handle.
- O1-O10: Operation steps including battery charging, working positions, starting/stopping, and filament extension.
- M1-M3: Maintenance steps for cleaning and replacing the filament cassette.
Model compatibility
- Compatible with POWER FOR ALL system batteries (PBA 18V).

Manual page author
Michael Turner
Technical manual editor
Reviews PDF manuals for structure, safety notes, and practical product details so readers can find the right information quickly.