Lighting / LED Lamps
Installation Guide for Ge Current LED Double Ended Type B T8 Tubes
A comprehensive installation guide for Ge Current LED Double Ended Type B T8 Tubes (120V-347V). This guide provides essential safety warnings, wiring diagrams, fuse requirements, and step-by-step instructions for qualified electricians to...
Table of contents
Important Information
This installation guide is intended for qualified electricians only. The LED Type B T8 tubes are designed for general lighting service and operate directly from 120V-347V mains. They are not compatible with ballasts, dimmers, or emergency lighting systems. The installation requires the removal of existing ballasts and the use of shunted lamp holders.
Safety Warnings
- Risk of Fire or Electric Shock: Installation requires knowledge of luminaire electrical systems. If not qualified, do not attempt installation.
- Do not use with dimmers or emergency lighting.
- Ensure the luminaire construction and dimensions meet the requirements for the retrofit kit.
- Do not expose wiring to sharp edges or sheet metal.
- The provided Caution label must be applied to the converted luminaire.
Installation Instructions
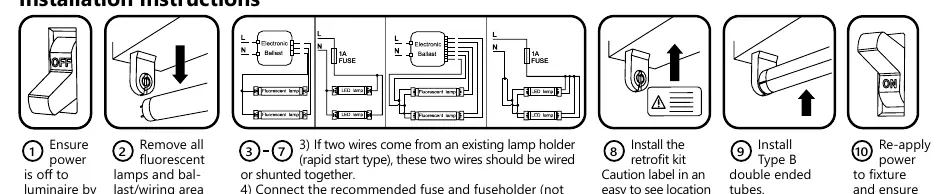
- Power Off: Ensure power is disconnected to the luminaire.
- Preparation: Remove all fluorescent lamps and the ballast/wiring area cover.
- Wiring Modification: Cut the ballast lead wires approximately 6 inches away from each lamp holder.
- Shunting: If two wires come from an existing lamp holder (rapid start type), these must be wired or shunted together.
- Fuse Installation: Connect the recommended fuse (Type 2AG, 1 amp, 500V) and fuseholder to the black (hot) wire from the mains.
- Wiring Connections: Connect all lamp holder leads on one side to the other side of the fuse. Connect all lamp holder leads on the other side of the fixture to the white (neutral) wire from the mains.
- Finalize: Replace the ballast/wiring area cover, ensuring no wires are pinched.
- Labeling: Install the provided Caution label in a visible location.
- Power On: Re-apply power to the fixture and ensure proper operation.
Technical Requirements
The system requires G13 (medium bi-pin) lamp holders that are internally or externally shunted. Current recommends installing an in-line fuse (Type 2AG, 1 amp, 500V, Littlefuse part number 0477001.MXP or equivalent) to protect against future misapplication. Only one fuse kit is needed for up to 4 tubes in the same fixture.
Practical help
Common problems
Ballast still connected
The ballast must be completely removed or bypassed. This LED tube operates directly from mains voltage.
Non-shunted lamp holders
The lamp holders must be shunted. If they are not, they must be replaced or converted to shunted type.
Dimmer or emergency lighting usage
This product is not compatible with dimmers or emergency lighting systems.
Before use
- Ensure power is disconnected at the source.
- Verify that the luminaire is suitable for the retrofit kit dimensions.
- Obtain a Type 2AG, 1 amp, 500V fuse.
- Confirm lamp holders are shunted (G13 medium bi-pin).
- Ensure you have the provided Caution label for application.
Images and diagrams
- The wiring diagram illustrates the removal of the ballast and the connection of the fuse in series with the hot (black) wire, followed by the connection of the shunted lamp holders to the hot and neutral lines.
Model compatibility
- Not for use with dimmers.
- Not for use with emergency lighting.
- Requires shunted lamp holders.

Manual page author
Michael Turner
Technical manual editor
Reviews PDF manuals for structure, safety notes, and practical product details so readers can find the right information quickly.