Home / Seasonal Decorations
Assembly Instructions for GE 23071LO 7 ft Winterberry Pre-Lit Artificial Tree
Quick guide for assembling and maintaining your GE 23071LO 7 ft Winterberry Pre-Lit Artificial Tree. Includes setup steps, safety warnings, and troubleshooting tips for the LED lighting system.
Quick answers from the manual
Quick answer
- This manual provides assembly instructions for the GE 23071LO 7 ft Winterberry Pre-Lit Artificial Tree, including safety warnings, connection steps for the LED lighting system, and troubleshooting tips. p. 1
Key actions
- Assemble the tree stand and sections. p. 1
- Connect the light strings. p. 1
First start
- Unpack, set up the stand, connect the tree sections, and plug the adapter into a GFCI outlet. p. 1
Show 4 more answers Show less
Problems and fixes
Lights not illuminating
Check that the section is fully connected, wires are not cut, and all electrical connections are secure.
p. 1Maintenance and reset
- Store in a cool, dry location protected from sunlight. p. 1
Technical specifications
| Parameter | Value | Meaning | Pages |
|---|---|---|---|
| Voltage | 120V | Operating voltage | p. 1 |
| Height | 7 ft | Tree height | p. 1 |
Where to find it in the PDF
- Assembly Instructions p. 1
Table of contents
Manual images
Click an image to enlargeQuick Guide: Assembly and Safety
This manual provides instructions for the GE 23071LO 7 ft Winterberry Pre-Lit Artificial Tree. Before starting, ensure you have all parts, including the tree sections, stand, and stakes. The tree is designed for indoor and outdoor use (120V). Always disconnect the tree from the power source before performing any maintenance or cleaning.
Assembly Instructions
Follow these steps to assemble your tree:
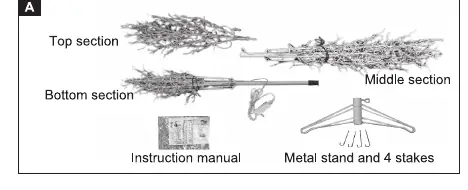
- Unpack: Carefully unpack the tree, removing any bubble wrap. Inspect the contents.
- Stand Setup: Open the tree stand and set it to a 90-degree angle. Tighten the thumbscrew after inserting the bottom section.
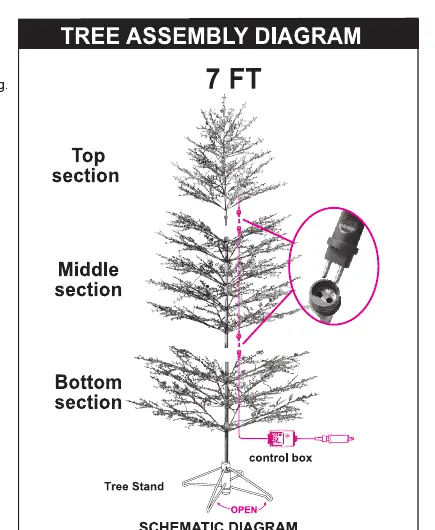
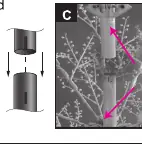
- Section Assembly: Assemble the tree section by section. Align the marks on the tree poles when connecting sections.
- Electrical Connection: Locate the white connector tags between each section. Connect the 2-pin polarized male and female connectors and screw the cap to secure the connection.
- Final Setup: Secure the tree in the desired location using the provided metal stakes. Connect the direct plug-in adapter to a working GFCI outlet or an outdoor-rated extension cord.
Maintenance and Storage
To ensure the longevity of your tree:
- Store the carton in a cool, dry location protected from sunlight.
- Do not place heavy loads on the carton to avoid crushing the tree.
- The individual LEDs are not replaceable; the light sets are designed for continued operation even if an individual LED fails.
Troubleshooting
If a section of your tree does not illuminate:
- Check that the specific section is fully connected.
- Inspect the wires for any cuts or damage.
- Ensure all electrical connections are tight and secure.
Technical Specifications
- Model: 23071LO
- Height: 7 ft
- Sections: 3
- Stand: Metal
- Voltage: 120V
- Assembly Time: 5–10 minutes
Practical help
Common problems
Lights not illuminating
Check that the section is fully connected, wires are not cut, and all electrical connections are secure.
Before use
- Inspect contents for damage upon unpacking
- Ensure the tree stand is set to a 90-degree angle
- Locate the white connector tags between sections
- Have a hammer or mallet ready for securing stakes
Show more Show less
Images and diagrams
- Tree Assembly Diagram: Illustrates the stacking order of the top, middle, and bottom sections.
- Schematic Diagram: Shows the connection points for the light plugs and the control box.
Model compatibility
- For indoor and outdoor use.
- Requires a GFCI outlet or outdoor-rated extension cord.

Manual page author
David Miller
Documentation analyst