Electronics / Body Worn Cameras
User Manual for Generic 3-Channel Dash Cam
Quick guide for the Generic 3-Channel Dash Cam. Includes installation steps, WiFi connection, G-sensor settings, and troubleshooting for common issues like file errors and image quality.
Table of contents
Manual images
Click an image to enlargeQuick Guide
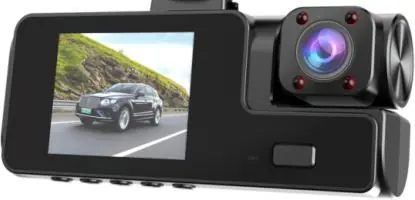
This 3-channel dash cam is designed for vehicle recording. Before installation, ensure the camera is functioning properly. The device supports automatic recording, G-sensor collision detection, and parking monitoring. For optimal performance, use a high-speed Class 10 TF card (4GB to 32GB).
Device Overview
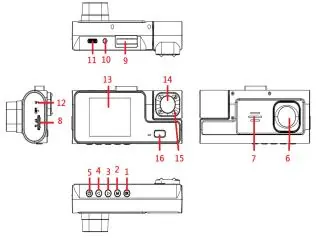
The device features a front-facing lens, an in-car lens, and a display screen. Key controls include the OK button (confirm/record), M button (mode/menu/lock), and navigation buttons (Flip Up/Down). The device also includes a reset button for troubleshooting and an infrared light for night vision.
Installation Guide
Follow these steps to install your dash cam:
- Preparation: Turn off the car engine and insert a high-speed Class 10 TF card (4GB-32GB).
- Mounting: Fix the recorder onto the front windshield using the provided bracket.
- Power: Insert the car charger into the cigarette lighter. Route the cable along the door frame and under the carpet.
- Rear Camera: Install the rear camera at the back of the vehicle. For reverse visibility, connect the red wire to the reverse light power supply.
- Adjustment: Adjust the lens angle and start the engine to verify operation.
Functionality
Recording: The device starts recording automatically when the engine is on and saves files when the engine is off. When the TF card is full, it overwrites the oldest files.
G-Sensor: In the event of a collision, the G-sensor locks the current recording file to prevent it from being overwritten.
WiFi Connection: To connect via the app, enter the menu to turn on WiFi. The screen will display the WiFi name and password. Use the 'Wind Recorder' app on your smartphone to add the device.
Troubleshooting
If you encounter issues, try the following:
- Cannot record: Check if the TF card has space and is not locked.
- Recording stops: Ensure you are using a high-speed Class 10 SDHC card.
- File error: Use the camera's 'Format' function to reformat the TF card.
- Image quality: If the image is misty, clean the lens with lens paper. If the image is too dark in high-contrast scenes, adjust the 'EV' value in the settings.
- Horizontal stripes: Adjust the 'Light Source Frequency' setting to 50Hz or 60Hz based on your local power supply.
Practical help
Common problems
Cannot take photos or videos
Check if the TF card has sufficient space and is not locked.
Recording stops automatically
Use a high-speed Class 10 SDHC compatible TF card.
File error prompt
Use the camera's 'Format' function to reformat the TF card.
Image shrouded in mist
Check the lens for dirt or fingerprints and clean with lens paper.
Horizontal stripe interference
Set the 'Light Source Frequency' to 50Hz or 60Hz based on local power supply.
Before use
- Check camera functionality before installation.
- Turn off the car engine.
- Insert a high-speed Class 10 TF card (4GB-32GB).
- Mount the recorder on the windshield.
- Connect the car charger to the cigarette lighter.
Specs in practice
- Light Source Frequency
- Set to 50Hz or 60Hz to match local power frequency and prevent screen flickering.
Images and diagrams
- The device features a front-facing lens, an in-car lens, and a display screen.
- Buttons include OK, M (Mode/Menu), Flip Up/Down, Power, and Reset.
- Ports include power interface, rear camera interface, and TF card slot.
Model compatibility
- Requires high-speed Class 10 TF card (4GB-32GB).
- Rear camera installation requires connection to reverse light power for automatic reverse visibility.

Manual page author
David Miller
Documentation analyst
Organizes user manual content into clear summaries, with attention to model details, product context, and everyday usability.