Home Appliances / Small Kitchen Appliances
User Manual for George Foreman 2-Serving Grill & Panini GR012F Series
Quick guide for the George Foreman 2-Serving Grill & Panini (GR012F Series). Includes setup, grilling instructions, cooking charts, cleaning tips, and safety information.
Quick answers from the manual
Quick answer
- The George Foreman 2-Serving Grill & Panini is an electric indoor grill featuring a dual-position stand for tilted or horizontal cooking and nonstick plates. It is designed for household use. p. 3, 4
Key actions
- Preheating the grill p. 4
- Cleaning the grill p. 6
First start
- Remove all packaging, stickers, and the plastic band around the power plug before first use. p. 4
Show 3 more answers Show less
Maintenance and reset
- The drip tray can be washed in the upper rack of the dishwasher. p. 4
Technical specifications
| Parameter | Value | Meaning | Pages |
|---|---|---|---|
| Power | 760 W | Power consumption | p. 20 |
| Voltage | 120 V | Operating voltage | p. 20 |
Where to find it in the PDF
- Getting to know your grill p. 3
- How to use p. 4
- Suggested cooking chart p. 5
- Care and cleaning p. 6
Table of contents
Quick Guide from the Manual
This manual provides instructions for the George Foreman 2-Serving Grill & Panini (GR012F Series). Key operations include using the dual grill position stand for tilted or horizontal cooking, preheating the unit until the green thermostat light turns on, and proper cleaning of the nonstick plates and drip tray.
Getting to Know Your Grill
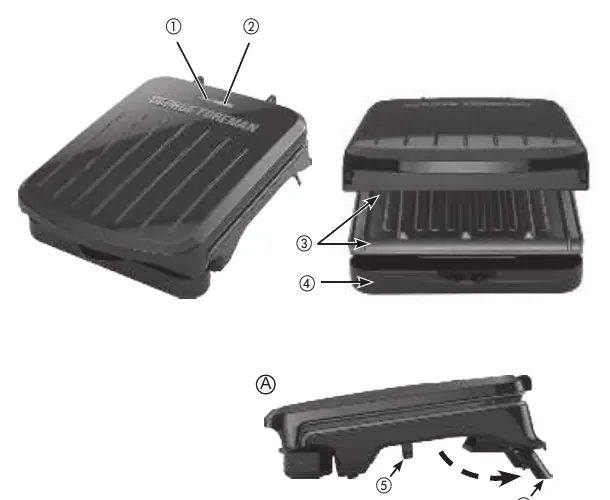
- Power light (red): Indicates the unit is plugged in and heating.
- Thermostat light (green): Indicates the grill has reached the correct cooking temperature.
- Grill plates: Nonstick surface for cooking.
- Drip tray: Collects fat and juices.
- Cord storage hooks: Located underneath the unit.
- Dual grill position stand: Allows for tilted or horizontal cooking.
How to Use
Getting Started
- Remove all packaging, stickers, and the plastic band around the power plug.
- Register your warranty at www.prodprotect.com/georgeforeman.
Using the Dual Grill Position Stand
- Tilted angle: Flip the stand out away from the grill for cooking foods like burgers or chicken.
- Horizontal level: Flip the stand to store underneath the grill for cooking foods like paninis or hot dogs.
Grilling
- Place the grill on a stable, level, heat-resistant surface.
- Slide the drip tray into the runners underneath the front of the grill.
- Close the lid and plug the cord into an outlet. The red power light will turn on.
- Wait for the green thermostat light to turn on, indicating the grill is preheated.
- Open the grill and place food on the bottom plate using a spatula or tongs.
- Close the grill. The hinge is articulated to accommodate thick or oddly shaped foods.
- When finished, unplug the grill.
Important Notes: Do not use aerosol cooking sprays as they can build up on the nonstick surface. Always use heatproof plastic, nylon, or wood utensils to avoid scratching the plates. Never use metal skewers, tongs, forks, or knives.
Care and Cleaning
Allow the grill to cool completely before cleaning.
- Drip tray: Empty and wash with warm water and dish soap, or place in the upper rack of the dishwasher.
- Grill plates: Clean with warm water and dish soap.
- Exterior: Wipe with a warm, wet sponge and dry with a soft, dry cloth.
- Restrictions: Do not use steel wool, scouring pads, or abrasive cleaners. Do not immerse the grill in water or any other liquid.
Safety
- Do not touch hot surfaces; use handles or knobs.
- Do not immerse the cord, plugs, or appliance in water.
- Close supervision is required when used near children.
- Do not operate with a damaged cord or plug.
- Do not use outdoors.
- The appliance is intended for household use only.
Official resources from the manual
Practical help
Common problems
Food sticking to grill plates
Ensure you are using heatproof plastic, nylon, or wood utensils. Do not use aerosol cooking sprays.
Uneven cooking
Ensure the grill plates are roughly parallel. Cut or pound meat to an even thickness.
Grill not heating
Ensure the unit is plugged into a working outlet and the lid is closed.
Before use
- Remove all packing material and stickers
- Remove and save literature
- Register warranty online
- Place on a stable, level, heat-resistant surface
- Slide the drip tray into the runners
Show more Show less
Images and diagrams
- 1. Power light (red)
- 2. Thermostat light (green)
- 3. Grill plates
- 5. Cord storage hooks
- 6. Dual grill position stand
Model compatibility
- Intended for household use only.
- Not intended for use with external timers or remote-control systems.

Manual page author
David Miller
Documentation analyst