Documents / Warranty Safety
User Guide for GIGABYTE AORUS 17 Laptop
Quick start guide for the GIGABYTE AORUS 17 laptop, covering initial setup, hardware overview, hotkey functions, and system recovery procedures.
Table of contents
Manual images
Jump to the sectionQuick guide from the manual
This document provides essential instructions for setting up and maintaining your AORUS 17 laptop. Key procedures include connecting the power adapter, initial system configuration, and using the built-in system recovery tool.
Using AORUS Notebook for the First Time
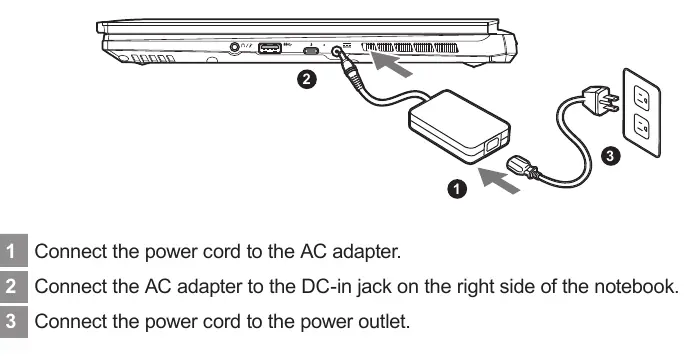
- Connect the power cord to the AC adapter.
- Connect the AC adapter to the DC-in jack on the right side of the notebook.
- Connect the power cord to the power outlet.
Important: Do not turn off the notebook during the initial configuration until the operating system setup is complete. Ensure the power adapter is grounded and the outlet is easily accessible.
AORUS Notebook Tour
The laptop features various ports and components, including:
- Connectivity: Ethernet (LAN), HDMI 2.1, Mini Display 1.4, USB 3.2 (Type-A), Thunderbolt 4 (USB Type-C), and an Audio Combo Jack.
- Input/Output: Microphone, Webcam, Keyboard, Touchpad, and Power Button.
- Audio: Built-in speakers.
Hotkeys
Use the Fn key in combination with other keys to control system functions:
- Fn+ESC: Maximize Fan Speed
- Fn+F1: Sleep
- Fn+F2: Wireless LAN toggle
- Fn+F3/F4: Brightness control
- Fn+F5: Display toggle
- Fn+F8/F9: Volume control
- Fn+F12: AI Mode switch
- Fn+Space: Keyboard backlight toggle
System Recovery
If the operating system malfunctions, you can restore it to factory defaults using the hidden recovery partition.
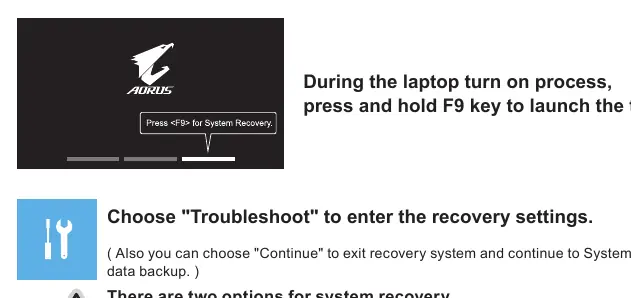
- Turn off and restart the laptop.
- During startup, press and hold the F9 key to launch the recovery tool.
- Select Troubleshoot to enter recovery settings.
- Choose between Reset this PC (keep/remove files) or Smart Recovery (factory reset).
Caution: Smart Recovery will delete all personal data and files. Ensure the laptop is plugged into power during the entire recovery process.
Support
For warranty, service, and FAQs, visit the official GIGABYTE support website at https://www.gigabyte.com/Support/Laptop or https://www.gigabyte.com/Support/Faq.
Official resources from the manual
Manufacturer information
Gigabyte Technology Co., Ltd.
Practical help
Common problems
Audio not functioning during initial setup
The audio will not function until the Windows setup process is fully completed.
System recovery option not available
If the storage has been replaced or the recovery partition deleted, the recovery option will not be available. Devices with EFI SHELL do not support this function.
Laptop overheating
Ensure ventilation vents on the side or bottom are not blocked. Avoid using the laptop on soft surfaces like bedding, pillows, or cushions.
Before use
- Ensure the power adapter is connected to a grounded outlet.
- Verify that the power adapter output matches the laptop's input requirements (20V, 12A).
- Place the laptop on a stable, flat surface to avoid vibrations.
- Ensure the laptop is not in direct sunlight or environments exceeding 45°C (112°F).
- Ensure the laptop is plugged into power before starting a system recovery.
Specs in practice
- Input voltage
- 100-240Vac, 50-60Hz (Universal compatibility)
- Rating output voltage
- 20V, 12A (Required power specification for the adapter)
Images and diagrams
- Page 3: Power connection sequence (Adapter to laptop, then to wall outlet).
- Page 4: Port identification diagram showing locations of USB, HDMI, Thunderbolt, and audio ports.
- Page 7: Recovery process steps using the F9 key.
Model compatibility
- Some models may have multiple rating output currents based on the available SKU.
- Recovery function is only available on devices with the operating system preinstalled.

Manual page author
Emily Carter
User documentation editor
Prepares concise manual descriptions and highlights the most useful setup, operation, and maintenance information for readers.