Lighting / Fixtures
User Manual for Globe 65927 Wall Sconce
Quick guide for the Globe 65927 Wall Sconce. Includes installation instructions for both plug-in and hardwire setups, wiring diagrams, and safety precautions.
Quick answers from the manual
Quick answer
- This manual provides instructions for installing the Globe wall sconce as either a plug-in fixture or a hardwired fixture. p. 2, 3, 4
Key actions
- Turn off power at the breaker or fuse box before starting installation. p. 2
- Install as a plug-in fixture by mounting the back plate and adjusting the cord length. p. 3
- Install as a hardwired fixture by removing the cord, installing the mounting bracket, and connecting the wires. p. 4
First start
- Ensure power is off, select the installation method (plug-in or hardwire), and install a medium (E26) base bulb (60W max). p. 2, 3, 4
Technical specifications
| Parameter | Value | Meaning | Pages |
|---|---|---|---|
| Bulb Base | Medium (E26) | Compatible bulb base type | p. 4 |
| Maximum Wattage | 60W | Maximum power rating for the bulb | p. 4 |
Where to find it in the PDF
- Safety and Contact Info p. 1
- Pre-installation and Hardware p. 2
- Plug-in Installation p. 3
- Hardwire Installation p. 4
Table of contents
Manual images
Click an image to enlargeQuick Guide from the Manual
This manual provides instructions for installing the Globe 65927 wall sconce. The fixture supports two installation methods: plug-in or hardwire. Before starting, ensure the power is turned off at the breaker panel. Always consult a qualified electrician if you are unsure about electrical installation.
Pre-Installation
Before beginning the installation, ensure you have the necessary tools and that the power is completely disconnected. Turn the wall switch to the OFF position and turn off the main power at the breaker panel or remove the fuse.
Hardware Included
The package includes the following components:
- Wall anchors (2)
- Mounting wall screws (2)
- Plug (1)
- Back plate (1)
- Outlet box screws (2)
- Wire connectors (3)
- Mounting bracket (1)
- Canopy screws (2)
- Nut (1)
Plug-in Installation
1. Mounting the Canopy: Mark the location for the anchors on the wall. Drill holes, insert anchors, and secure the back plate to the wall using the mounting screws.
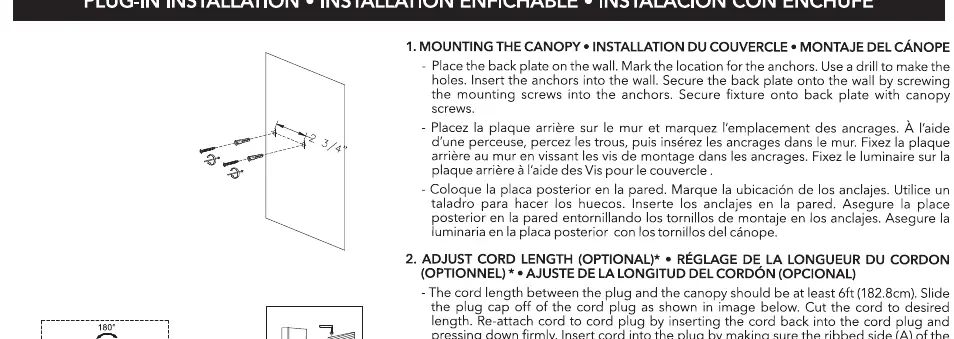
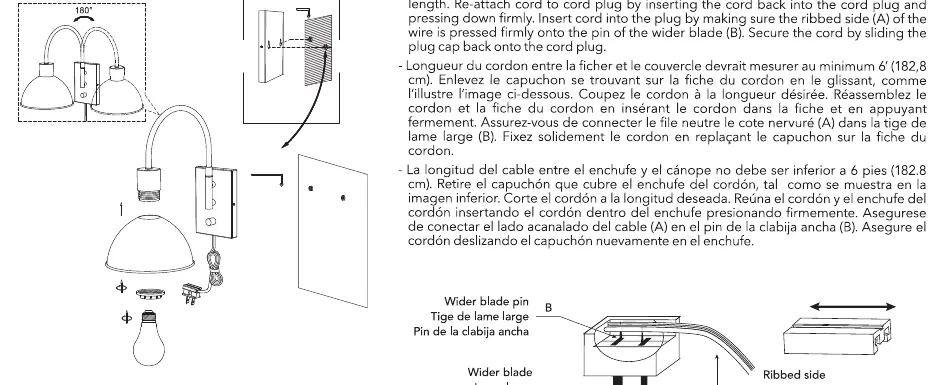
2. Adjust Cord Length (Optional): If you need to adjust the cord length, remove the plug cap from the cord. Cut the cord to the desired length. Re-attach the plug by inserting the cord back into the plug and pressing down firmly. Ensure the wire is connected to the wider blade pin (ribbed side) and secure the cord by sliding the plug cap back onto the plug.
Hardwire Installation
1. Remove the Cord: Remove the back plate by unscrewing the canopy screws. Unwire the black and white wires from the cord, ensuring you keep the switch connected. Slide the cord out through the hole and remove it.
2. Install Mounting Bracket: Install the mounting bracket to the inside of the canopy using the canopy screws.
3. Connecting the Wires: Strip approximately 0.6 inches (1.5 cm) of plastic coating from the white and black wires. Wrap the ground wire from the outlet box around the ground screw on the mounting crossbar. Use a wire connector to connect the ground wire from the fixture to the ground wire from the outlet box. Connect the white wire from the fixture to the white (neutral) wire from the outlet box, and the black wire from the fixture to the black (live) wire from the outlet box. Secure connections with electrical tape.
4. Attaching the Canopy: Position the canopy over the junction box and secure it with the outlet box screws.
5. Attaching the Nut: Use the nut to insert in the original outlet hole in the canopy.
Technical Specifications
The fixture requires 1 medium (E26) base bulb, 60 watt maximum (sold separately).
Manufacturer information
Globe Electric
Practical help
Common problems
Light does not turn on
Ensure the bulb is properly installed, the power is on at the breaker, and all wire connections are secure.
Cord is too long
Follow the cord adjustment steps to trim the cord and re-attach the plug cap.
Before use
- Turn off power at the breaker panel.
- Verify all hardware is included (anchors, screws, wire connectors).
- Ensure you have a compatible E26 bulb (max 60W).
- Decide between plug-in or hardwire installation method.
Specs in practice
- Installation
- Supports both plug-in and hardwire
Images and diagrams
- The wiring diagram illustrates connecting the ground, white (neutral), and black (live) wires using wire connectors.
- The plug-in installation diagram shows how to mount the back plate to the wall using anchors.
Model compatibility
- Requires 1 medium (E26) base bulb, 60 watt maximum (sold separately).

Manual page author
Michael Turner
Technical manual editor
Reviews PDF manuals for structure, safety notes, and practical product details so readers can find the right information quickly.