Lighting / Fixtures
User Manual for Globe Rockhill 1-Light LED Vanity Light
Quick guide for the Globe Rockhill 1-Light LED Vanity Light (Model 63000231). Includes installation steps, wiring instructions, color temperature settings, and night light operation.
Table of contents
Manual images
Click an image to enlargeQuick Guide
The Globe Rockhill 1-Light LED Vanity Light is a wall-mounted fixture featuring an integrated LED, adjustable color temperature, and a motion-activated night light. This guide provides essential installation and operation steps.
Safety Instructions
Warning: This unit has a non-replaceable integrated LED diffuser. Do not remove.
- Always turn off power at the main service panel before starting any electrical work.
- Use a voltage tester to ensure wires are not live before touching them.
- Ensure the fixture is properly grounded.
- Work with adequate lighting to avoid mistakes.
- If in doubt, consult a qualified electrician.
- Maintain a minimum distance of 20cm between the radiator and your body during operation.
Features and Specifications
Main Light
- Finish: Matte Black with Frosted glass shade
- Light Source: 12 W Integrated LED
- Brightness: 500 lumens
- Color Temperature: Selectable (5000 K, 4000 K, 3500 K, 3000 K, 2700 K)
- Dimmable: 10% - 100%
Night Light
- Operation: Motion activated
- Brightness: 20 lumens
- Color Temperature: 2000K
- Power: Rechargeable Lithium Battery (600 mAh 3.7 V)
- Sensor Range: 25ft / 90° detection range
- Battery Life/Charge: 4.5 hours
Installation
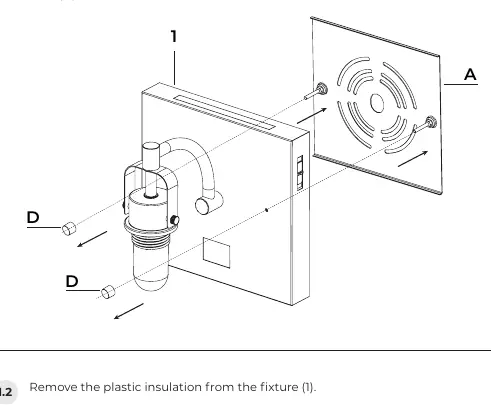
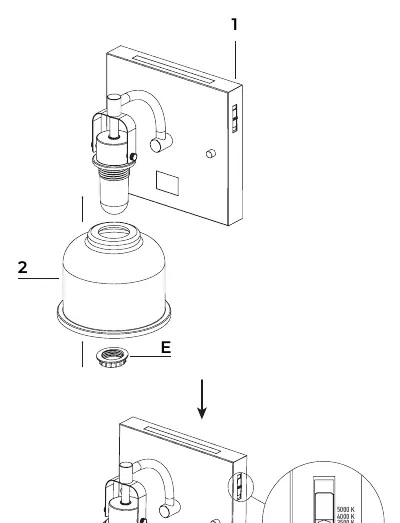
- Prepare Mounting Plate: Remove the mounting plate (A) from the fixture (1) by unscrewing the decorative nuts (D). Remove the plastic insulation from the fixture.
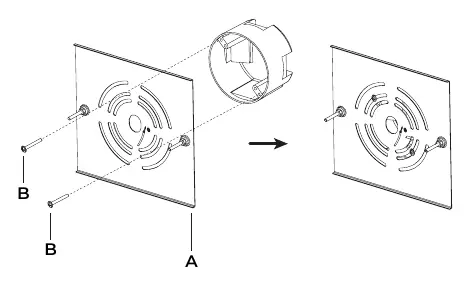
- Attach Mounting Plate: Secure the mounting plate (A) to the outlet box using the provided outlet box screws (B).
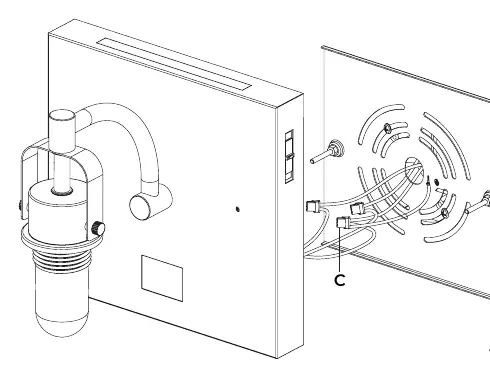
- Wiring: Connect the green/bare ground wire from the fixture to the ground wire from the outlet box. Connect the white wire from the fixture to the white (neutral) wire from the outlet box. Connect the black wire from the fixture to the black (live) wire from the outlet box. Use the provided wire connectors (C). Ensure no wires are exposed.
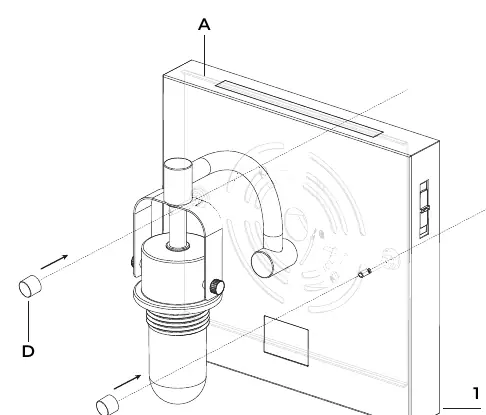
- Mount Fixture: Align the fixture (1) with the screws on the mounting plate (A) and secure it using the decorative nuts (D).
- Install Shade: Place the glass shade (2) on the fixture (1) and secure it with the socket ring (E).
Night Light Function
The night light provides dim ambient lighting. It turns on automatically when two conditions are met: the main light is off and motion is detected. It turns off automatically 5 minutes after the last movement is detected. The battery recharges automatically whenever the main light is turned on.
Care and Maintenance
Before cleaning, turn off the switch. Clean the fixture using clear water and a soft dry cloth only to maintain its appearance.
Troubleshooting
If the light does not turn on, check the following:
- Ensure the wall switch or circuit breaker is in the ON position.
- Check for bad main supply wiring; consult a certified electrician.
- If the switch is defective, consult a certified electrician.
- If components are damaged, contact Customer Service.
For further assistance, contact Globe Electric Customer Service at 1-888-543-1388 or via email at [email protected].
Manufacturer information
Globe Electric
Practical help
Common problems
Light does not turn on
Check if the wall switch or circuit breaker is off and turn it on.
Light does not turn on
Check for bad main supply wiring; consult a certified electrician.
Light does not turn on
The switch may be defective; consult a certified electrician.
Before use
- Turn off power at the main breaker.
- Verify voltage with a tester.
- Ensure tools have insulated handles.
- Check that the electrical system is properly grounded.
- Ensure you have all hardware: mounting plate, screws, wire connectors, decorative nuts, and socket ring.
Specs in practice
- Color Select
- Allows switching between 5000K, 4000K, 3500K, 3000K, and 2700K color temperatures.
- Night Light Battery
- 600 mAh 3.7V rechargeable battery; charges automatically when the main light is on.
- Motion Sensor
- Detects motion within a 25ft range at a 90-degree angle.
Images and diagrams
- Wiring: Connect green/bare copper to ground, white to neutral, and black to live using wire connectors.
- Mounting: Secure the mounting plate to the outlet box before attaching the fixture canopy.
Model compatibility
- Requires a standard electrical outlet box.
- The LED diffuser is integrated and non-replaceable.

Manual page author
David Miller
Documentation analyst
Organizes user manual content into clear summaries, with attention to model details, product context, and everyday usability.