Lighting / Ceiling Fans
User Manual for Globo Lighting 03672B Ceiling Fan
Quick guide for the Globo Lighting 03672B and 03672W ceiling fan. Includes installation instructions for cement and wood ceilings, wiring diagrams, remote control operation, and technical specifications.
Table of contents
Manual images
Click an image to enlargeQuick guide from the manual
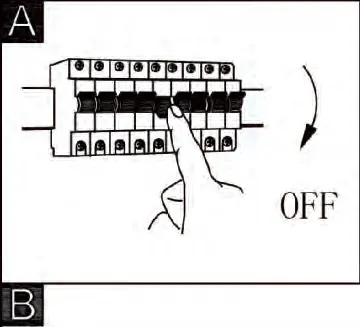
This manual provides installation and operation instructions for the Globo Lighting 03672B and 03672W ceiling fans. Before beginning, ensure the main power supply is turned off. The fan is designed for indoor use and features a 2.4G RF remote control for adjusting fan speed, light intensity, and timer settings. Note that the LED light source is integrated and cannot be replaced.
Installation
The installation process requires basic tools and should be performed by a qualified person. Ensure the ceiling structure is capable of supporting the fan's weight.
Ceiling Mounting
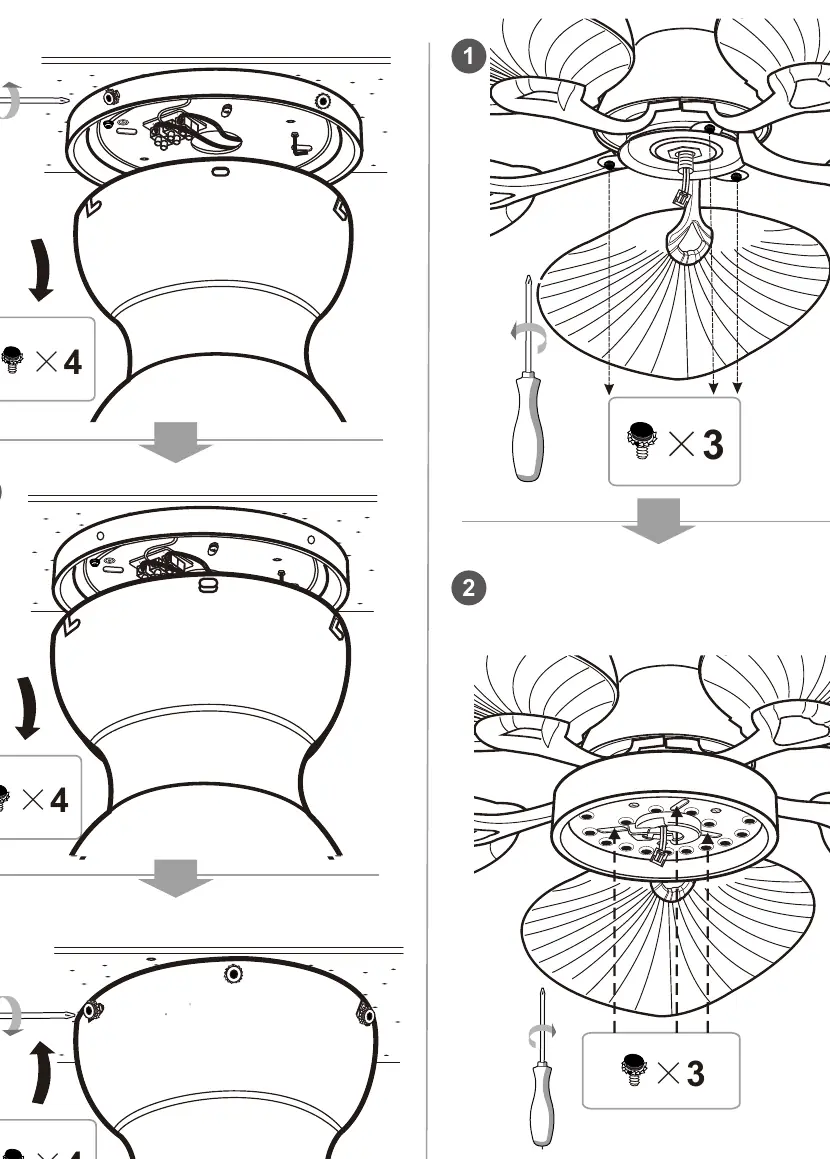
The fan can be mounted to either cement or wood ceilings. For cement ceilings, use the provided expansion bolts. For wood ceilings, use the appropriate wood screws. Ensure the mounting bracket is securely fastened before attaching the fan motor housing.

Blade Assembly
Attach the fan blades to the motor housing. Ensure the "THIS SIDE UP" label is facing the correct direction. Secure each blade using the provided screws, ensuring they are tightened firmly to prevent vibration.

Wiring
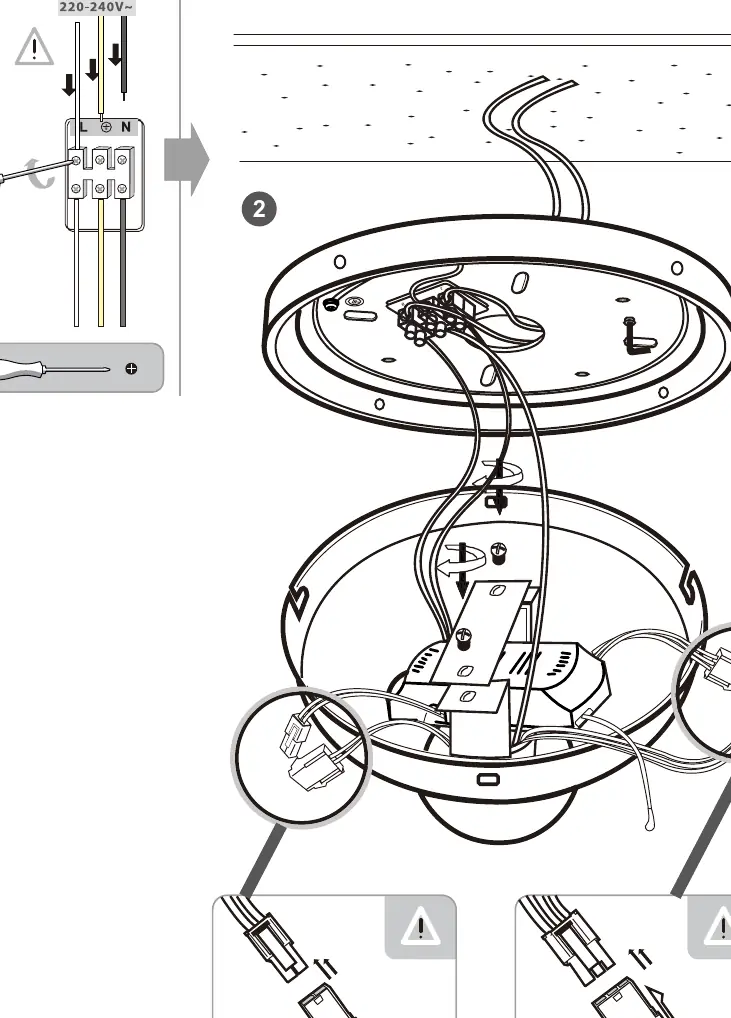
Connect the fan to the main power supply (220-240V~50Hz). Connect the Live (L) and Neutral (N) wires to the corresponding terminals on the terminal block. Ensure all connections are secure and properly insulated.
Housing and Light Kit
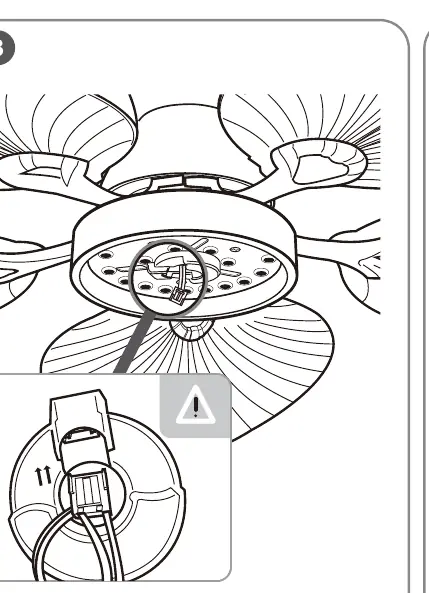
Once the motor is mounted and wired, attach the main housing cover. Finally, install the light kit assembly by connecting the internal plugs and securing the cover to the motor housing.
Remote Control Operation
The remote control allows for full operation of the fan and light.
- Fan Speed: Buttons 1-6 control the fan speed.
- Light Control: Use the Light ON/OFF button to toggle the light. The fan supports multiple light steps (3000K, 4500K, 6000K).
- Timer: Set the fan to turn off automatically after 1H, 2H, or 4H.
- Forward/Reverse: Use the F/R button to change the direction of the fan blades for summer or winter operation.
- Natural Wind: Activates the natural wind mode.
Technical Specifications
- Input Voltage: 220-240V~50Hz
- Motor Power: Max 35W
- LED Power: Max 22W
- Frequency Bandwidth: 433MHz
- Transmitting Power:< 2dBm
- Battery: 2x AAA (R03) 1.5V
Manufacturer information
Globo Lighting
Practical help
Common problems
Fan does not respond to remote control
Ensure the batteries (2x AAA) are installed correctly. Check if the remote is paired or if there is interference.
Light is not working
Verify that the wiring connections (L and N) are secure. The LED light source is integrated and cannot be replaced if faulty.
Fan wobbles during operation
Check that all blade screws are tightened securely and the mounting bracket is firmly attached to the ceiling.
Before use
- Turn off the main power supply at the circuit breaker.
- Verify the ceiling can support the fan weight.
- Ensure you have all components: blades, motor, remote, and mounting hardware.
- Insert 2x AAA batteries into the remote control.
- Check that the wiring matches the L and N terminals.
Specs in practice
- Input Voltage
- 220-240V~50Hz standard household power.
Images and diagrams
- The wiring diagram shows the connection of Live (L) and Neutral (N) wires to the terminal block.
- Installation diagrams illustrate the difference between mounting on cement ceilings (using expansion bolts) and wood ceilings (using screws).
Model compatibility
- The LED light source is non-replaceable and integrated into the product design.
- The control gear is also non-replaceable.

Manual page author
Michael Turner
Technical manual editor
Reviews PDF manuals for structure, safety notes, and practical product details so readers can find the right information quickly.