Electronics / Microphones
User Manual for Godox Alink Wireless Microphone
Comprehensive user guide for the Godox Alink wireless microphone system. Includes setup, pairing instructions, connection guides for cameras and smartphones, charging procedures, and technical specifications.
Quick answers from the manual
Quick answer
- The Godox Alink is a wireless microphone system. To use it, charge the units in the case, power them on by holding the button for 2 seconds, and connect the receiver to your camera, phone, or computer. p. 1, 8, 10, 11
Key actions
- Pairing the devices p. 3, 5
- Adjusting Noise Cancellation p. 3, 6
First start
- Remove the blue static film from the bottom of the receiver and transmitter before use. p. 8
Show 4 more answers Show less
Problems and fixes
Indicator light flashing red
The device has low battery and needs to be charged.
p. 3, 4Maintenance and reset
- If the device malfunctions, contact the distributor or authorized service center. Do not disassemble. p. 2, 16
Technical specifications
| Parameter | Value | Meaning | Pages |
|---|---|---|---|
| Transmission Type | 2.4GHz Frequency Hopping | Wireless signal type | p. 14 |
| Max Wireless Distance | 300m | Maximum operating range | p. 14 |
Where to find it in the PDF
- Transmitter Operation p. 3
- Receiver Operation p. 4
- Charging Case p. 8
Table of contents
Manual images
Click an image to enlargeQuick Start Guide
The Godox Alink is a wireless microphone system designed for mobile phones, cameras, and computers. Before first use, ensure you remove the blue static film from the bottom of the receiver and transmitter. The system features 2.4GHz transmission, noise cancellation, and a charging case for convenient power management.
Safety Warnings
- This product is a high-precision instrument; avoid dropping, collision, or pounding.
- Do not disassemble, modify, or attempt to repair the product without permission.
- Keep out of reach of children.
- Do not use in flammable or explosive environments.
- Do not expose to high temperatures, sunlight, or fire.
- If the battery swells, discontinue use immediately.
- Use only compatible power adapters for charging.
Transmitter (TX) Operation
The transmitter features a back clip and a multi-function button for power, noise cancellation, and pairing.
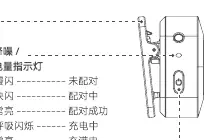
- Power On/Off: Press and hold for 2 seconds.
- Noise Cancellation: Press once to turn on/off.
- Pairing: Press twice to start pairing.
Indicator Lights:
- Green Flash (Slow): Unpaired.
- Green Flash (Rapid): Pairing.
- Green Constant: Paired.
- Blue Breathe: Charging.
- Blue Constant: Fully charged.
- Red Flash: Low battery.
- Orange Constant: Noise cancellation on.
Receiver (RX) Operation
The receiver features a camera cold shoe adapter and controls for mode and gain.
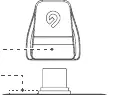
- Power On/Off: Press and hold for 2 seconds.
- Noise Cancellation: Press once to turn on/off.
- Pairing: Press twice to start pairing.
- Mode/Gain Adjustment: Press the M button to adjust gain or noise cancellation level. Press and hold for 3 seconds to switch between mono and stereo modes.
Indicator Lights:
- Green Constant: Mono mode.
- Blue Constant: Stereo mode.
- Gain Levels: Indicated by 1, 2, or 3 green lights (Low, Medium, High).
Charging Case
The charging case stores and charges the transmitter and receiver simultaneously.
- Charging: Place devices in the case; they will start charging automatically.
- Indicator: Flash white (charging), Constant white (fully charged), Flash red (low battery).
- Battery Life: Up to 20 hours total with the charging case.
Connecting to Devices
- Camera: Connect the receiver to the camera using the provided TRS to TRS cable.
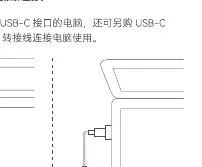
- Mobile Phone: Connect the receiver directly to the phone's USB-C port.
- Computer: Insert the receiver directly into the computer's USB-C port or use a USB-C female to USB-A adapter cable (sold separately).
Technical Specifications
- Transmission: 2.4GHz Frequency Hopping System.
- Range: Up to 300m (sight distance).
- Frequency Response: 20Hz-20KHz.
- Max SPL: 115dB.
- Battery Life: Approx. 10 hours (TX/RX).
- Charging Time: Approx. 1.5 hours.
Practical help
Common problems
Microphone not pairing
Ensure the transmitter is in pairing mode (press button twice) and the receiver is ready. Check indicator lights.
Low battery indicator
Place the transmitter or receiver into the charging case or connect to a power source.
Noise cancellation not working
Press the power/noise cancellation button once to toggle the feature on (indicated by orange light).
Before use
- Remove the blue static film from the bottom of the receiver and transmitter.
- Charge the transmitter, receiver, and charging case fully before first use.
- Check if your device requires a specific adapter (e.g., USB-C to USB-A for some computers).
- Ensure the transmitter is within 300m of the receiver.
Show more Show less
Specs in practice
- 2.4GHz Frequency Hopping
- Wireless technology that automatically switches frequencies to maintain a stable connection.
- Max SPL 115dB
- The maximum sound pressure level the microphone can handle without distortion.
- Mono/Stereo Mode
- Mono combines audio into one channel; Stereo separates audio into left and right channels.
Images and diagrams
- The transmitter features a back clip for attachment to clothing.
- The receiver has a cold shoe mount for camera attachment.
- The charging case has a USB-C port for charging the case itself.
Model compatibility
- Compatible with mobile phones, cameras, and computers.
- Android app available for noise cancellation adjustment.
- USB-C to USB-A adapter cable for computers is sold separately.

Manual page author
Michael Turner
Technical manual editor