Electronics / Microphones
User Manual for Godox MoveLink Wireless Microphone System
Comprehensive user guide for the Godox MoveLink 2.4GHz wireless microphone system. Includes setup instructions, pairing guide, installation methods, and technical specifications.
Quick answers from the manual
Quick answer
- To pair the Godox MoveLink transmitter and receiver, long press the pairing button on both units. The indicator light will turn blue when the connection is successful. p. 9, 10
Key actions
- Powering on/off p. 9, 10
- Adjusting volume p. 10
First start
- Charge the devices using the USB Type-C port or charging case. p. 9, 10
Problems and fixes
No audio signal
Check battery levels, ensure units are paired on the same channel, and verify cable connections.
p. 13Maintenance and reset
- Keep the device dry, avoid drops, and store away from strong magnetic fields. p. 13
Technical specifications
| Parameter | Value | Meaning | Pages |
|---|---|---|---|
| Working Range | 50m | Maximum distance in no shelter situation. | p. 13 |
| Battery Capacity | 300mAh | Internal lithium battery capacity. | p. 13 |
Where to find it in the PDF
- Transmitter Operation p. 9
- Receiver Operation p. 10
- Technical Data p. 13
Table of contents
Manual images
Click an image to enlargeQuick guide from the manual
The Godox MoveLink is a 2.4GHz wireless microphone system designed for video recording, interviews, and streaming. Before using the device, ensure the batteries are charged using the provided USB Type-C cable or the optional charging case. The system consists of a transmitter (TX) and a receiver (RX). Ensure both units are paired and set to the same channel for proper operation.
Device overview
MoveLink TX (Transmitter): Features a built-in microphone, 3.5mm audio port, power switch, mute button, pairing button, TFT display, and USB Type-C port.
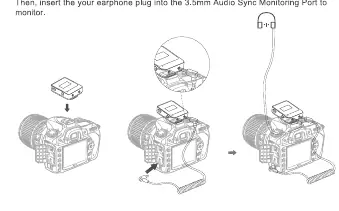
MoveLink RX (Receiver): Features a 3.5mm audio sync monitoring port, 3.5mm TRS audio output port, power switch/volume setting button, volume +/- buttons, pairing button, TFT display, and USB Type-C port.
Functions and operation
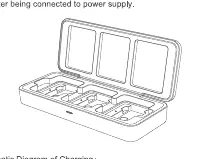
Power: Long press the power switch to turn the device on or off. When connected to a power source, the device enters standby mode and displays charging animation.
Pairing: Long press the pairing button on both units to match the receiver and transmitter. The indicator will light blue when successfully matched.
Volume Adjustment: On the receiver, use the volume +/- buttons to adjust the audio level. In dual channel mode, short press to adjust A/B channels simultaneously or separately.
Mute: Short press the mute button on the transmitter to toggle silent mode.
Installation methods
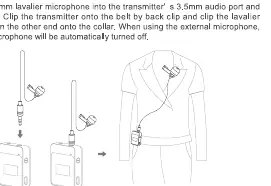
Using built-in microphone: Use the back clip to attach the transmitter to your collar, aiming the microphone towards the sound source.
Magnetic mount: The back clip contains a magnet. Use the included iron sheet to attach the transmitter or receiver to clothing. Place the iron sheet inside the clothing and the back clip on the outside.
Using external microphone: Insert the 3.5mm lavalier microphone into the transmitter's 3.5mm audio port. The built-in microphone will automatically turn off.
Camera connection: Install the receiver onto the camera's hotshoe using the back clip. Connect the receiver to the camera using the 3.5mm TRS-TRS audio cable.
Troubleshooting and maintenance
If you experience issues, check the following:
- No audio signal: Ensure batteries are charged, units are paired, and the microphone/earphone is properly connected.
- Signal interference: Change the channel on the transmitter and receiver.
- Maintenance: Keep the device dry and avoid exposure to high humidity, extreme temperatures, or strong magnetic fields. Do not drop the device.
Technical specifications
The system operates on a 2.4GHz frequency hopping system with a working range of up to 50 meters. It features a built-in 300mAh lithium battery providing approximately 6 hours of working time. The frequency range is 50Hz-20KHz.
Practical help
Common problems
Unable to receive audio signal
Check if batteries are charged, units are paired on the same channel, and cables are securely connected.
Signal interference
Change the channel on both the transmitter and receiver.
Magnetic mount not holding
Do not use on thick, ultra-thick, or multilayer clothing as the magnetic strength may be insufficient.
Before use
- Charge the transmitter and receiver using the USB Type-C cable or charging case.
- Ensure the transmitter and receiver are paired (indicator light blue).
- Check that the correct microphone (built-in or external) is selected.
- Verify the volume settings on the receiver.
- Ensure the receiver is properly connected to the camera or recording device.
Specs in practice
- Working Range
- Up to 50 meters in an open area without shelter.
- Working Time
- Approximately 6 hours on a full charge.
- Frequency Range
- 50Hz to 20KHz, suitable for high-quality audio recording.
Images and diagrams
- The magnetic mount uses an iron sheet placed inside clothing to hold the transmitter's back clip in place.
- The receiver can be mounted on a camera hotshoe and connected via a 3.5mm TRS cable.
Model compatibility
- Compatible with cameras via 3.5mm TRS-TRS cable.
- Compatible with smartphones via 3.5mm TRS-TRRS cable.

Manual page author
David Miller
Documentation analyst
Organizes user manual content into clear summaries, with attention to model details, product context, and everyday usability.