Electronics / Microphones
User Manual for Godox Virso S Wireless Microphone System
Quick guide for the Godox Virso S 2.4GHz Wireless Microphone System. Learn how to pair, operate, adjust settings, and troubleshoot your wireless audio setup.
Quick answers from the manual
Quick answer
- The Godox Virso S is a 2.4GHz wireless microphone system featuring a transmitter and receiver with a 200m range, suitable for various recording scenarios. p. 2, 23
Key actions
- Pairing the transmitter and receiver p. 16
- Restoring to factory settings p. 13
First start
- Power on and pair the devices before use. p. 10, 31
Problems and fixes
Unable to receive audio signal
Check if transmitter and receiver are set to the same channel, and microphone/earphone is connected.
p. 21Maintenance and reset
- Use the reset hole or menu combination to reset the device. p. 13
Technical specifications
| Parameter | Value | Meaning | Pages |
|---|---|---|---|
| Frequency Range | 50Hz-18KHz | Audio frequency response | p. 20 |
| Transmission Distance | 200m | Maximum wireless range | p. 21 |
Where to find it in the PDF
- Transmitter Components p. 4, 25
- Receiver Components p. 5, 26
- Installation p. 18
Table of contents
Manual images
Click an image to enlargeQuick guide from the manual
The Godox Virso S is a 2.4GHz wireless microphone system designed for cameras, suitable for live streaming, interviews, and video recording. It features a transmitter (Virso TX) and a receiver (Virso SRX) with a maximum transmission distance of 200m. Key features include noise reduction, screen rotation, and multiple output modes (Mono/Stereo/Safety track).
Product Overview
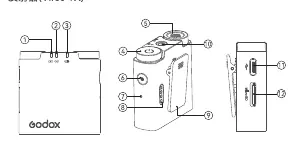
Transmitter (Virso TX): Includes battery indicator, pairing indicator, recording/mute indicator, power/mute button, recording/pairing button, built-in microphone, 3.5mm audio input, and Type-C port.
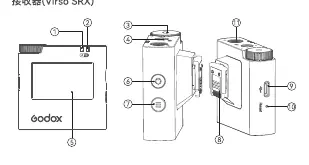
Receiver (Virso SRX): Includes A/B group indicators, select/confirm dial, 3.5mm audio output, color display, power/return button, and Type-C port.
Installation
Lavalier Microphone: Insert the omnidirectional lavalier microphone into the transmitter's 3.5mm audio input port and clip the transmitter to your belt. Alternatively, use the built-in microphone by clipping the transmitter to your collar.
Camera Connection: Slide the receiver into the Sony camera's hotshoe. If using other camera brands, connect the receiver to the camera using the provided 3.5mm TRS-TRS audio cable.
Operation
Pairing: Long press the recording/pairing button on the transmitter to start pairing. On the receiver, use the menu to select the pairing option.
Recording: Short press the recording/pairing button on the transmitter to start or stop recording. Files are saved in WAV format. The system supports up to 255 files; it is recommended to delete old files to prevent overwriting.
Menu Navigation: Use the menu button on the receiver to enter the menu interface. Use the select/confirm dial to navigate and adjust settings such as backlight, track mode (Mono/Stereo/Safety), volume, language, and denoise.
Troubleshooting
- No audio signal: Check if the transmitter and receiver are powered on, set to the same channel, and not in mute mode. Ensure the microphone or earphone is connected correctly.
- Signal disturbance: Change the channel on both the transmitter and receiver.
- Limited distance: Check if batteries are exhausted and replace or recharge if necessary.
Maintenance
- Avoid dropping or strong collisions to prevent malfunction.
- Keep the device dry; it is not waterproof.
- Avoid sudden temperature changes to prevent condensation.
- Keep away from strong magnetic fields.
Practical help
Common problems
Unable to receive audio signal
Ensure both devices are powered on, set to the same channel, and not in mute mode. Check cable connections.
Signal disturbance or interference
Change the channel settings on both the transmitter and receiver.
Limited operating distance
Check if the batteries are low and recharge them.
Before use
- Charge the transmitter and receiver fully.
- Ensure the transmitter and receiver are paired.
- Select the appropriate audio track mode (Mono/Stereo/Safety) in the menu.
- Mount the receiver to the camera hotshoe or connect via 3.5mm cable.
- Check if the microphone is securely connected to the transmitter.
Specs in practice
- Frequency Range
- 50Hz-18KHz, the range of audio frequencies the system can capture.
- Transmission Distance
- Up to 200m in optimal conditions.
- Battery Capacity
- 400mAh for Transmitter, 600mAh for Receiver.
Images and diagrams
- The transmitter features a built-in microphone and a 3.5mm input for external lavalier mics.
- The receiver display shows battery levels, signal strength, and audio volume for A/B groups.
- Installation involves clipping the transmitter to clothing and mounting the receiver to the camera hotshoe.
Model compatibility
- Designed for Sony cameras via hotshoe mount.
- Compatible with other camera brands using the 3.5mm TRS-TRS audio cable.

Manual page author
David Miller
Documentation analyst
Organizes user manual content into clear summaries, with attention to model details, product context, and everyday usability.