Electronics / Microphones
User Guide for Hollyland LARK MAX Wireless Microphone System
A comprehensive user guide for the Hollyland LARK MAX wireless microphone system. Includes setup, pairing, recording, settings, and technical specifications.
Quick answers from the manual
Quick answer
- The LARK MAX is a wireless microphone system featuring ENC, 8GB internal recording, and an AMOLED touchscreen. It supports 2 TX + 1 RX or 1 TX + 1 RX modes. p. 4
Key actions
- Recording p. 24, 26
First start
- Charge the devices using the charging case. p. 15
Show 4 more answers Show less
Problems and fixes
Low battery
Charge via the charging case.
p. 15Maintenance and reset
- Factory Reset p. 18
Technical specifications
| Parameter | Value | Meaning | Pages |
|---|---|---|---|
| Transmission Range | 250m (LOS) | Maximum distance in open environment. | p. 29 |
| Battery Capacity (TX) | 300mAh | Transmitter battery capacity. | p. 29 |
Where to find it in the PDF
- Interface Description p. 5, 6, 7
- Specifications p. 29, 30, 31, 32
Table of contents
Manual images
Click an image to enlargeQuick Guide from the Manual
The Hollyland LARK MAX is a professional-grade wireless microphone system designed for high-quality audio recording. It features a compact design, 2.4GHz digital transmission, Environmental Noise Cancellation (ENC), and a built-in 8GB storage for standalone recording on the transmitter.
Interface Description
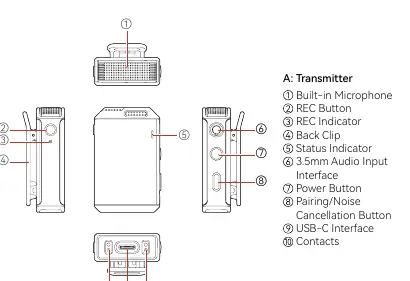
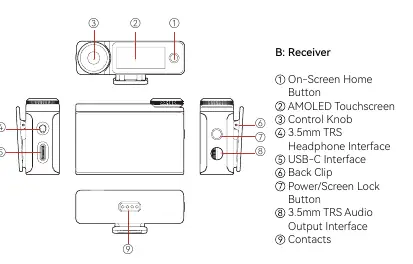
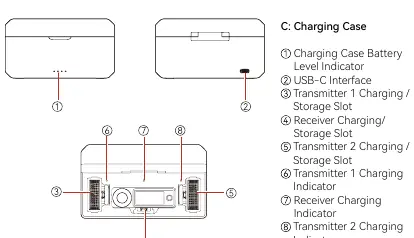
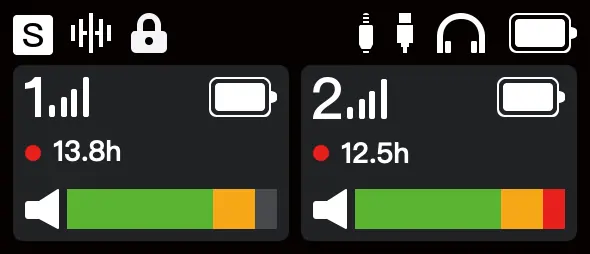
Transmitter
- Built-in Microphone: Captures audio.
- REC Button: Starts/stops internal recording.
- Power Button: Turns the device on/off and mutes.
- Pairing/Noise Cancellation Button: Used for pairing and toggling ENC.
- USB-C Interface: For charging and data transfer.
Receiver
- AMOLED Touchscreen: Displays status and settings.
- Control Knob: Used to navigate menus and adjust settings.
- Power/Screen Lock Button: Turns the device on/off and locks the screen.
- 3.5mm Audio Output: Connects to cameras or other recording devices.
Charging Case
- Battery Level Indicator: Shows the case's charge status.
- Charging Slots: Dedicated slots for the transmitter and receiver.
Operation Instructions
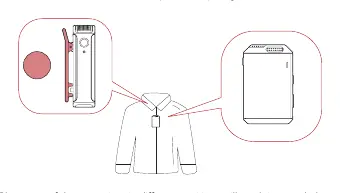
Attachment
Attach the transmitter to the collar or upper chest area using the back clip or the included clip magnet. Use the furry windshield when recording outdoors to reduce wind noise.
Connecting to Devices
- iPhone: Connect using a USB-C to Lightning cable.
- Android: Connect using a USB-C to USB-C cable.
- Camera: Attach the receiver to the camera's hot/cold shoe and connect via a 3.5mm TRS to TRS cable.
Pairing
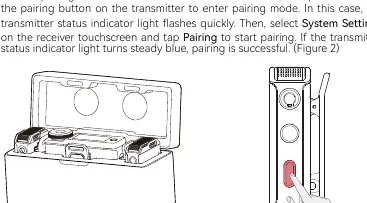
The devices are paired by default. If disconnected, use the charging case for auto-pairing or use the receiver's System Settings > Pairing menu for manual pairing.
Recording
Press the REC button on the transmitter to start internal recording. The transmitter records in 48 kHz/24-bit mono WAV format. Files are automatically split every 30 minutes.
Settings
Access the receiver's menu by pressing the control knob. You can configure:
- REC Mode: Stereo, Mono, or Safety Track.
- Mic Settings: Adjust gain, auto-record, and storage management.
- EQ: Hi-Fi, Low Cut, or Vocal Boost.
- System Settings: Pairing, brightness, date/time, language, and factory reset.
Firmware Update
Connect the transmitter, receiver, and charging case separately to a computer. Copy the firmware update file to the device to initiate the update process.
Practical help
Common problems
Transmitter not pairing
Place the transmitter and receiver in the charging case for auto-pairing, or use the 'Pairing' option in the receiver's System Settings menu.
Sound distortion
Ensure you are using the original cables provided. Check the gain settings in the 'Mic Settings' menu.
Storage full
Format the transmitter storage via the receiver's menu or by connecting it to a computer.
Before use
- Charge the transmitter, receiver, and charging case fully.
- Attach the transmitter to the collar or upper chest area.
- Use the furry windshield for outdoor recordings.
- Ensure the correct cable is used for your specific device (iPhone, Android, or Camera).
- Check the receiver's main interface for signal strength and battery levels.
Show more Show less
Specs in practice
- Transmission Range
- Up to 250m (LOS) / 60m (NLOS) in an unobstructed environment.
- Recording Format
- Lossless 48 kHz/24-bit mono WAV.
- Battery Life
- Transmitter: ~7.5 hours; Receiver: ~9 hours.
Images and diagrams
- Transmitter interface layout showing buttons and ports.
- Receiver interface layout showing touchscreen and control knob.
- Charging case layout showing slots and indicators.
- Receiver display icons for signal, battery, and recording status.
Model compatibility
- Compatible with iPhone (USB-C to Lightning), Android (USB-C), and Cameras (3.5mm TRS).

Manual page author
Emily Carter
User documentation editor