Lighting / LED Lamps
Installation Guide for Green Creative 15T8U6/8CCTS/HYB/C LED Tube
Comprehensive installation guide for the Green Creative 15T8U6/8CCTS/HYB/C LED tube. Includes instructions for both Type A (ballast compatible) and Type B (bypass/direct wire) installations, CCT adjustment, and safety warnings.
Table of contents
Manual images
Click an image to enlargeQuick Guide from the Manual
This document provides installation instructions for the Green Creative 15T8U6/8CCTS/HYB/C LED tube. This product supports two installation methods: Type A (direct substitution using existing electronic ballast) and Type B (bypass/direct wire installation). Always verify the luminaire voltage (120-277V) and ensure power is disconnected at the source before beginning any work.
Safety Warnings
- Risk of Fire/Electric Shock: Do not install in emergency exit fixtures or pre-heat luminaires.
- Ambient Temperature: Operate only between -4°F (-20°C) and 95°F (35°C).
- Compatibility: Not compatible with luminaires using a remote starter.
- Operation: If the lamp or luminaire exhibits undesirable operation (buzzing, flickering), turn off power immediately, remove the lamp, and contact the manufacturer.
CCT Adjustment
The lamp features a CCT select switch. Adjust this switch to the desired color temperature before installing the lamp. Do not adjust the switch while the power is on.
Installation Instructions
Type A (Direct Replacement)
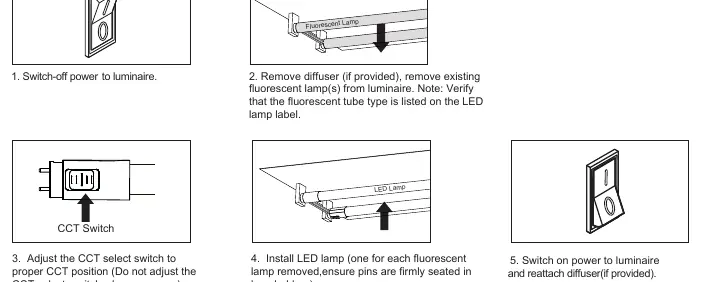
- Switch off power to the luminaire.
- Remove the diffuser (if provided) and the existing fluorescent lamp(s).
- Verify the fluorescent tube type is listed on the LED lamp label.
- Adjust the CCT select switch to the desired position.
- Install the LED lamp, ensuring pins are firmly seated in the lampholders.
- Switch on power to the luminaire and reattach the diffuser.
Type B (Bypass / Direct Wire)
- Switch off power to the luminaire.
- Remove the diffuser and existing fluorescent lamps.
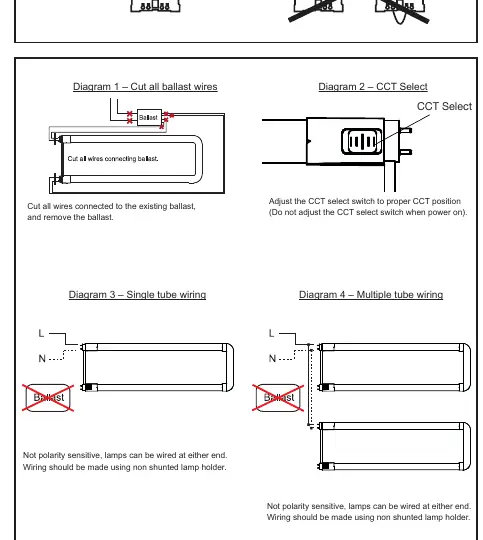
- Cut all wires connected to the existing ballast and remove the ballast.
- Adjust the CCT select switch to the desired position.
- Follow the specific wiring diagrams provided in the manual for single-ended or double-ended installation.
- Install the LED lamp into the wired lampholder.
- Affix the provided "Modification Sticker" to the luminaire.
- Switch on power to the luminaire and reattach the diffuser.
Technical Specifications
- Voltage: 120-277V
- Lamp Compartment Dimensions: 24" Length, 23-7/8" Width, 3-3/8" Height.
- Maximum Lamps in Luminaire: 2
- Compatibility: Suitable for damp locations. Suitable for shunted or non-shunted lamp holders (Type B).
Practical help
Common problems
Lamp does not light when energized
Remove the lamp from the luminaire and contact the lamp manufacturer or a qualified electrician.
Buzzing, flickering, or undesirable operation
Immediately turn off power, remove the lamp from the luminaire, and contact the manufacturer.
Before use
- Verify the luminaire voltage is 120-277V.
- Ensure the luminaire is not an emergency exit fixture.
- Check if the luminaire uses a remote starter (not compatible).
- Confirm ambient temperature is between -4°F and 95°F.
- Verify the fluorescent tube type is listed on the LED lamp label.
Images and diagrams
- Diagrams 1-4: Single-ended wiring instructions for Type B installation.
- Diagrams 5-8: Double-ended wiring instructions for Type B installation.
Model compatibility
- Suitable for damp locations.
- Compatible with shunted or non-shunted lamp holders for Type B installation.
- Not for use where directly exposed to weather or water.

Manual page author
David Miller
Documentation analyst
Organizes user manual content into clear summaries, with attention to model details, product context, and everyday usability.