Lighting / Fixtures
Installation Instructions for Sunco Lighting LED T8 Hybrid 15W
A comprehensive installation guide for the Sunco Lighting LED T8 Hybrid 15W. This manual covers safety precautions, operational modes (UL Type A and Type B), step-by-step installation procedures, and wiring diagrams.
Table of contents
Manual images
Click an image to enlargeQuick guide from the manual
The Sunco Lighting LED T8 Hybrid 15W is designed for use in luminaires with traditional fluorescent-type lampholders. It supports two operational modes: UL Type A (Direct replacement/Plug & Go) for use with compatible electronic ballasts, and UL Type B (Direct Wire/Ballast Bypass) for direct connection to 120-277V mains. Installation must be performed by a qualified electrician.
Safety Information
- Disconnect power at the source before installation or servicing.
- Do not install in pre-heat luminaires.
- Ensure the luminaire is suitable for the retrofit kit's input rating.
- Do not expose wiring to sharp edges or alter open holes in the enclosure.
- Suitable for damp locations.
- Not intended for use with emergency exit fixtures or battery backups.
UL Type A Installation (Plug & Go)
- Ensure power is OFF.
- Remove the lens or diffuser if applicable.
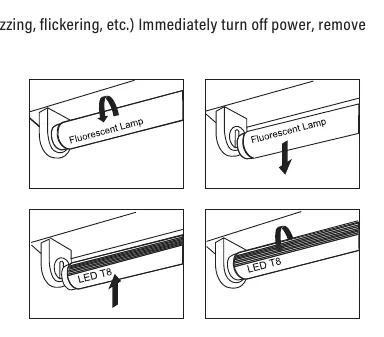
- Remove existing fluorescent lamps. Verify the fluorescent tube type is listed on the LED lamp label and check the ballast compatibility list.
- Place the LED lamp in the luminaire and insert pins into lampholders.
- Rotate the LED lamp until it locks in place, ensuring the front points away from the back of the luminaire.
- Install one LED T8 replacement lamp for each fluorescent lamp removed.
- Replace lens or diffuser and power ON.
UL Type B Double Ended Installation
- Remove existing covers and fluorescent tubes.
- Cut wires connected to the ballast and remove the ballast (and starter if present).
- Connect Line (L) from the power source into one lamp holder (Line In).
- Connect Neutral (N) from the power source into the opposite end lamp holder (Neutral In).
- For multiple lamps, connect separate Line and Neutral wires from the primary lamp holder to the adjacent tube.
- Install the double-ended bypass lamp into the wired lamp holders.
- Affix the provided Modification Sticker to the luminaire.
- Reinstall housing cover and lens.
UL Type B Single Ended Installation
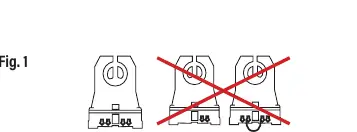
- This method requires NON-SHUNTED lampholders.
- Remove existing covers, tubes, and ballast.
- Connect Line (L) from the power source into one side of the non-shunted lamp holder.
- Connect Neutral (N) from the power source into the other side of the non-shunted lamp holder.
- For multiple lamps, daisy-chain Line and Neutral wires to adjacent tubes.
- Install the lamp with the L and N markings into the wired lamp holder end.
- Affix the Modification Sticker and reinstall covers.
Dimming Compatibility
If dimming is required for Type B installations, use only specific dimmers manufactured by Lutron: NTELV-300, CTELV-303P, DVELV-303P, or SELV-300P. These dimmers operate only on 120V.
Practical help
Common problems
Lamp does not light
For Type A, verify ballast compatibility. For Type B, ensure wiring connections are correct and power is reaching the lamp holders.
Buzzing or flickering
Immediately turn off power, remove the lamp from the luminaire, and contact the manufacturer.
Dimming issues
Ensure you are using only the specified Lutron dimmers (NTELV-300, CTELV-303P, DVELV-303P, or SELV-300P) and that the system is operating on 120V.
Before use
- Ensure power is disconnected at the source.
- Verify ballast compatibility list (for Type A).
- Check if the luminaire is a pre-heat type (do not install if yes).
- Ensure you have a qualified electrician for installation.
- Inspect the lamp for damage caused during transportation.
- Confirm the luminaire construction features match the requirements.
Images and diagrams
- Wiring diagrams illustrate connections for one to four lamps in Type B configurations.
- Fig 1 distinguishes between Non-Shunted and Shunted lampholders.
Model compatibility
- Type A requires compatible electronic ballasts.
- Type B requires ballast bypass.
- Dimming is only supported with specific Lutron models on 120V.

Manual page author
Emily Carter
User documentation editor
Prepares concise manual descriptions and highlights the most useful setup, operation, and maintenance information for readers.