Electronics / Video Lighting
User Manual for GVM-1300D/GVM-1500D Photography Light
Quick guide for GVM-1300D and GVM-1500D photography lights. Includes installation, control settings, app connectivity, and troubleshooting steps.
Table of contents
Manual images
Click an image to enlargeQuick Guide from the Manual
The GVM-1300D and GVM-1500D are professional LED photography lights designed for studio, outdoor, and live broadcast use. Before operation, ensure the device is used by a professional or under professional guidance. Always remove the protective cover before use and ensure the device is operated within a temperature range of -10°C to 40°C. Do not look directly into the light source when it is on.
Installation
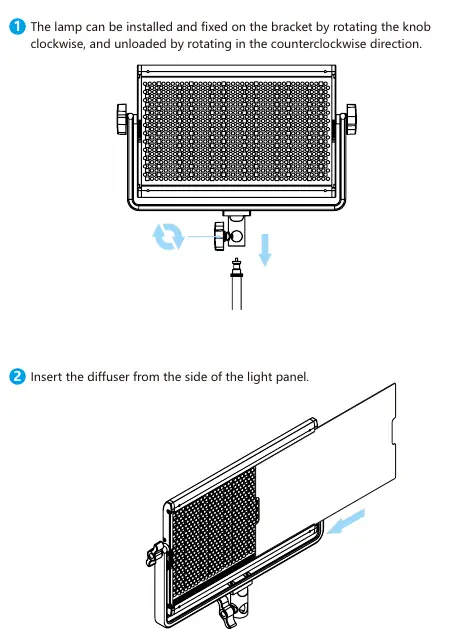
Mounting: The light can be installed on a bracket by rotating the knob clockwise to secure it and counterclockwise to remove it. Loosen the adjustment knobs on both sides of the U-bracket to set the desired angle, then tighten them to lock the position.
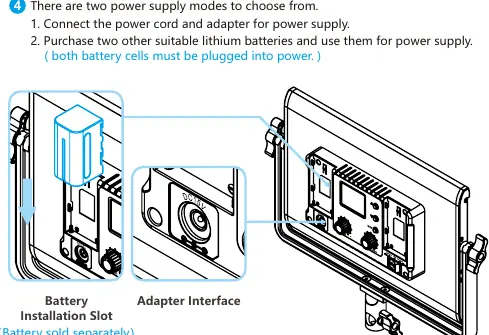
Diffuser: Insert the diffuser panel from the side of the light panel.
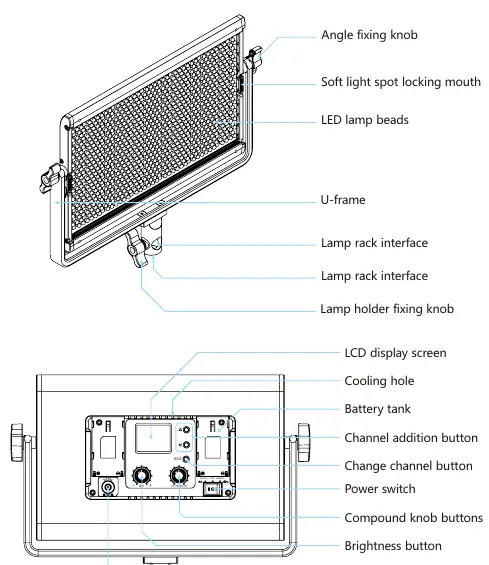
Power Supply: There are two power supply modes:
- DC Adapter: Connect the power cord and adapter to the DC15V input interface.
- Batteries: Purchase two suitable lithium batteries and insert them into the battery slots. Both battery cells must be installed for power.
Control Panel and Operation
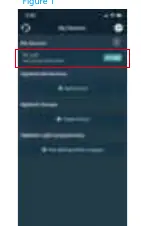
The control panel features an LCD screen and several buttons/knobs:

- Power Switch: Turns the device on or off.
- Mode Control Button: Switches between control modes (Rotate, Slave, Master, APP).
- Brightness Adjustment Button: Adjusts the light intensity.
- Multifunctional Knob: Short press to switch between CCT (Color Temperature), HUE, and SAT (Saturation). Long press for 3 seconds to activate/deactivate Scene (SC) mode. Rotate to adjust values.
- Channel Buttons: Used to select channels in Master/Slave mode.
Modes:
- Rotate Control: Adjust settings using the dimming knob.
- Master/Slave Control: Set one light to Master and others to Slave with the same channel to synchronize settings.
- APP Control: Connect via the GVM LED app for remote adjustments.
APP Control
To use the app, switch the light to APP mode. Ensure Bluetooth and GPS are enabled on your phone. Open the GVM LED application, search for "BT_LED", and connect. You can control brightness, color temperature, hue, saturation, and scene types through the app. You can also save custom light effects in the "My Scenes" section.
Troubleshooting
If the light does not turn on, check the power adapter connection or battery charge. If the knobs are unresponsive, ensure the device is not in Slave mode; switch to Master mode to regain control. If the light is on but the display is off, check if it was turned off via the app. If RGB colors are missing, check if the Saturation (SAT) value is set to 0.
Safety and Maintenance
Do not use the light in high humidity or near corrosive liquids. The device is not waterproof. Always unplug the power cord by pulling the plug, not the cable. Clean the device with a dry, soft cloth; do not use wet cloths or detergents. If the device will not be used for a long time, disconnect the power and remove batteries.
Practical help
Common problems
Switch indicator does not light up
Check if the power adapter is well connected or if the battery is depleted and needs charging.
Brightness/Color temperature knob is unresponsive
The device may be in Slave mode. Press the MODE button to switch to Master mode.
Light is ON but display/light is off
Check if the light was turned off via the mobile app. Press the ON/OFF button again.
App cannot connect or control the light
Ensure the light is in APP mode, Bluetooth and GPS are enabled on your phone, and you are connecting to 'BT_LED' within the app, not system Bluetooth settings.
No RGB color output
Check if the Saturation (SAT) value is set to 0. Increase the SAT value using the multifunctional knob or app.
Before use
- Remove the protective cover from the light.
- Ensure ambient temperature is between -10°C and 40°C.
- Verify power source (DC adapter or two compatible lithium batteries).
- Ensure the light is mounted firmly on the stand.
- Check that the power cord is not damaged.
Specs in practice
- Color Temperature 3200K-5600K
- Adjustable range from warm (3200K) to cool (5600K) white light.
Images and diagrams
- Angle fixing knob: Located on the sides of the U-bracket to adjust tilt.
- Battery tank: Slots on the back for external lithium battery power.
- Multifunctional knob: Primary control for CCT, HUE, SAT, and Scene modes.
- Adapter interface: DC input for the power adapter.
Model compatibility
- Requires 15V/5A DC power supply.
- Not waterproof; use only in dry environments.
- Requires GVM LED app for smartphone control.

Manual page author
David Miller
Documentation analyst
Organizes user manual content into clear summaries, with attention to model details, product context, and everyday usability.