General / Service Manuals
GYS 050932-13-02-2020-V2 Bumper Repair Kit User Guide
Comprehensive guide for the GYS Bumper Repair Kit, covering plastic identification, surface preparation, stainless steel mesh reinforcement, and brazing techniques for professional bumper repairs.
Table of contents
Quick guide from the manual
This document provides instructions for using the GYS Bumper Repair Kit to fix cracks and holes in automotive plastic bumpers. The process involves identifying the plastic type, reinforcing the area with a stainless steel mesh, and filling the damage with specialized brazing sticks.
Plastic identification
Before starting, identify the plastic type by checking the ID symbol on the back of the part:
- Thermoplastics: PP, PE, PP/EPDM, TEEE, TPE, TPO, TPU, TPUR.
- Thermoset: PUR, RIM, RRIM, EEBC.
Note that different plastic types require different repair methods. Some materials like SMC, Glass fiber, UP, FRP, ABS, PA, PC/PBT, and PPO cannot be repaired using this brazing process and should be glued instead.
Surface preparation
- Clean the area thoroughly using soapy water. Do not use solvent-based cleaners.
- Grind the area to be repaired using 40-grain abrasive paper. Avoid high rotation speeds to prevent melting the plastic.
- For holes, grind 3-4 cm around the area and bevel the edges.
Repair procedure
- Connect the soldering iron to a 230V supply and allow it to reach operating temperature.
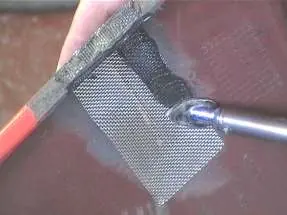
- Position the stainless steel mesh (ref. 052949) over the crack or hole.
- Use the soldering iron to melt the mesh into the plastic. Do not press too hard; the 550°C tip temperature is sufficient to allow the plastic to flow through the mesh.
- Once cooled, grind the area around the break and chamfer the edges.
- Fill the area with JBDC brazing sticks (ref. 052956). Pre-heat the stick until it melts on half its thickness, then apply it like tin soldering.
- Finish by sanding with 40 or 80-grain paper, followed by ABRALON abrasive for a smooth surface.
Safety and maintenance
- Never leave the soldering iron switched on with the tip facing down, as this can cause the body to overheat and deteriorate.
- Ensure proper ventilation; wear a breathing mask if air extraction is insufficient.
- Only use the provided stainless steel mesh. Aluminum or generic steel meshes may oxidize or lack the necessary mechanical resistance.
Manufacturer information
GYS
Practical help
Common problems
Mesh oxidizes or repair is weak
Only use the official JBDC stainless steel mesh. Generic steel or aluminum meshes are prone to oxidation or mechanical failure.
Soldering iron overheating
Never leave the iron switched on with the tip facing down.
Plastic does not bond
Verify the plastic type. Materials like SMC, Glass fiber, ABS, or PC/PBT are not compatible with this brazing process and require gluing.
Before use
- Identify plastic type via ID symbol on the part
- Clean surface with soapy water (no solvents)
- Grind area with 40-grain abrasive paper
- Ensure 230V power supply is available
- Wear a breathing mask if working in poorly ventilated areas
Specs in practice
- Soldering iron tip temperature
- 550°C, designed to melt plastic through the mesh without excessive pressure.
- Stainless steel mesh (ref. 052949)
- Reinforcement material, 25cm x 12.5cm, essential for structural integrity.
- Brazing sticks (ref. 052956)
- Polypropylene filler reinforced with glass and carbon fiber for finishing.
Images and diagrams
- The mesh must be melted into the plastic to act as a structural reinforcement on the back of the bumper.
- Brazing sticks should be pre-heated until melted on half their thickness to ensure proper capillary action.
Model compatibility
- SMC, Glass fiber, UP, and FRP must be glued (use UV PATCH/FASTSEALER).
- ABS, PA, PC/PBT, and PPO cannot be brazed and must be glued.

Manual page author
Emily Carter
User documentation editor
Prepares concise manual descriptions and highlights the most useful setup, operation, and maintenance information for readers.