Tools / Power Tools
Operating Instructions for Hilti AG 125-19SE Angle Grinder
Quick guide for the Hilti AG 125-19SE angle grinder. Includes safety instructions, assembly steps for guards and discs, operation, and maintenance.
Table of contents
Manual images
Click an image to enlargeQuick guide from the manual
This document provides essential operating instructions for the Hilti AG 125-19SE angle grinder. Always read the full safety instructions before use. The tool is intended for grinding, cutting, and brushing metal and mineral materials without the use of water. Ensure you use the correct protective guard for the specific application.
Product overview
The tool features a spindle lock button, an on/off switch, ventilation slots, a side handle, and various mounting accessories. Refer to the diagram on page 12 for the exact location of these components.

Assembly
Protective guard: Install the guard by aligning the triangles on the guard and the tool. Press the guard release button and rotate the guard until it clicks into the desired position.
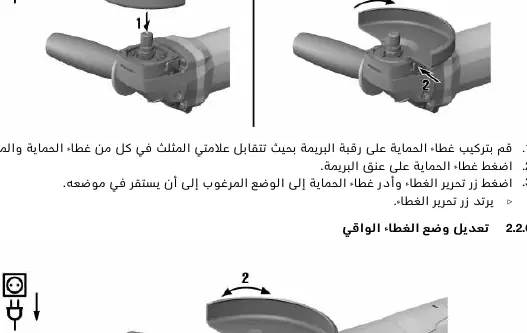

Side handle: Screw the side handle into one of the threaded bushings provided on the tool.
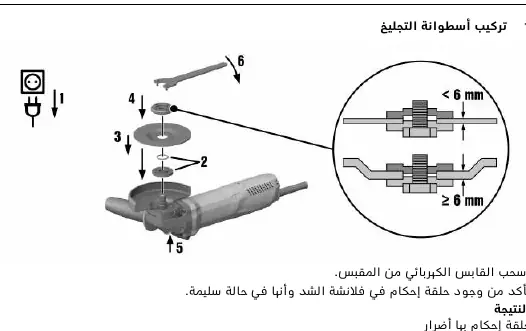
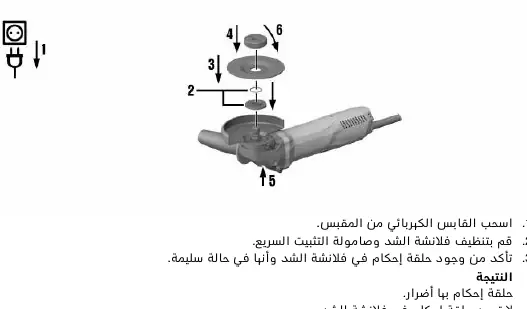
Discs: Ensure the power plug is disconnected. Clean the clamping flange and nut. Place the clamping flange on the spindle, position the disc, and secure it with the clamping nut or the Kwik lock nut. Use the pin wrench to tighten the standard nut while holding the spindle lock button.
Operation
Starting: Plug the tool into the power supply. Press the rear part of the on/off switch and slide it forward to lock it in the 'on' position.
Speed control: The tool features variable speed preselection from 2800 to 11500 RPM.
ATC (Active Torque Control): The tool is equipped with ATC, which detects if the disc is about to jam and stops the motor to prevent kickback. If ATC triggers, release the on/off switch and restart the tool.
Maintenance
Clean the ventilation slots regularly with a dry brush. Check the power cable and plug for damage. If the cable is damaged, have it replaced by a qualified professional. After maintenance, ensure all safety devices are correctly installed and functional.
Troubleshooting
If the tool does not start, check the power supply and the cable. If the tool does not run at full power, the extension cable may have an insufficient cross-section. If the gear housing becomes too hot, allow the tool to run at idle to cool down.
Manufacturer information
Hilti Corporation
Practical help
Common problems
Tool does not start
Check the power supply and ensure the cable and plug are not damaged.
Tool does not run at full power
The extension cable cross-section is too small; use a cable with a sufficient cross-section.
High gear housing temperature
Run the tool at idle speed to allow it to cool down.
Before use
- Check that the disc is not damaged, cracked, or worn.
- Ensure the protective guard is correctly installed and locked.
- Verify the side handle is securely attached.
- Check that the power cable and plug are in good condition.
- Ensure the correct flange and nut are used for the specific disc type.
Specs in practice
- Max disc diameter
- 125 mm
Images and diagrams
- 1: Spindle lock button
- 2: On/Off switch
- 3: Ventilation slots
- 5: Side handle
- 10: Protective guard
Model compatibility
- Use only with compatible Hilti discs and accessories.
- Do not use for polishing applications.
- Use the appropriate dust guard for cutting concrete or masonry.

Manual page author
David Miller
Documentation analyst
Organizes user manual content into clear summaries, with attention to model details, product context, and everyday usability.