Tools / Power Tools
Operating Instructions for Hilti DCG 125-S, DAG 125-S, and DAG 125-SE Angle Grinders
Quick guide and operating instructions for Hilti DCG 125-S, DAG 125-S, and DAG 125-SE angle grinders. Includes safety guidelines, disc installation, operation, and maintenance procedures.
Table of contents
Manual images
Click an image to enlargeQuick guide from the manual
This document provides operating instructions for the Hilti DCG 125-S, DAG 125-S, and DAG 125-SE angle grinders. It is essential to read these instructions before first use. Always keep the manual with the tool.
Operating controls and components
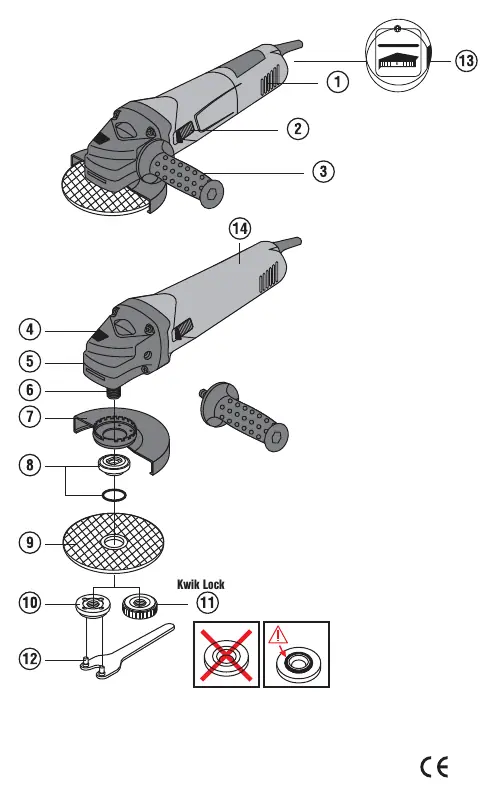
- Ventilation slots
- On / off switch
- Vibration-absorbing side handle
- Spindle lockbutton
- Guard release button
- Spindle
- Guard
- Clamping flange with O-ring
- Abrasive cutting/grinding disc
- Clamping nut
- Kwik-Lock quick-release clamping nut (optional)
- Wrench
- Speed preselection thumbwheel (DAG 125-SE only)
Safety instructions
General Safety: Always wear personal protective equipment, including eye protection, hard hat, ear protection, protective gloves, and breathing protection. Ensure the workplace is well-lit and ventilated.
Electrical Safety: Check the power supply voltage matches the tool's rating. Use a residual current device (RCD) when working outdoors. Do not use the tool if the supply cord is damaged.
Operational Safety: Never use the tool without the guard. Always use the side handle. Do not use the tool for materials hazardous to health (e.g., asbestos). If the tool starts with a jolt, it may be defective; have it repaired by a Hilti Service Center.
Before use
Fitting the guard: Fit the guard onto the drive spindle collar, aligning the triangular marks. Press the guard release button and rotate until it engages.

Fitting the disc: Ensure the speed rating of the disc is equal to or higher than the tool's rated speed. Use the clamping flange and nut (or Kwik-Lock nut). Press the spindle lockbutton only after the spindle has stopped rotating.
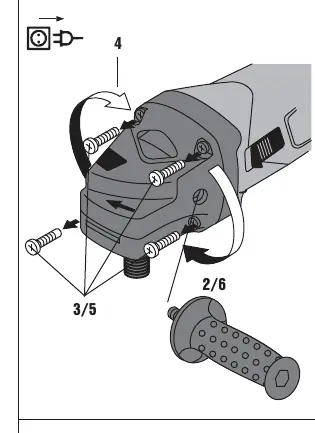
Rotating the gearing section: The gearing section can be rotated to one of four positions at 90-degree intervals for better ergonomics. Remove the four screws, rotate the section, and re-secure.
Operation
Rough grinding: Maintain an angle of 5° to 30° between the disc and the working surface. Move the tool to and fro with moderate pressure.
Cutting: Apply moderate feed pressure and do not tilt the disc. Hold at approximately 90° to the surface.
Switching on/off: Plug in the tool, press the rear section of the switch, slide it forward, and lock it. To switch off, press the rear section of the switch.
Care and maintenance
Disconnect the mains plug before any maintenance. Regularly clean the air vents with a dry brush. Do not use silicone-based cleaning agents. If the tool is dropped or suffers mechanical damage, have it checked by a Hilti Service Center.
Manufacturer information
Hilti Corporation
Practical help
Common problems
The power tool doesn't start.
Check for interruption in the electric supply, inspect the supply cord/plug for defects, or check if carbon brushes are worn.
The power tool doesn't achieve full power.
The extension cord's conductor cross-section may be inadequate; use a cord with an adequate cross-section.
Before use
- Ensure the guard is securely attached and positioned correctly.
- Verify the side handle is fitted.
- Check that the disc speed rating matches or exceeds the tool's rated speed.
- Inspect the disc for cracks or damage.
- Ensure the power supply matches the tool's identification plate.
- Verify the clamping flange O-ring is present.
Specs in practice
- Max. washer diameter
- 125 mm.
- Protection class
- Protection class II (double insulated).
Images and diagrams
- Page 2: Overview of all controls and components.
- Page 4: Step-by-step guide for fitting and removing discs and using the Kwik-Lock nut.
- Page 5: Instructions for rotating the gearing section.
Model compatibility
- Use only synthetic resin-bonded, fiber-reinforced discs.
- Do not use for wet cutting or grinding.
- Use only discs approved for a peripheral speed of at least 80 m/sec.

Manual page author
David Miller
Documentation analyst
Organizes user manual content into clear summaries, with attention to model details, product context, and everyday usability.