Tools / Anchoring Systems
Installation Instructions for Hilti HIT-Z(-R)-D TP M16 Chemical Anchor
A comprehensive installation guide for the Hilti HIT-Z(-R)-D TP M16 chemical anchor system. Includes technical specifications, drill diameters, embedment depths, and step-by-step mounting procedures with torque requirements.
Quick answers from the manual
Quick answer
- The Hilti HIT-Z(-R)-D TP M16 is a chemical anchor. Installation requires an 18 mm drill bit, a 125 mm embedment depth, and a torque of 80 Nm (HIT-Z-D TP) or 155 Nm (HIT-Z-R-D TP). p. 1, 2
Key actions
- Drill the hole to 125 mm depth using an 18 mm drill bit. p. 1, 2
- Tighten the nut to 80 Nm (HIT-Z-D TP) or 155 Nm (HIT-Z-R-D TP). p. 1, 2
Technical specifications
| Parameter | Value | Meaning | Pages |
|---|---|---|---|
| Drill Diameter (d0) | 18 mm | Required hole size | p. 1, 2 |
| Fixture Hole Diameter (df) | 20 mm | Clearance hole in fixture | p. 1, 2 |
| Embedment Depth (hef) | 125 mm | Depth of anchor in concrete | p. 1, 2 |
| Installation Torque (Tinst) | 80 Nm / 155 Nm | Tightening force | p. 1, 2 |
Where to find it in the PDF
- Installation Specifications and Steps p. 1, 2
Table of contents
Manual images
Click an image to enlargeImportant Information
This document provides installation instructions for the Hilti HIT-Z(-R)-D TP M16 chemical anchor system. Ensure that the ambient temperature during installation is between +5°C and +40°C. Always use the appropriate personal protective equipment (PPE) as indicated by the pictograms.
Technical Specifications
The following parameters are critical for the correct installation of the anchor:
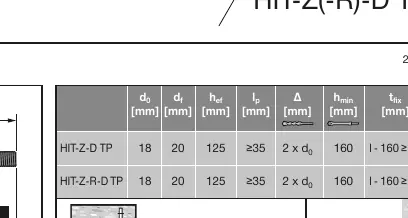
- Drill bit diameter (d0): 18 mm
- Fixture hole diameter (df): 20 mm
- Effective embedment depth (hef): 125 mm
- Installation torque (Tinst): 80 Nm for HIT-Z-D TP; 155 Nm for HIT-Z-R-D TP
Installation Procedure
Follow these steps to ensure a secure installation:
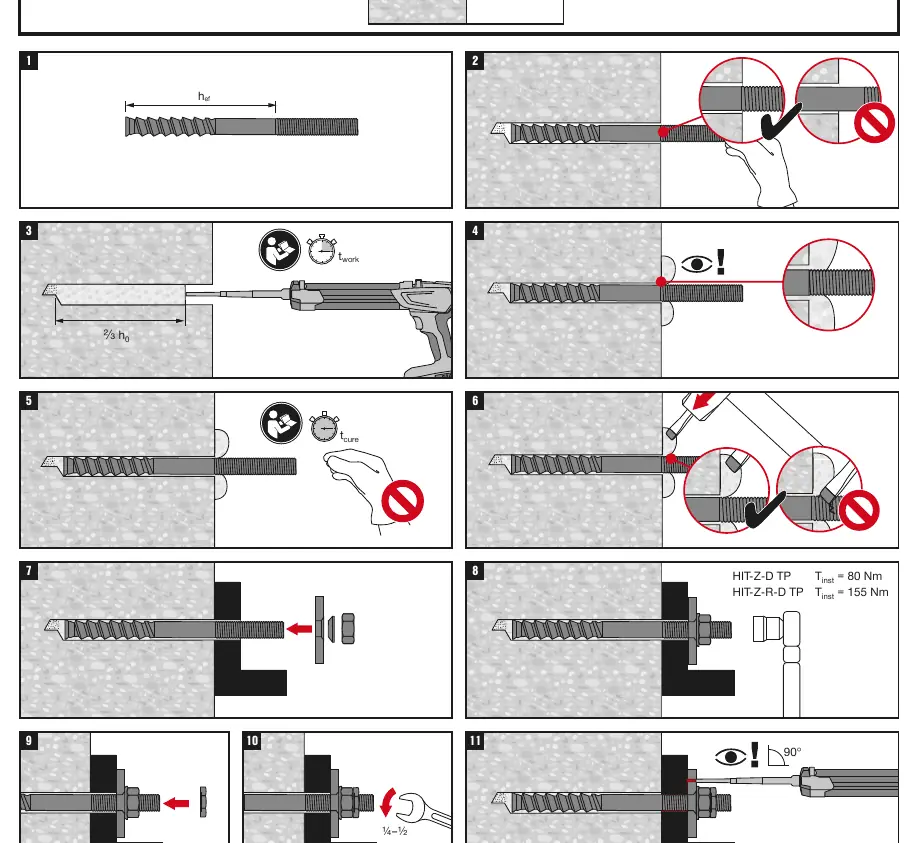
- Preparation: Mark the required embedment depth (hef + tfix) on the anchor rod.
- Drilling: Drill the hole to the specified depth.
- Cleaning: Ensure the hole is thoroughly cleaned of dust and debris before proceeding.
- Adhesive Injection: Inject the Hilti HIT-HY 200 adhesive into the hole, filling approximately 2/3 of the hole depth (h0).
- Anchor Insertion: Insert the anchor rod into the hole. Ensure the adhesive is properly distributed.
- Curing: Allow the adhesive to cure according to the specified curing time (tcure). Do not disturb the anchor during this period.
- Fixture Installation: Once cured, place the fixture over the anchor.
- Torque Application: Install the washer and nut. Tighten the nut to the specified installation torque (Tinst) using a calibrated torque wrench.
Manufacturer information
Hilti Corporation
Practical help
Common problems
Anchor does not reach full depth
Ensure the hole is drilled to the correct depth (125 mm) and is free of debris.
Adhesive not curing
Verify that the ambient temperature is within the allowed range (+5°C to +40°C) and that the curing time has elapsed.
Before use
- Verify the anchor type (HIT-Z-D TP or HIT-Z-R-D TP)
- Check that the drill bit diameter is 18 mm
- Ensure the fixture hole diameter is 20 mm
- Confirm ambient temperature is between +5°C and +40°C
- Have a calibrated torque wrench ready
Specs in practice
- Tinst (80/155 Nm)
- The required torque to tighten the nut, specific to the anchor model.
Images and diagrams
- The diagrams show the sequence from drilling to final torque application.
- Pay close attention to the torque values, as they differ between the standard and R-D versions.
Model compatibility
- Compatible with Hilti HIT-HY 200-A V3 and HIT-HY 200-R V3 adhesive systems.

Manual page author
Emily Carter
User documentation editor
Prepares concise manual descriptions and highlights the most useful setup, operation, and maintenance information for readers.