Tools / Anchoring Systems
Installation Guide for Hilti HIT-HY 200-A V3 / HIT-HY 200-R V3 Injection System
Comprehensive installation guide for Hilti HIT-HY 200-A V3 and HIT-HY 200-R V3 injection systems. Includes drilling, cleaning, and injection procedures for rebar connections.
Quick answers from the manual
Quick answer
- The Hilti HIT-HY 200-A V3 and HIT-HY 200-R V3 are injection systems for anchoring reinforcing bars (rebars) in concrete. Installation requires specific drilling, cleaning, and injection steps based on the hole depth and application type. p. 2, 15
Key actions
- Drill the hole to the required embedment length. p. 15
- Clean the drill hole thoroughly using the specified method (Manual, Compressed Air, or Automatic). p. 16, 17, 18
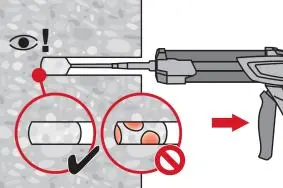
- Inject adhesive from the back of the hole to avoid air voids. p. 19
- Insert the rebar and allow the mortar to cure. p. 20
First start
- Ensure the rebar is dry and free of oil. Mark the embedment depth on the rebar. Attach the mixing nozzle to the foil pack and discard the initial amount of adhesive as specified. p. 18
Problems and fixes
Aborted drill hole
The drill hole must be filled with mortar.
p. 15Technical specifications
| Parameter | Value | Meaning | Pages |
|---|---|---|---|
| Rebar diameter | 8 - 32 mm | Compatible rebar sizes for the system. | p. 3 |
| Concrete strength | C20/25 to C50/60 | Compatible concrete classes for installation. | p. 3 |
Where to find it in the PDF
- Product Description p. 4
- Installation Instructions p. 14, 15, 16, 17
Table of contents
Manual images
Click an image to enlargeQuick guide from the manual
This document provides installation instructions for the Hilti HIT-HY 200-A V3 and HIT-HY 200-R V3 injection systems used for rebar connections. The core process involves drilling the hole, cleaning it thoroughly, injecting the adhesive, and setting the rebar. Always consult the Material Safety Data Sheet (MSDS) before use and wear appropriate protective gear.
Product description
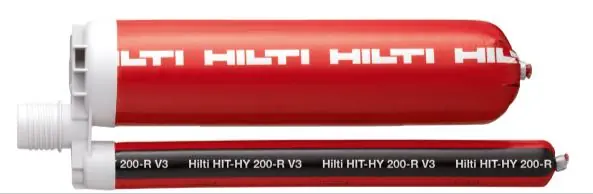
The Hilti HIT-HY 200-A V3 and HIT-HY 200-R V3 are hybrid injection systems designed for anchoring reinforcing bars (rebars) in existing concrete structures. They are compatible with rebar diameters from 8 mm to 32 mm in concrete classes C20/25 to C50/60.
Installation
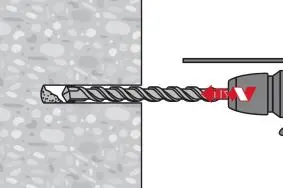
Hole drilling
Drill the hole to the required embedment length using a hammer drill in rotation-hammer mode, a hollow drill bit with vacuum attachment, or diamond coring with a roughening tool (TE-YRT). Ensure the drill hole is parallel to existing rebar; use a drilling aid (HIT-BH) if necessary.
Hole cleaning
Proper cleaning is critical for load values. Choose the method based on hole diameter and depth:
- Manual Cleaning (MC): For diameters ≤ 20 mm and depths ≤ 10 · ϕ. Use a Hilti hand pump to blow out the hole, brush with a specified Hilti HIT-RB brush, and blow out again.
- Compressed Air Cleaning (CAC): For larger holes or depths. Use oil-free compressed air and the specified brush.
- Automatic Cleaning (AC): Performed during drilling with Hilti TE-CD/TE-YD systems and a vacuum cleaner.
Injection preparation
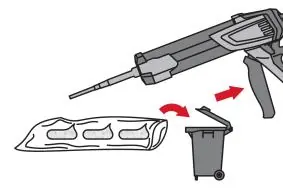
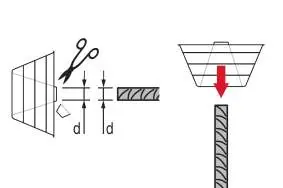
Attach the Hilti mixing nozzle (HIT-RE-M) to the foil pack. Insert the pack into the dispenser. Discard the initial amount of adhesive (2 strokes for 330 ml, 3 strokes for 500 ml, 4 strokes for 500 ml at < 5°C).
Injection method
Inject adhesive from the back of the hole to prevent air voids. Slowly withdraw the mixer as you inject. For holes > 250 mm or overhead applications, use extensions and piston plugs (HIT-SZ) to ensure proper filling.
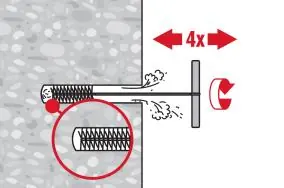
Setting the element
Ensure the rebar is dry and free of oil. Insert the rebar into the hole while slowly twisting until the embedment mark reaches the concrete surface. For overhead applications, use a dripping cup (HIT-OHC) and support the rebar until the mortar hardens. Do not apply full load until the curing time (tcure) has elapsed.
Manufacturer information
Hilti Corporation
Practical help
Common problems
Drill hole not parallel to existing rebar
Use Hilti drilling aid HIT-BH, a lath, or a spirit level to ensure alignment.
Inadequate hole cleaning
Follow the specific cleaning procedure (Manual, Compressed Air, or Automatic) to ensure proper load values.
Mortar flowing out during overhead installation
Use the HIT-OHC dripping cup to collect excess mortar.
Before use
- Verify concrete is non-carbonated and dry/wet (not flooded).
- Check rebar diameter (8-32 mm).
- Ensure concrete temperature is within installation range (-10°C to +40°C).
- Verify drill bit size matches requirements.
- Check that the rebar is dry and free of oil/residue.
Specs in practice
- Working time (twork)
- Time available to inject adhesive and adjust rebar position before hardening begins.
- Curing time (tcure)
- Time required for the adhesive to fully harden before applying full load.
- Embedment depth (lb)
- Required depth for the rebar to be inserted into the concrete.
Images and diagrams
- The manual includes tables for drilling, cleaning, and setting tools based on rebar diameter.
- Annex B10-B15 provides visual step-by-step installation instructions for different drilling and injection methods.
Model compatibility
- Compatible with concrete classes C20/25 to C50/60.
- Not for use in flooded holes.
- Rebar diameter range: 8 mm to 32 mm.

Manual page author
David Miller
Documentation analyst
Organizes user manual content into clear summaries, with attention to model details, product context, and everyday usability.