Electronics / Televisions
Installation Guide for Hisense 100-inch Laser Cinema Display Screen
A comprehensive installation guide for the Hisense 100-inch Laser Cinema Display Screen (Model FS100). This guide covers tool preparation, parts identification, step-by-step frame assembly, screen surface installation, and wall mounting...
Table of contents
Manual images
Click an image to enlargeQuick Guide
This guide provides instructions for installing the Hisense 100-inch Laser Cinema Display Screen (Model FS100). Before beginning, ensure you have a clean, flat area for assembly and all necessary tools. The installation involves assembling the inner frame, preparing the screen surface, attaching the outer frame, and finally mounting the screen to the wall.
Product Specifications
- Model: FS100
- Screen Size: 100 inches
- Screen Material: PET
- Projection Scale: 16:9
- Net Weight: 11.7kg
- Total Weight: 24.5kg
- Gain: ≥1.0
Tools Required
- Tape measure
- Electric drill
- Woodworking pencil
- Screw driver
- Hammer
- Metal detector
- Level ruler
Parts List
The package includes various components labeled A1 through Z3. Please verify all parts against the accessories list provided in the manual before starting assembly. Key components include inner frame sections, outer frame sections, fiber rods, pull rods, and various screws.
Assembly Steps


I. Assemble Inner Frame
Lay the white installation pad on a clean floor. Assemble the inner frame sections (A1, A2, B) using the inner frame connectors (C) and secure them with inner frame corner screws (E). Ensure the frame is square and properly aligned.
II. Installation of Screen Surface
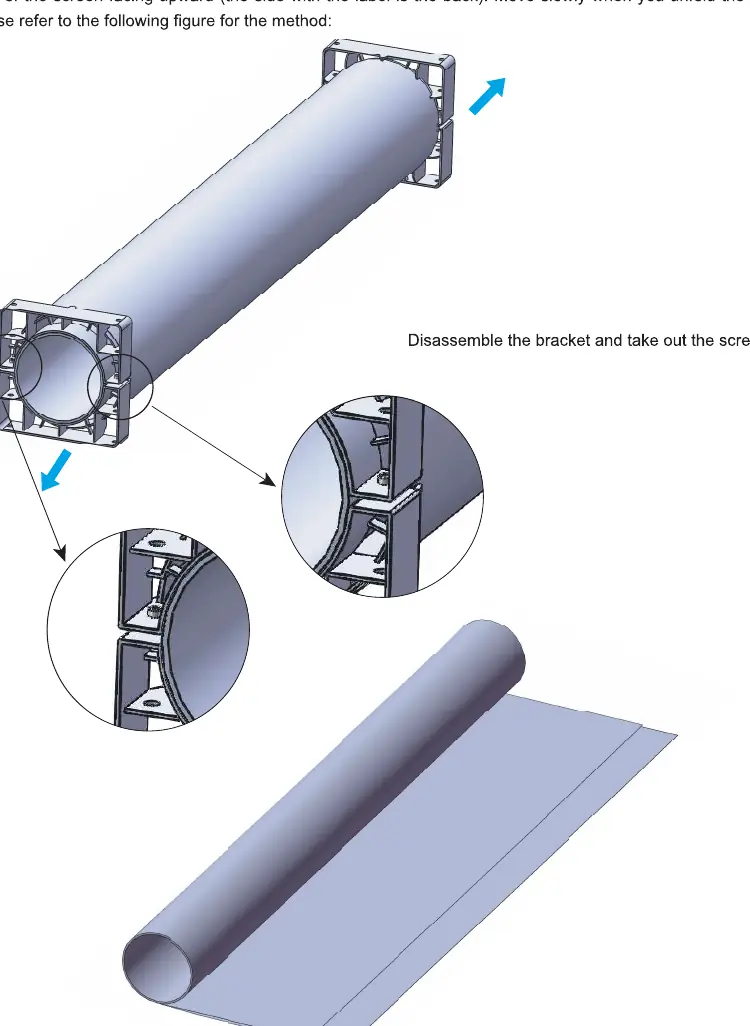
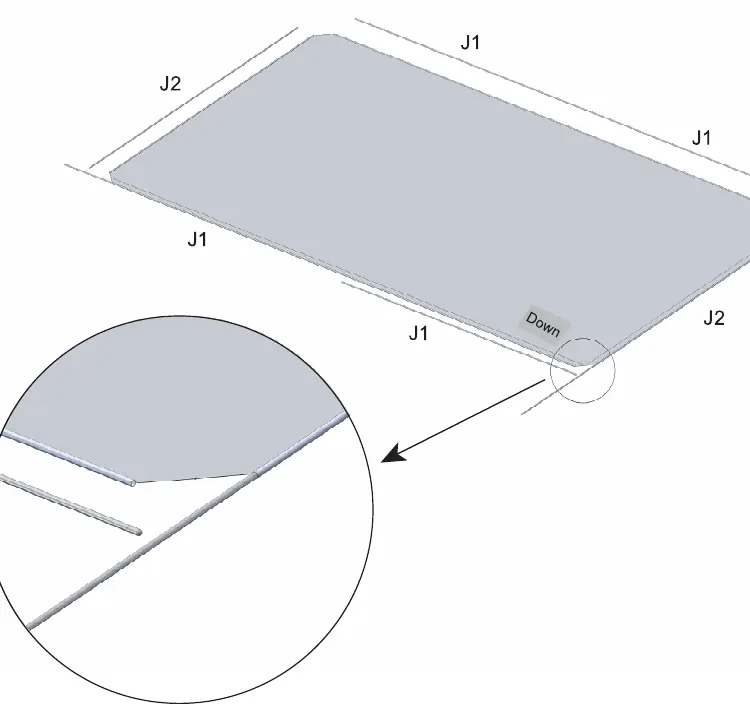
Carefully remove the screen surface from the paper tube, wearing installation gloves to prevent staining. Unfold the screen surface on the mat with the back facing upward. Insert the fiber rods (J1, J2) into the edges of the screen. Thread the pull rods (N, M) into the screen sealing edges. Center the inner frame on the back of the screen surface and secure it using the pull pin nuts (K) and pull pin screws (L), tightening them symmetrically to ensure the screen is flat.
III. Install Outer Frame
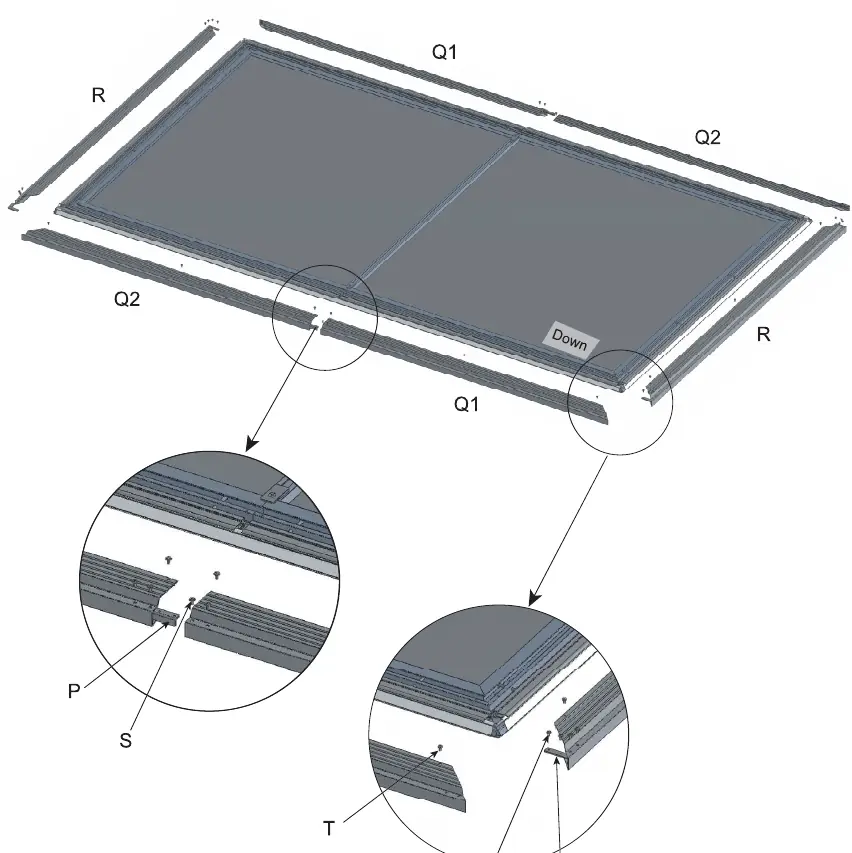
After splicing the long side outer frames (Q1, Q2) and short outer frames (R), lift the inner frame slightly to buckle the outer frame onto the assembly. Secure the outer frame using the outer frame connecting screws (S) and corner pieces (O).
IV. Paste Cushion Block
Apply the cushion blocks (U) to the inner frame according to the specified positions to protect the wall and ensure proper spacing.
V. Install Wall Mounting Bracket
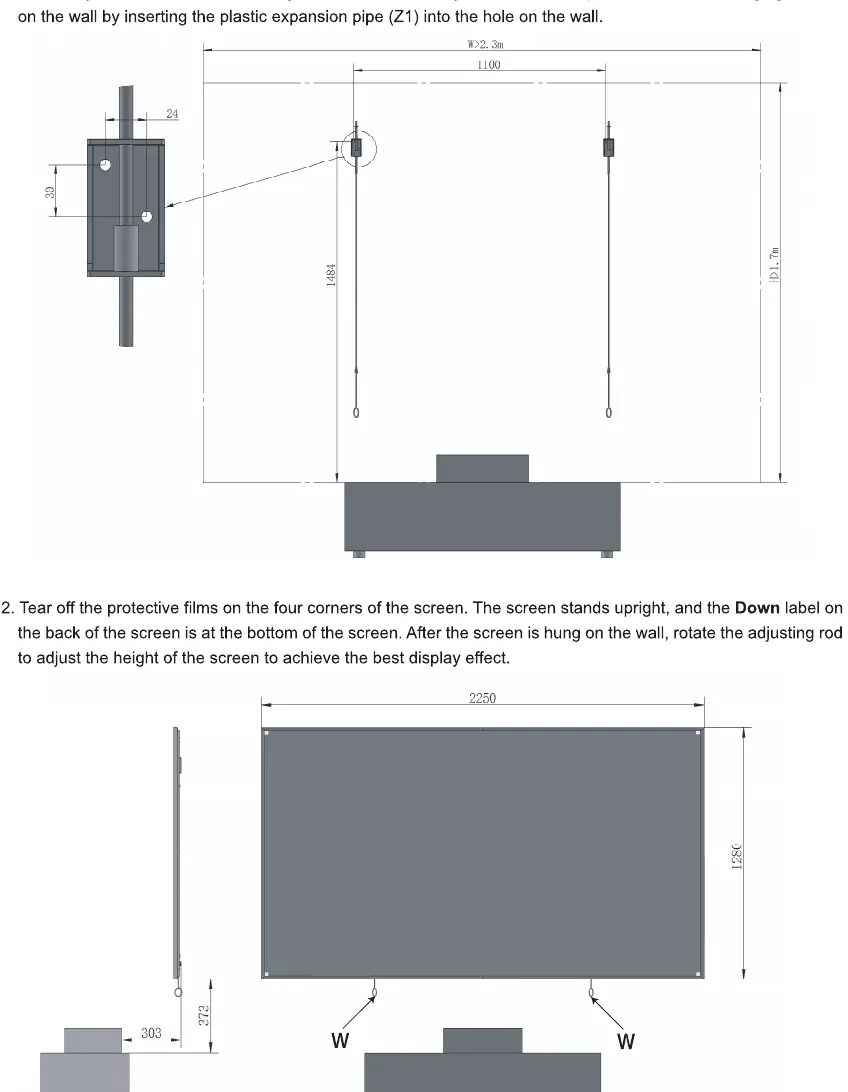
Drill holes in the wall using a φ8 drill bit. Fix the wall hanging brackets using the provided plastic expansion pipes (Z1). Hang the screen on the wall and use the adjusting rods (W) to fine-tune the height for the best display effect.
Maintenance and Safety
- Use a dust-free soft cotton cloth dipped in absolute ethanol to gently wipe the anti-light screen and frame.
- Do not touch or wipe the anti-light screen with an ordinary towel.
- Do not spill dirty water, oil stains, or other pollutants on the screen.
- Do not place the product on an unstable cart, tripod, or desktop.
- Do not scratch the screen with hard objects.
- Do not expose the screen to direct sunlight.
- Keep away from inflammable, explosive, and dangerous goods.
Manufacturer information
Hisense
Practical help
Common problems
Screen surface is not flat
Adjust the tension of the pull screws symmetrically until the screen surface is flat.
Screen surface stained
Wear installation gloves during assembly and avoid touching the screen surface with bare hands.
Before use
- Clear a clean, flat area on the floor for assembly.
- Check all parts against the accessories list provided in the manual.
- Ensure you have all required tools: tape measure, electric drill, pencil, screwdriver, hammer, metal detector, and level ruler.
- Wear the provided installation gloves.
Specs in practice
- Total Weight
- 24.5kg (weight of the full package).
Images and diagrams
- The structure consists of an inner frame, the screen surface, and an outer frame.
- The screen is tensioned using fiber rods, pull rods, and screws to ensure a flat surface.
Model compatibility
- Designed for 100-inch laser cinema projectors.

Manual page author
David Miller
Documentation analyst
Organizes user manual content into clear summaries, with attention to model details, product context, and everyday usability.