Furniture / Tables & Desks
Assembly Guide for Hokku Designs 2-Door Pantry Cabinet
Comprehensive assembly and installation guide for the Hokku Designs 2-Door Pantry Cabinet. Includes step-by-step instructions for attaching hinges, installing raised panel or glass doors, and adjusting hinges for a perfect fit.
Quick answers from the manual
Quick answer
- This manual provides assembly instructions for the Hokku Designs 2-Door Pantry Cabinet, including hinge attachment, door mounting, and hinge adjustment. p. 2, 5, 6, 10
Key actions
- Attach hinges to the hinge plates. p. 5
- Install doors to the cabinet frame. p. 6, 7, 8
- Adjust hinges for proper door alignment. p. 10
Problems and fixes
Door alignment issues
Use the hinge adjustment guide to modify the door position.
p. 10Technical specifications
| Parameter | Value | Meaning | Pages |
|---|---|---|---|
| A44 Screw | 3.5x14mm | Standard screw for hinge attachment. | p. 4 |
| A25 Screw | M4x25mm | Standard screw for handle attachment. | p. 4 |
Where to find it in the PDF
- Warranty Information p. 1
- Parts Overview p. 2, 3
- Hardware List p. 4
- Assembly Steps p. 5, 6, 7, 8
- Hinge Adjustment p. 10
Table of contents
Manual images
Click an image to enlargeQuick guide from the manual
This document provides instructions for assembling the doors of the Hokku Designs 2-Door Pantry Cabinet. It covers the installation of both raised panel and glass door options, including hinge attachment, door mounting, and final hinge adjustments.
Pre-assembly preparation
- Check all contents against the parts list before beginning assembly.
- Assemble the unit on a flat, smooth surface, preferably on top of a blanket to prevent damage.
- Use only a low-speed setting if using a power drill.
- Assemble the product as near as possible to its final point of use.
- Warning: The hardware pack contains small items that pose a choking hazard. Keep away from young children.
Parts and hardware
The assembly requires the following hardware:
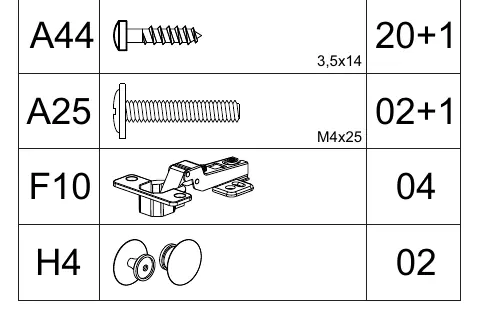
- A44: 3.5x14mm screws
- A25: M4x25mm screws
- F10: Hinges
- H4: Handles
Hinge installation
Before attaching the doors to the cabinet, prepare the hinges:
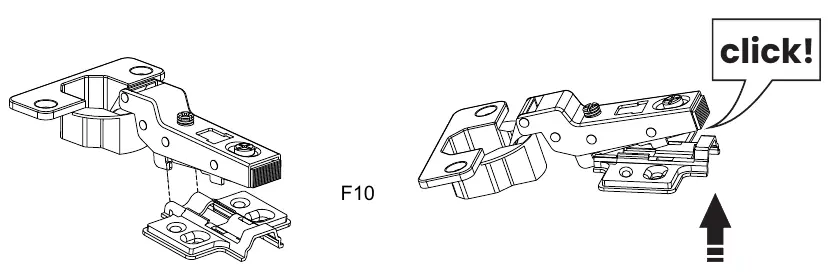
- Attach the hinge (F10) to the hinge plate if they are separated.
- Push the hinge against the plate until it clicks into place.
Door installation
The manual provides specific steps for installing both raised panel doors and glass doors:
- Right/Left Raised Panel Doors: Secure the hinges to the cabinet frame using A44 screws. It may be necessary to adjust the hinges (F10) before installing the door.
- Right/Left Glass Doors: Follow the same procedure as the raised panel doors, ensuring the glass panels are handled with care.
- 2-Cabinet Option: If stacking or combining cabinets, follow the specific alignment instructions provided in the manual.
Hinge adjustment
If the doors are not aligned correctly, use the hinge adjustment guide on page 10. The hinges allow for three-dimensional adjustment to ensure the doors hang straight and close properly.
Warranty information
The product is warranted to the original purchaser against defects in material or workmanship for one year from the date of purchase. This warranty does not cover defects caused by improper assembly, disassembly, product modifications, intentional damage, accident, misuse, or exposure to the elements.
Practical help
Common problems
Door is misaligned or does not close properly
Use the hinge adjustment guide on page 10 to adjust the hinge screws for proper alignment.
Hinge is separated from the plate
Push the hinge against the plate until it clicks into place.
Before use
- Check all parts against the checklist before starting.
- Prepare a flat, smooth surface (use a blanket).
- Ensure you have a screwdriver and a hammer (as shown in tools required).
- Set power drill to low-speed setting if used.
- Keep small hardware items away from children.
Images and diagrams
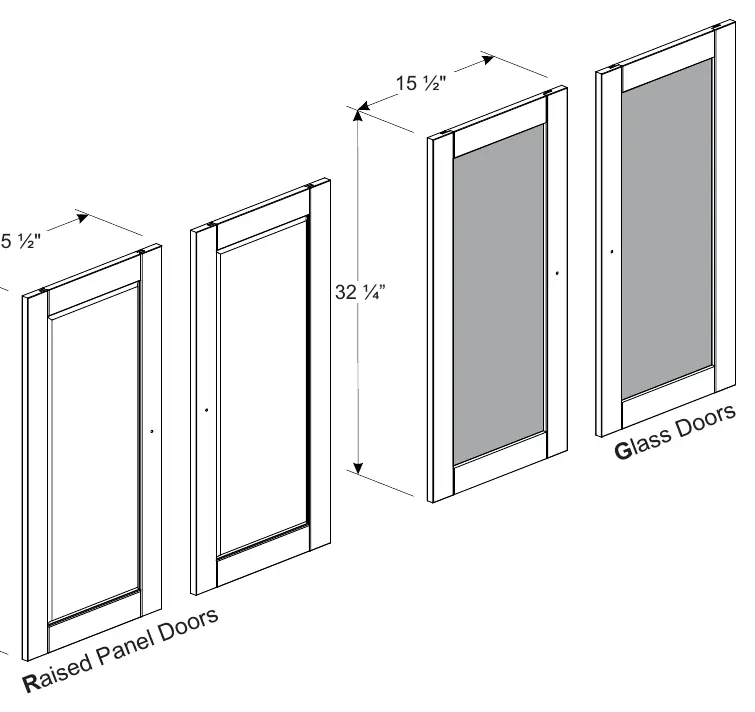
- Page 2 shows the dimensions and types of doors (Raised Panel vs Glass).
- Page 4 details the hardware sizes.
- Page 10 provides a visual guide for 3-way hinge adjustment.
Model compatibility
- The cabinet is designed for indoor use only.
- The assembly guide covers both Raised Panel and Glass door configurations.

Manual page author
Emily Carter
User documentation editor
Prepares concise manual descriptions and highlights the most useful setup, operation, and maintenance information for readers.