Furniture / Storage Cabinets
User Manual for Style Selections 21-Inch Reversible Shelf Cabinet
Complete assembly and maintenance guide for the Style Selections 21-Inch Reversible Shelf Cabinet (Model LOWECABWH-01). Includes step-by-step instructions, safety warnings, and parts list.
Quick answers from the manual
Quick answer
- This manual provides assembly instructions for the Style Selections 21-Inch Reversible Shelf Cabinet (Model LOWECABWH-01). It includes a parts list, safety warnings, and care instructions. p. 1, 18
Key actions
- Assemble the cabinet using the provided cam lock system. p. 2, 6, 7, 9
First start
- Ensure all parts are present, assemble on a level surface, and do not exceed the 25 lbs (11.3 kg) weight limit. p. 5
Technical specifications
| Parameter | Value | Meaning | Pages |
|---|---|---|---|
| Maximum Load | 25 lbs (11.3 kg) | Maximum weight capacity per unit. | p. 5 |
Where to find it in the PDF
- Assembly Instructions p. 6, 17
- Parts List p. 3, 18
Table of contents
Manual images
Click an image to enlargeImportant Information
This manual provides instructions for the Style Selections 21-Inch Reversible Shelf Cabinet (Model LOWECABWH-01). Please read and understand the entire manual before attempting to assemble, operate, or install the product.
Safety Warning: The unit is intended for use only with the maximum weight indicated. The maximum load is 25 lbs (11.3 kg). Overloading the storage unit may result in injury. Distribute any weight in units evenly. Do not allow children to climb or play in or around this product. Do not use shelves as a step ladder.
Assembly Preparation
Before beginning assembly, ensure all parts are present by comparing them with the package contents list. If any part is missing or damaged, do not attempt to assemble the product. Estimated assembly time is 50 minutes.
Tools Required (not included): Phillips screwdriver, power drill, 5/16 in. drill bit, 3/32 in. drill bit, level, stud finder, marking pencil, tape measure, step ladder, and rubber mallet.
Cam Lock System Operation
The cabinet uses a cam lock system for assembly:
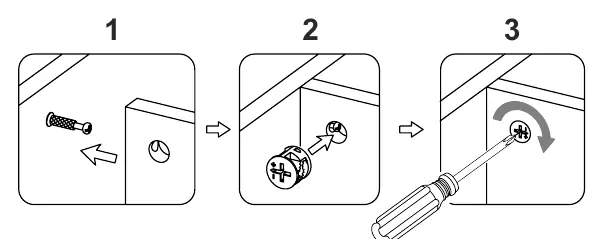
- Screw cam bolts into the predrilled small holes on the panel.
- Insert the cam lock into the predrilled large hole on the panel.
- Ensure the arrow on the cam lock is pointed toward the cam bolts.
- Connect both panels together, ensuring cam bolts go into the predrilled hole on the end of the panel with the cam lock.
- Once connected, use a Phillips screwdriver to tighten the cam lock clockwise.
Assembly Instructions
Follow these steps to assemble your cabinet:
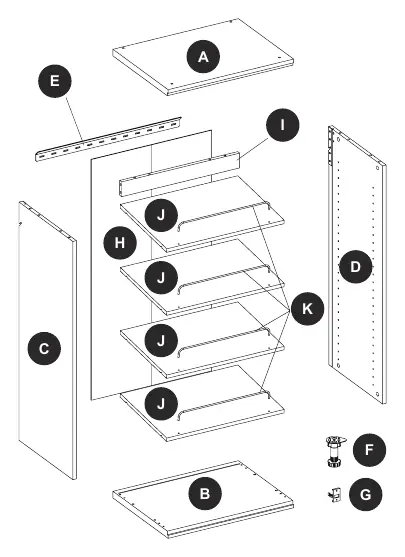
- Frame Assembly: Attach the stretcher (I) to the side panels (C and D) using cam locks and wood dowels.
- Top Panel: Attach the top panel (A) to the assembled frame using cam locks and wood dowels.
- Back Panel: Insert the back panel (H) into the side and top panels.
- Bottom Panel: Attach the bottom panel (B) using cam locks and M4 x 50 mm screws (DD).
- Finishing: Insert caps (FF) into the top panel holes.
- Feet: Attach adjustable feet (F) to the bottom panel (B) using M3.5 x 12 mm screws (EE). These are optional.
- Shelves: Insert wire stoppers (K) into the shoe shelves (J).
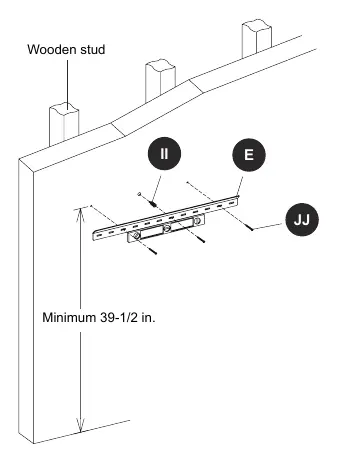
- Wall Mounting: Locate wall studs using a stud finder. Use the metal bracket (E) as a template to mark holes. Drill pilot holes (3/32 in. for studs, 5/16 in. for others). Install the drywall anchor (II) and attach the bracket (E) using M5 x 55 mm screws (JJ).
- Mounting: Hang the unit onto the metal bracket (E) with the help of another person. Adjust feet (F) for leveling.
- Final Touches: Install shelf pins (GG) and shoe shelves (J). Cover cam locks with PVC covers (HH).
- Toe Kick: Attach clasps (G) to the toe kick (sold separately) and press onto the adjustable feet.
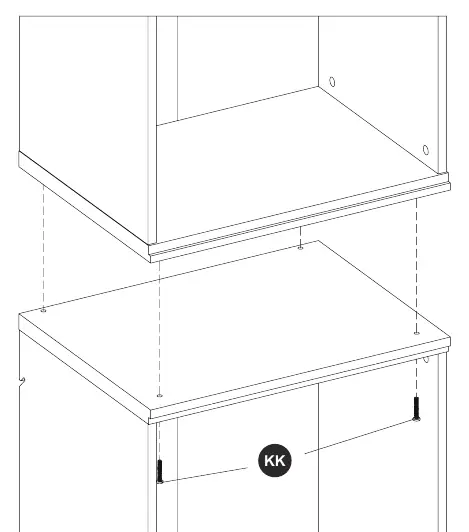
- Stacking: To stack two units, attach the top panel of one to the bottom panel of the other using 1/4 in. x 38 mm bolts (KK).
Care and Maintenance
- Periodically check that all components are properly positioned, free from damage, and firmly connected.
- Use a soft, clean cloth for dusting.
- Never use water to clean the furniture; wipe clean using a damp cloth and a mild cleaner, then dry immediately.
- Keep furniture away from direct sunlight.
- Maintain in a climate-controlled environment to prevent warping or splitting.
Warranty
This product includes a one-year limited warranty for the original purchaser against defects in materials or workmanship. The warranty is void if the product is assembled incorrectly, misused, abused by overloading, or altered.
Practical help
Common problems
Missing or damaged parts
Contact customer service at 877-888-8225 or [email protected].
Overloading
Do not exceed the maximum load of 25 lbs (11.3 kg). Distribute weight evenly.
Before use
- Check all parts against the package contents list.
- Ensure you have a Phillips screwdriver, power drill, and other required tools.
- Assemble on a sturdy, level, and protective surface.
- Verify all bolts and screws are tightly fastened before use.
Specs in practice
- Maximum Load
- 25 lbs (11.3 kg) per unit. Do not exceed to avoid injury.
Images and diagrams
- Cam Lock System: Shows how to insert cam bolts and locks to secure panels.
- Assembly Steps: Detailed diagrams for each step of the cabinet construction.
Model compatibility
- Designed for stacking two units. Additional units sold separately.

Manual page author
David Miller
Documentation analyst
Organizes user manual content into clear summaries, with attention to model details, product context, and everyday usability.